
Installation Instructions

page 2 of 2
822172 REV-A 12/2012
Pro 24" and 27" Deep Wall Hoods
IMPORTANT NOTE: Remove packaging material used to
prevent ap damage during shipping. Damper will not
function properly unless this material is removed prior to
mounting the hood.
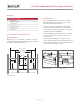
5 Separate electrical box from back panel by removing
two nuts, then reinstall on new back panel. Refer to the
illustration below.
6 For internal blowers, mount blower to mounting studs
on the new back panel using nuts supplied with blower.
7 Turn back panel assembly upright and reattach using
screws previously removed.
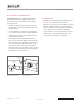
8 Mount damper and two hold-down brackets to the
back of the hood. Verify the damper is hinged vertically.
Damper drops into place and damper tongues drop into
slots on the back panel. Hold-down brackets clamp
on the damper groove overhang. Secure hold-down
brackets using two screws per bracket. Refer to the illus-
tration below. Seal with aluminum tape or high tempera-
ture duct tape to ensure a tight seal.
wolfappliance.com 800.222.7820
HOOD INSTALLATION
1 Attach the two mounting brackets to wall framing using
#10 x 1
1
/2" (38) screws and washers provided.
2 Align cut-outs on the back of the hood with the mounting
brackets. If additional support is required, drill supple-
mentary mounting holes in the back panel and use these
holes to attach the hood assembly to wall framing.
3 Connect damper to duct using sheet metal screws and
aluminum tape or high temperature duct tape. Verify
screws do not affect operation of the damper.
ACCESSORY
BACK PANEL
MOUNTING
STUD
ELECTRICAL
BOX
DAMPER
Mounting stud location.
Mount damper.