
Installation Instructions


page 1 of 2
Contents
HORIZONTAL DISCHARGE
1 Panel, back
2 Bracket, mounting
4 Screw, #8 x
3
/8"
12 Screw, #10 x 1
1
/2"
12 Washer, at #12
1 Instructions
Pro 24" and 27" Deep Wall Hoods
WALL PREPARATION
Minimum 2" (51) x 4" (102) lumber is required to construct
wall framing. Additional horizontal framing may be required
for sufcient anchoring and support.
Pro Wall Hood Horizontal Discharge Installation
wolfappliance.com 800.222.7820
WIDTH OF HOOD
GRAY LINES INDICATE VERTICAL AND HORIZONTAL WALL FRAMING
26
1
/4
" (667)
MOUNTING CUT-OUT CENTER
13" (330)
WALL
CUT-OUT
10
3
/4
"
(273)
C
L
17
1
/2
"
(446)
15
1
/16
"
(383)
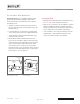
Hood Installation.
HOOD PREPARATION
1 Hood is shipped with back panel in place. Damper is
attached upside down to inside top surface of back
panel. Refer to the illustration below.
2 To remove lters, press upward then rotate bottom
outward. To aide in removal, remove center lter rst.
Remove grease cups from bottom edge of hood. Gloves
should be worn when handling lters.
3 Detach existing back panel and damper assembly from
hood by removing the top and back screws. Do not
discard screws.
4 Turn assembly over and place on a protected work
surface. Separate damper from back panel by removing
the hold-down brackets. Do not discard brackets and
screws. Refer to the illustration below.
DAMPER
HOLD-DOWN
BRACKET
PACKAGING
MATERIAL
BACK PANEL
Damper inside hood.
Remove damper.