
Installation guide

Outdoor Grill Installation 16
Install Side Burner to Cart
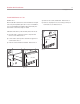
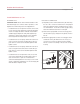
REMOVE REAR PANEL, DOOR AND DRIP TRAY
1)
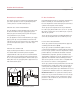
Removing rear panel and door of grill cart will provide
easier access for installation. Remove rear panel by
removing four screws. Refer to illus 4.
2) Remove door by depressing rear lever on each hinge.
Refer to illus 5.
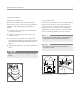
3) Removing grill drip tray will provide easier access for
installation. To remove drip tray, slide forward and lift
out. Refer to illus 5.
SCREWS
SCREWS
Illus 4. Illus 5.
REAR LEVER
DRIP TRAY
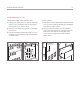
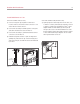
BUSHING
(INSERT THROUGH
INSIDE OF CART)
Illus 6. Illus 7.
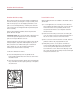
SCREWS
SCREWS
INSTALL SHROUD
1)
Push plastic bushing supplied with side burner through
access hole from inside cart. Bushing must be applied
in this direction. Refer to illus 6.
2) Hang shroud by hand-starting four 10-32 machine
screws through the upper slots of the shroud, into the
upper holes of the cart. Do not fully tighten these
screws until proper alignment has been achieved.
Refer to illus 7.