
Installation guide

Outdoor Grill Installation 18
Install Side Burner to Cart
IMPORTANT NOTE: F
or natural gas installations, the gas
line connection must be made before installing the side
burner. Refer to page 20.
INSTALL SIDE BURNER
1)
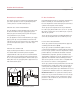
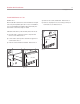
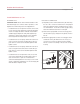
Place side burner into shroud as shown in illus 11.
Guide flexible gas line and wire harness into cart
access hole. Alignment of unit should be verified at this
point, prior to attaching side burner to shroud. Refer to
alignment tips on the following page if desired align-
ment is not achieved.
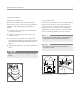
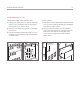
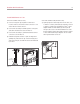
2) Using a bar clamp with protected ends to avoid
damage to stainless steel, place bar clamp just behind
bullnose on fire box and under shroud. Do not include
any part of bullnose within bar clamp. Refer to illus 12.
3) C
ompress bar clamp until hole in bullnose aligns with
threaded hole in shroud. Alignment and placement of
this screw is very important to alignment and square-
ness of side burner. Refer to illus 13.
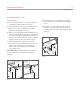
4) Attach side burner to shroud by first placing 8-32 hex
cap screw into right side of front underside of bullnose
and into shroud as shown. Then, place the left side hex
cap screw. Tighten both screws and remove bar clamp.
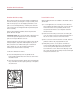
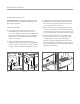
5) At rear of unit, push side burner toward grill to estab-
lish proper gap at rear. Loosen rear grill cart screws
and shift grill if necessary to achieve proper gap.
Attach two 8-18 pan head (sharp tip) screws into the
rear of the side burner and shroud as shown in illus 14.
Refer to alignment tips on the following page if desired
alignment is not achieved.
ACCESS HOLE
Illus 11. Illus 12.
HOLES
ALIGN
Illus 13. Illus 14.
REAR
SCREWS