
Remote Blower Install


MODEL 801640
Page 3
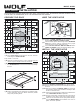
11" dia.
hole
29½"
11" dia.
hole
1¼"
dia. hole
12
7
/
8
"
10¾"
25"
7¼"
7¼"
1¼"
dia. hole
9
1
/
8
"
9
1
/
8
"
Wall Stud
10¾"
25"
29½"
Wall Stud
12
7
/
8
"
Wall Stud
Wall Stud
REMOVE
SIDING
REMOVE
SIDING
8½"
8½"
Pilot
Pilot
Hole
Hole
Pilot
Hole
OUTSIDE - WALL VIEW
OUTSIDE - WALL VIEW
From inside the wall:
q 1
Drill a PILOT HOLE through the wall, 8½" from the inside
edge of a WALL STUD.
From outside - on the wall:
q 2
Measure and mark the 25" x 29½" rectangle. Cut and
remove only the siding inside this rectangle.
q 3
Measure and mark the 11" DIAMETER HOLE and the
1¼" DIAMETER HOLE. Cut these holes all the way
through the wall.
PREPARE THE WALL
INSTALL THE VENTILATOR
WIRE THE VENTILATOR
120 VAC
LINE IN
BLACK
TO
BLACK
WHITE
TO
WHITE
GREEN
TO
GREEN
q 4
Remove 7 COVER SCREWS and lift off ventilator cover.
Remove BIRD SCREEN and WIRING COVER.
q 5
Feed the electric power cable through the 1¼" DIAMETER
HOLE and connect cable to ventilator with a proper
connector for the type of cable being used.
q 6
Connect BLACK TO BLACK, WHITE TO WHITE, and the
GREEN TO GREEN or bare wire. Replace wiring cover.
OUTSIDE - WALL VIEW
OUTSIDE - WALL VIEW
Shipping
Cardboard
Shipping
Cardboard
Flashing Sheet
7 Cover
7 Cover
Screws
Screws
7 Cover
Screws
6
Mounting
Holes
6
Mounting
Holes
Bird Screen
Bird Screen
Wiring
Cover
q 7
Remove SHIPPING CARDBOARD from blower wheel.
q 8
Place ventilator on wall so that ventilator's discharge collar
fits into 11" diameter hole.
q 9
Use the 6 screws (provided) to attach the ventilator to the
wall. 6 MOUNTING HOLES are provided.
q 10
Seal the screw heads and edges of the flashing sheet
with a good grade of roofing cement.
q 11
Check for free movement of the spring-loaded damper,
re-install BIRD SCREEN and ventilator cover. Turn on
power and check operation.
WALL MOUNT
INSTALLATION
For use with Wolf CTWH30/CTWH36 wall mount, IH4227 island chimney hoods, 10” tall & 30” wide x 18” tall wall hoods.