
Installation guide


FLUSH MOUNT INSTALLATION—OPTION 2
For this flush mount installation, the countertop cut-out
will be the same size as the outer edge of the glass-
ceramic top. It is recommended that unframed cooktop
itself be used as the template for the cut-out. Turn the
cooktop over and mark the opening using the glass-
ceramic top as a template.
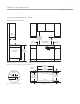
It will be necessary to attach L-shaped cleats to the inner
perimeter of the countertop cut-out to support the
unframed cooktop. The top edge of the cleat can be no
wider than
7
/8" (22) and will be attached
5
/16" (8) below the
surface of the countertop. Refer to the illustration below.
Attach the cleats wherever enough countertop material is
present.
For additional support in the cut-out area, adhere scrap
countertop material to the bottom side of the countertop.
Consult your countertop supplier for the proper methods
of attachment.
Induction Cooktop Installation 13
wolfappliance.com/specs
Unframed Installations
FLUSH MOUNT INSTALLATION—OPTION 1
For this flush mount installation, a recessed area
surrounding the standard countertop cut-out is required.
Fabrication of the recessed area must take place before
the final countertop installation. A template of the counter-
top cut-out is provided with the unframed cooktop for
fabrication purposes.
IMPORTANT NOTE: This option is not recommended for
molded backsplash style countertops.
In order to rout the required recessed area for this flush
mount installation, a second template must be made from
1
/2" (13) plywood. The template will be used as a guide for
a top-bearing router bit.
Make the wood template wide enough so that clamps
used to hold the template to the countertop do not inter-
fere with the router base. The cut-out dimension of the
wood template should match the outer perimeter of the
template supplied with the cooktop.
Center the wood template over the existing cut-out in the
countertop and clamp. Use double-sided tape to adhere
the template to the countertop to keep the template from
shifting during routing. Make sure that the adhesive can
be easily removed by testing it on a scrap piece of the
countertop. Using a top-bearing router bit with the wood
template as a guide, rout out a
5
/16" (8) deep recessed
area in the countertop cut-out.
7
/8" (22)
5
/16" (8)
L-SHAPED
CLEATS
Support cleats.