Drop-Down Door Microwave Oven Installation Guide SPECIFICATIONS, INSTALLATION, AND MORE
Drop-Down Door Microwave Oven Contents Important Note 3 Drop-Down Door Microwave Oven To ensure this product is installed and operated as safely and efficiently as possible, take note of the following types of highlighted information throughout this guide: 4 Specifications 7 Installation 7 Troubleshooting Features and specifications are subject to change at any time without notice. Visit wolfappliance.com/specs for the most up-to-date information.
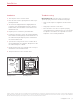
Drop-Down Door Microwave Oven Product Information Important product information, including the model and serial number, are listed on the product rating plate. The rating plate is located on the lower left side of the front face frame. The oven door must be open to view the rating plate. Refer to the illustration below. If service is necessary, contact Wolf Factory Certified Service with the model and serial number.
Specifications Installation Requirements Electrical Requirements The drop-down door microwave oven can be installed in a standard or flush inset application. Installation must comply with all applicable electrical codes. Finish the edges of the opening. They may be visible when the door is open. For standard installations, the face trim overlaps stiles and rails. Refer to the chart below. For flush inset installations, a minimum 1/8" (3) reveal is required on all sides.
Specifications Drop-Down Door Microwave Oven STANDARD INSTALLATION 21 9/16" (548) OPENING DEPTH TOP VIEW E 17 11/16" (449) OPENING HEIGHT W OPENING WIDTH SIDE VIEW FRONT VIEW NOTE: 24" (610) and 30" (762) models require the same opening dimensions. OPENING WIDTH W 24" Model 221/8" (562) 30" Model 221/8" (562) wolfappliance.
Specifications Drop-Down Door Microwave Oven FLUSH INSET INSTALLATION 7/8" (22) 23" (584) FLUSH INSET DEPTH FINISHED CLEATS* TOP VIEW E 5/16" (8) 18 1/8" (460) FLUSH INSET HEIGHT** A 1/8" (3) W FLUSH INSET WIDTH** SIDE VIEW FRONT VIEW *Will be visible and should be finished to match cabinetry. **Dimension provides minimum reveals. OPENING WIDTH W A 24" Model 233/4" (603) 13/16" (21) 30" Model 301/8" (765) 4" (102) 6 | Wolf Customer Care 800.222.
Installation Installation Troubleshooting 1 Turn off power to the electrical outlet. 2 Move the unit near the opening. Remove and recycle packing materials. 3 30" models are shipped with two shipping brackets located on each side behind the front face. Remove both brackets, then reinstall the screws. Refer to the illustration below. 4 Plug the power cord into the grounded outlet.
Horno de microondas con puerta abatible Contenido Aviso importante 3 Horno de microondas con puerta abatible Para garantizar que este producto se instale y opere de la forma más segura y eficiente posible, tome nota de los siguientes tipos de información resaltada en este manual: 4 Especificaciones 7 Instalación 7 Resolución de problemas Las características y especificaciones están sujetas a cambios sin previo aviso. Visite wolfappliance.com/specs para obtener la información más actualizada.
Horno de microondas con puerta abatible Información del producto La información importante del producto, incluido el modelo y número de serie de la unidad, se encuentra en la placa de datos del producto. La placa de datos se encuentra en el lado inferior izquierdo del marco de la cara frontal. La puerta del horno debe estar abierta para ver la placa de datos. Consulte la siguiente ilustración.
Especificaciones Requisitos de instalación Instalación eléctrica El horno de microondas de puerta abatible se puede instalar en una aplicación estándar o empotrable. La instalación debe cumplir con todos los códigos eléctricos vigentes. Dé el acabado a los bordes de la abertura. Pueden ser visibles cuando la puerta está abierta. Coloque el suministro eléctrico como se muestra en las ilustraciones de las páginas siguientes.
Especificaciones Horno de microondas con puerta abatible INSTALACIÓN ESTÁNDAR 21 9/16" (548) PROFUNDIDAD DE LA ABERTURA VISTA SUPERIOR E 17 11/16" (449) ALTURA DE LA ABERTURA W ANCHO DE ABERTURA VISTA LATERAL VISTA FRONTAL NOTA: Los modelos de 24" (610) y 30" (762) requieren las mismas dimensiones de abertura. ANCHO DE ABERTURA ANCHO (W) Modelo de 24" 221/8" (562) Modelo de 30" 221/8" (562) wolfappliance.
Especificaciones Horno de microondas con puerta abatible INSTALACIÓN EMPOTRABLE 7/8" (22) 23" (584) PROFUNDIDAD DE LA INSTALACIÓN EMPOTRABLE CORNAMUSAS TERMINADAS* VISTA SUPERIOR E 5/16" (8) 18 1/8" (460) ALTURA EMPOTRABLE** A 1/8" (3) W ANCHO DE LA INSTALACIÓN EMPOTRABLE** VISTA LATERAL VISTA FRONTAL *Será visible y debe tener un acabado que haga juego con los gabinetes. **Dimensión proporciona reavels mínimos.
Instalación Instalación Resolución de problemas 1 Desconecte la alimentación del tomacorriente eléctrico. 2 Mueva la unidad cerca de la abertura. Retire y recicle los materiales de embalaje. 3 La unidad se entrega con dos soportes de embalaje que se encuentran a cada lado detrás de la cara frontal. Retire los dos soportes e instale los tornillos. Consulte la siguiente ilustración. 4 Conecte el cable de alimentación eléctrica en un toma- corriente con conexión a tierra.
Four à micro-ondes à porte s’ouvrant vers le bas Table des matières Remarque importante 3 Four à micro-ondes à porte s’ouvrant vers le bas Pour s’assurer que ce produit est installé et utilisé en toute sécurité et aussi efficacement que possible, prenez note des types de renseignement mis en évidence tout au long de ce guide : 4 Spécifications 7 Installation 7 Dépannage Les caractéristiques et les spécifications peuvent être modifiées en tout temps sans préavis. Visitez wolfappliance.
Four à micro-ondes à porte s’ouvrant vers le bas Renseignements sur le produit Des renseignements importants sur le produit, y compris les numéros de modèle et de série, se trouvent sur la plaque signalétique du produit. La plaque signalétique est située sur le côté gauche du cadre du panneau avant. La porte du four doit être ouverte pour voir la plaque signalétique. Reportezvous à l’illustration ci-dessous.
Spécifications Exigences d’installation Électricité Le four à micro-ondes à porte s’ouvrant vers le bas peut être installé dans une application standard ou à affleurement. L’installation doit se conformer à tous les codes électriques applicables. Finissez les rebords de l’ouverture. Ils peuvent être visibles lorsque la porte est ouverte. Pour les installations standards, la garniture frontale chevauchera les montants et les rails. Reportez-vous au tableau.
Spécifications Four à micro-ondes à porte s’ouvrant vers le bas INSTALLATION STANDARD 21 9/16 po (548) PROFONDEUR DE L'OUVERTURE VUE DE DESSUS E 17 11/16 po (449) HAUTEUR DE L'OUVERTURE W LARGEUR DE L'OUVERTURE VUE DE PROFIL VUE DE FACE REMARQUE : Les modèles 24 po (610) et 30 po (762) nécessitent les mêmes dimensions d'ouverture. LARGEUR DE L’OUVERTURE LARGEUR (W) Modèle de 24 po 221/8 po (562) Modèle de 30 po 221/8 po (562) wolfappliance.
Spécifications Four à micro-ondes à porte s’ouvrant vers le bas INSTALLATION À AFFLEUREMENT 23 po (584) PROFONDEUR DE 7/8 po (22) L'AFFLEUREMENT TAQUETS FINIS* VUE DE DESSUS E 5/16 po (8) 18 1/8 po (460) HAUTEUR DE L'AFFLEUREMENT** A 1/8 po (3) W LARGEUR DE L'AFFLEUREMENT** VUE DE PROFIL VUE DE FACE *Seront visibles et doivent avoir une finition correspondant à l’ébénisterie. **Dimension fournit minimum révèle.
Installation Installation Dépannage 1 Coupez le courant au niveau de la prise de courant. 2 Déplacez l’unité près de l’ouverture. Retirez et recyclez les matériaux d’emballage. 3 L’unité est expédiée avec deux supports d’expédition de chaque côté, derrière la face avant. Retirez les deux supports, puis réinstallez les vis. Reportez-vous à l’illustration ci-dessous. 4 Branchez le cordon d’alimentation dans la prise mise à la terre.
WOLF APPLIANCE, INC. P.O. BOX 44848 MADISON, WI 53744 9004760 REV-C 4 / 2021 WOLFAPPLIANCE.COM 800.222.