
Pro Wall Hoods IG


10 | Wolf Customer Care 800.222.7820
INSTALLATION
2 Remove the wood mounting strip from the back of the
hood by extracting the screws from inside the hood.
3 Remove the electrical box from the inside the hood.
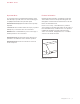
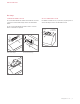
4 Remove the transition from inside the hood by removing
the hold-down brackets. Remove the shipping material
from the damper. Refer to the illustration below.
5 Mount the transition and hold-down brackets to the top
of the hood using the existing screws. Refer to the illus-
tration below.
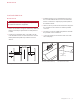
6 For internal blowers, install the blower prior to mounting
the hood. Refer to the instructions provided with the
blower.
TRANSITION
HOLD-DOWN
BRACKET
TRANSITION
Transition position (shipping)
Transition mounting
24"/27" Deep Wall Hood
INSTALLATION
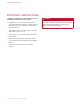
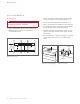
WARNING
Wall framing must be able to support the weight of the
hood and internal blower, if applicable.
1 Refer to the illustration below for typical wall framing.
Additional framing or blocking is required in the
mounting strip location.
C
L
BLOCKING
MOUNTING
STRIP
18"
(457)
TO BOTTOM
OF HOOD
Wall framing (typical)