
Pro Wall Hoods IG


wolfappliance.com | 9
INSTALLATION
Low-Prole Wall Hood
INSTALLATION
WARNING
Wall framing must be able to support the weight of the
hood and internal blower, if applicable.
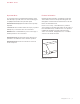
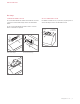
1 Refer to the illustration for typical wall framing. Additional
framing or blocking is required in the mounting bracket
location.
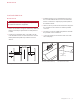
2 Position the mounting brackets on the wall as shown
in the illustration below. Secure the brackets to the wall
framing and blocking with the provided screws and
washers.
26
1
/4" (667)
MOUNTING BRACKET
CENTERS
7
1
/4" (189)
TO BOTTOM
OF HOOD
BLOCKING
C
L
Mounting bracket location
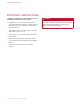
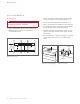
3 Install the transition. For an internal blower, the transi-
tion is included with the blower. For in-line and remote
blowers, a transition is required (not provided). Refer to
the illustration below.
4 Lift the hood into position and insert Romex
®
wire(s) into
the electrical knockout and secure with the provided
connector.
5 Secure the hood to the wall blocking and structure with
the provided screws and washers.
6 Connect the ducting to the transition and secure with
duct sealing tape.
TRANSITION
ELECTRICAL
BOX
(INSIDE HOOD)
Transition (internal blower)
Electrical box location