PRO WALL HOOD INSTALLATION GUIDE S P E C I F I C AT I O N S , I N S TA L L AT I O N , A N D M O R E
P RO WALL HO OD Contents Pro Wall Hood 3 4 Safety Precautions 5 Specifications 9 Installation 14 Blower Specifications 15 Troubleshooting Features and specifications are subject to change at any time without notice. Visit wolfappliance.com/specs for the most up-to-date information. 2 | Wolf Customer Care 800.222.
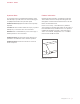
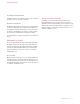
P RO WALL HO OD Important Note Product Information To ensure this product is installed and operated as safely and efficiently as possible, take note of the following types of highlighted information throughout this guide: Important product information, including the model and serial number, are listed on the product rating plate. The rating plate is located inside the left wall of the hood shell. Refer to the illustration below. IMPORTANT NOTE highlights information that is especially important.
S AF ET Y PR ECAUTIONS IMPORTANT INSTRUCTIONS TO REDUCE THE RISK OF FIRE, ELECTRIC SHOCK, OR INJURY, OBSERVE THE FOLLOWING: • Installation work and electrical wiring must be done by qualified person(s) in accordance with all applicable codes and standards, including firerated construction. • Two installers are recommended due to the size and weight of the pro hood. • Install the pro hood only with a blower manufactured by Wolf.
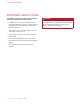
S PECIF ICAT IO NS Installation Requirements Installation of the hood should be 30" (762) to 36" (914) from the bottom of the hood to the countertop. B LO WER AS S EM BL IE S Pro Wall Hoods require an internal, in-line, or remote blower assembly, available through an authorized Wolf dealer. For local dealer information, visit the find a showroom section of our website, wolfappliance.com. Refer to specific installation instructions provided with each blower assembly.
S PECIF ICAT IO NS Ducting WARNING To reduce the risk of fire, use only metal ducting. IMPORTANT NOTE: Consult a qualified HVAC professional for specific installation and ducting applications. Pro Wall Hoods accommodate a 10" (254) round duct. Use only rigid metal ducting. A straight, short duct run allows the hood to perform most efficiently. If the duct run exceeds 50' (15 m), a higher CFM blower may be required to maintain proper air flow. Internal and in-line blowers require a roof or wall cap.
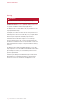
S PECIF ICAT IO NS Discharge L O W-PR O F ILE WAL L HOOD 2 4 " / 2 7 " D EEP WALL H O O D Pro Low-Profile Wall Hoods with an internal blower can have a vertical or horizontal discharge. Refer to the illustrations below. Pro Wall Hoods that are 24" (610) and 27" (686) deep have a vertical discharge. Refer to the illustration below. For Pro Low-Profile Wall Hoods with an in-line or remote blower, a transition is required.
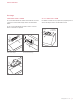
S PECIF ICAT IO NS Electrical Requirements Hood Preparation Installation must comply with all applicable electrical codes. emove the filters prior to installation. To remove, press R the filter upward and rotate the bottom. Remove the grease cups from the bottom edge of the hood. Refer to the illustration below. Locate the electrical supply as shown in the illustration below. A separate circuit servicing only this appliance is required.
I N S TALLAT IO N Low-Profile Wall Hood 3 Install I N S TALLAT IO N WARNING Wall framing must be able to support the weight of the hood and internal blower, if applicable. 1 Refer to the illustration for typical wall framing. Additional framing or blocking is required in the mounting bracket location. 2 Position the mounting brackets on the wall as shown in the illustration below. Secure the brackets to the wall framing and blocking with the provided screws and washers. the transition.
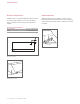
I N S TALLAT IO N 24"/ 27" Deep Wall Hood I N S TALLAT IO N WARNING Wall framing must be able to support the weight of the hood and internal blower, if applicable. 3 Position the mounting brackets on the mounting strip as shown in the illustration below. Secure the brackets to the mounting strip with the provided screws and washers. MOUNTING BRACKET LOCATION 1 Refer to the illustration for typical wall framing. Additional framing or blocking is required in the mounting bracket location.
I N S TALLAT IO N 24"/ 27" Deep Wall Hood 8 Place I N S TALLAT IO N 4 The hood is shipped with the transition attached upside down inside the top of the hood. Refer to the illustration below. 5 Separate the transition from the hood by removing the hold-down brackets. Remove the shipping material from the transition. 6 Mount the transition and hold-down brackets to the top of the hood using the existing screws. Refer to the illustration below.
I N S TALLAT IO N Electrical Connections WARNING Before making electrical connections, verify power is turned off at the service panel. IMPORTANT NOTE: Refer to installation instructions provided with the blower assembly. I N T ER NAL B LO WE R 1 Remove 2 the hood’s electrical box cover. onnect black to black and white to white with the C provided connectors, and connect the green/bare wire to the ground screw. 3 Place all wiring connections inside the electrical box.
I N S TALLAT IO N Complete the Installation F I LT ER S W O LF LO GO Install the grease cups at the bottom rear edge of the hood. Orient the filters with the lines running vertically. To install, place the top edge of the filter against the spring, press upward and rotate the bottom. Refer to the illustration below. To attach the Wolf logo, clean the mounting area with rubbing alcohol. Remove the paper backing, position the logo parallel with the bottom of the hood, then press into place.
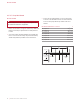
B LO WER S PECI FICATIONS Blower Dimensions I N -LINE B LO WE RS 24 7/8" 24 3/8" (632) (619) 11 3/4" (298) 18" (457) 18 1/2" (470) 12" (305) 4 1/2" (114) 8" (203) 211/2" 12 1/4" (546) 22" (311) 600 CFM in-line blower 18" (559) (457) 1100 CFM in-line blower R EMO T E B LO WERS 18" (457) 20 3/4" (527) 28 1/4" (718) (749) 10" (254) DIAMETER 14 3/4" 24 1/2" 29 1/2" (375) (254) 29 1/2" (749) DIAMETER (394) 10" (254) 29 1/2" 10" (254) 15 1/2" 21" (533) 10" (749) 10" (
T R O UB LES HO O TING Troubleshooting IMPORTANT NOTE: If the hood does not operate properly, follow these troubleshooting steps: • Verify electrical power is supplied to the hood. • Verify proper wiring connections. • If the hood does not operate properly, contact Wolf Factory Certified Service. Do not attempt to repair the hood. Wolf is not responsible for service required to correct a faulty installation.
WOLF APPLI ANCE , I NC. P. O. BOX 44848 MA D I SO N , WI 5 3 7 4 4 10 / 2018 WO L FA P P L I A N C E. C O M 8 0 0 . 2 2 2.