P R O W A L L C H I M N E Y V E N T I L AT I O N H O O D S I NSTALLATION I NSTRUCTIONS READ AND SAVE THESE INSTRUCTIONS
WARNING – TO REDUCE THE RISK OF A RANGE TOP GREASE FIRE: C O N TA C T I N F O R M AT I O N Wolf Customer Service: 800-332-9513 Website: wolfappliance.com As you follow these instructions, you will notice WARNING and CAUTION symbols. This blocked information is important for the safe and efficient installation of Wolf equipment. There are two types of potential hazards that may occur during installation. A) Never leave surface units unattended at high settings.
W O L F P R O WA L L C H I M N E Y V E N T I L A T I O N H O O D S I N S TA L L AT I O N R E Q U I R E M E N T S IMPORTANT NOTE: This installation must be completed by a qualified installer or Wolf authorized service center technician. Installer: Please read the entire Installation Instructions prior to installation. Save these instructions for the local inspector’s reference, then leave them with the homeowner.
W O L F P R O WA L L C H I M N E Y V E N T I L A T I O N H O O D S Wall Chimney Hood L I S T O F M AT E R I A L S I N S TA L L AT I O N C O N S I D E R A T I O N S The following is a list of materials shipped with the Wolf Pro wall chimney hood. Wolf Pro wall chimney ventilation hoods are recommended for use with all Wolf cooking appliances.
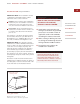
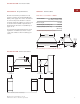
I N S TA L L AT I O N I N S T R U C T I O N S ELECTRICAL R E Q U I R E M E N T S OV E R A L L D I M E N S I O N S Wolf Pro wall chimney ventilation hoods require a separate, grounded 110/120 V AC, 60 Hz power supply. The service should have its own 15 amp circuit breaker. Locate the electrical supply through the top of the hood as shown in the Installation Specifications illustration below. Refer to Install Wiring on pages 12–13.
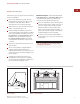
W O L F P R O WA L L C H I M N E Y V E N T I L A T I O N H O O D S I N S TA L L AT I O N S P E C I F I C A T I O N S The illustration and chart below provides dimensions specific to each Pro wall chimney hood model. These dimensions are critical for proper installation. To reduce the risk of fire and electric shock, install this ventilation hood only with a blower manufactured by Wolf. Blower model numbers are listed on page 17.
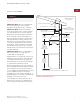
I N S TA L L AT I O N I N S T R U C T I O N S I N S T A L L D U C T WO R K To reduce the risk of fire, use only metal ductwork. IMPORTANT NOTE: Wolf recommends that the Pro wall chimney hood be installed 30" (762) to 36" (914) above the countertop. IMPORTANT NOTE: All Pro wall chimney hoods must exhaust to the outdoors. Always use metal ducting. Do not use flex ducting. Decide where the ductwork will run between the hood and the outside.
W O L F P R O WA L L C H I M N E Y V E N T I L A T I O N H O O D S WA L L F R A M I N G IMPORTANT NOTE: There must be a minimum 10" (254) opening in the ceiling to accommodate the ductwork necessary for proper ventilation. Layout the dimensions of the back of the wall chimney hood on the wall (shaded area of illustration below). The back of the hood dimensions will vary with the size of the hood. For dimensions of your model, refer to the illustration and chart on page 12.
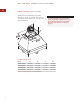
I N S TA L L AT I O N I N S T R U C T I O N S H O O D P R E PA R AT I O N Follow these steps to prepare the wall chimney hood for installation: Remove the filters by pressing up at the angle the filters are placed in, then rotate the bottom of the filter down. Gloves should be worn to provide proper grip. Slide the grease cups out from the bottom edges of the back of the hood. Using a Phillips screwdriver, remove the screws retaining the internal frame (shaded area of the illustration below) to the hood.
W O L F P R O WA L L C H I M N E Y V E N T I L A T I O N H O O D S D U C T C OV E R I N S T A L L A T I O N ACCESSORIES Optional accessories are available through your Wolf dealer. To obtain local dealer information, visit the Locator section of our website, wolfappliance.com. Installing a duct cover assembly will impact all aspects of the hood installation including hood location, ducting, electrical placement and the mounting surface.
I N S TA L L AT I O N I N S T R U C T I O N S H O O D I N S TA L L AT I O N IMPORTANT NOTE: If an optional duct cover is to be used with the Pro wall chimney hood, it must be installed before installing the hood— except for the 36" (914) and 42" (1067) wide hoods with an internal blower. Refer to Duct Cover Installation on page 10. Due to the weight of the hood, be sure to have adequate manpower for installation. The filters and internal frame must be removed from the hood prior to installation.
W O L F P R O WA L L C H I M N E Y V E N T I L A T I O N H O O D S I N S TA L L W I R I N G INTERNAL BLOWER WIRING I M P O R TA N T N OT E You must follow all National Electrical Code regulations. In addition, be aware of local codes and ordinances when installing your service. Risk of electrical shock. This ventilation hood must be properly grounded. This unit should be installed by a qualified electrician in accordance with all applicable national and local electrical codes and standards.
I N S TA L L AT I O N I N S T R U C T I O N S I N S TA L L W I R I N G I N - L I N E O R R E M OT E B L OW E R W I R I N G Place all wiring connections inside the electrical box and reinstall the cover. Make sure that the wires are secure and that no wires are pinched between the cover and box. Remove the hood electrical box cover. Run power cable to the installation location. Insert the power cable into the electrical box by running it through the wire clamp previously installed.
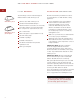
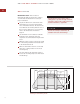
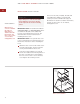
W O L F P R O WA L L C H I M N E Y V E N T I L A T I O N H O O D S F I LT E R I N S T A L L A T I O N WO L F N A M E P L A T E Follow these instructions to install filters and grease cups for Wolf Pro wall chimney hoods: The Wolf logo nameplate does not come installed on the hood since there are various locations that the nameplate can be attached. Also, some customers prefer not to have a nameplate on their hood. Reinstall the internal frame. Refer to Hood Preparation on page 9.
I N S TA L L AT I O N I N S T R U C T I O N S INTERNAL B L OW E R S IMPORTANT NOTE: Refer to the specific installation instructions provided with each internal blower for additional mounting and wiring instructions. Reattach the transition to the hood with the shipping screws. If you are installing a duct cover with the hood, refer to instructions on page 10. CTBLOWER-60INT / CTBLOWER-90INT ACCESSORIES IBLOWER-120INT Remove filters and internal frame from the hood.
W O L F P R O WA L L C H I M N E Y V E N T I L A T I O N H O O D S I N - L I N E A N D R E M OT E B L O W E R S Be sure that there is enough space for any transitions that may be needed between the blower and the connecting ductwork. For best performance, locate transitions nearest the blower. B L O W E R I N S TA L L AT I O N IMPORTANT NOTE: Refer to the specific installation instructions provided with each blower for additional mounting instructions.
I N S TA L L AT I O N I N S T R U C T I O N S B L OW E R A S S E M B L I E S Wolf Pro wall chimney ventilation hoods are shipped without the blower assembly. Wolf internal, in-line and remote blower assemblies are available as sales accessories through your Wolf dealer. IMPORTANT NOTE: Blower options vary with the cooking surface. Use only a Wolf blower with the Pro wall chimney hood. Refer to the Wolf Design Guide for Pro ventilation recommendations. You can also visit our website at wolfappliance.com.
W O L F P R O WA L L C H I M N E Y V E N T I L A T I O N H O O D S TROUBLES H O OT I N G IMPORTANT NOTE: If the Pro wall chimney ventilation hood does not operate properly, follow these troubleshooting steps: C O N TA C T I N F O R M AT I O N Wolf Customer Service: 800-332-9513 Website: wolfappliance.com Verify that power is being supplied to the ventilation hood. Check electrical connections to ensure that the installation has been completed correctly.
LEFT OUTER EDGE OF HOOD 19 BOTTOM EDGE OF HOOD CUT-OUT FOR LOGO PLACEMENT FOLD LINE FOR LOGO PLACEMENT
WOLF APPLIANCE, INC. 810482 6 / 2007 P. O . B O X 4 4 8 4 8 MADISON, WI 53744 800-332-9513 W O L FA P P L I A N C E .