
Installation Guide


L Series Oven Installation 12
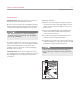
POSITION THE OVEN
Carefully lift the oven up to the opening. Resting the oven
on the cabinet base platform, slide the oven into the
opening until it is approximately 6"
(152) from full insertion.
Make sure the conduit slides through the opening in the
platform as the oven is moved into place.
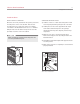
IMPORTANT NOTE: The conduit must fit into the recessed
area along the right rear edge of the oven. Make sure it is
not trapped between the oven and cabinet wall.
IMPORTANT NOTE: To avoid interference, a 90° door stop
may be required for any appliance or cabinet door installed
next to an L series oven.
Do not block the exhaust vent located at the bottom
of the oven. It must remain clear for proper ventilation.
Install the Oven
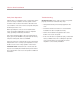
ELECTRICAL CONNECTIONS
With the oven positioned directly in front of the installation
opening, feed the conduit through the opening in the
cabinet platform (if applicable). Depending on local codes,
connect the oven to the electrical supply following steps
for either a three-wire or four-wire electrical system.
THREE-WIRE ELECTRICAL SYSTEM
1) Where local codes permit, connect the ground appli-
ance wire to the neutral (white) supply wire.
2) Connect the ground and white appliance wires to the
neutral (white) supply wire in the electrical box.
3) Connect the black appliance wire to the black (L1)
power supply wire in the electrical box.
4) Connect the red appliance wire to the red (L2) power
supply wire in the electrical box.
FOUR-WIRE ELECTRICAL SYSTEM
1) Separate the ground and white appliance wires.
2) Connect the white appliance wire to the neutral (white)
supply wire in the electrical box.
3) Connect the black appliance wire to the black (L1)
power supply wire in the electrical box.
4) Connect the red appliance wire to the red (L2) power
supply wire in the electrical box.
5) Connect the ground appliance wire to the green/
ground house grounding wire in the electrical box.
Verify that power is disconnected from the electrical
box before proceeding.