
Hood Installation Manual


10
|
Wolf Customer Care 800.222.7820
Hood Installation—Internal Blower
HOOD INSTALLATION
IMPORTANT NOTE: Mounting hardware is not provided.
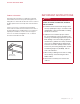
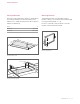
1 Verify the control panel on the hood is located on the
right. Refer to the illustration below.
2 Insert the hood into the opening.
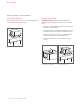
3 Secure the hood to the ceiling support framing. Refer to
the illustration below.
4 Connect the ductwork to the damper, then secure with
duct sealing tape.
Hood installation
INSTALLATION
WIRING CONNECTIONS
WARNING
Before making electrical connections, make sure the
electrical power is turned off at the service panel.
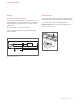
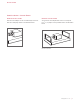
1 Remove the knockout above the home supply junction
box, then insert the home electrical supply (Romex) into
the electrical box. Refer to the illustration below.
2 Secure the electrical supply to the electrical box with a
UL or C/UL approved connector (not provided).
3 Connect the green or bare ground wire to the green
grounding screw. Use appropriate wire connectors (not
provided) to connect white to white and black to black.
4 Place all wiring connections inside the electrical box
and install the cover. Verify all wires are secure and not
pinched between the cover and electrical box.
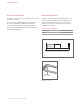
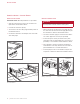
5 Insert the plug from the control board housing into the
receptacle on the blower. Refer to the illustration below.
HOME
SUPPLY
BLOWER
RECEPTACLE
Wiring connections
Blower connection
Control panel location