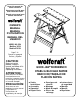
Save this manual for future reference. Conservez ce guide pour toute référence future. Guarde este manual para futuras referencias. ® wolfcraft OWNER’S MANUAL MANUEL D’UTILISATION MANUAL DEL USUARIO MODEL NO. 6134 Modèle n°:6134 Modelo Nº 6134 Page 7-11: Français et espagnol Frances y Español WOLF112-C ® wolfcraft CAUTION: Before using this product, read this manual and follow all its Safety Rules and Operating Instructions.
WARNING: FAILURE TO HEED ALL SAFETY AND OPERATING INSTRUCTIONS AND WARNINGS REGARDING USE OF THIS PRODUCT CAN RESULT IN SERIOUS BODILY INJURY. SAFETY INSTRUCTIONS plywood and the plywood is securely clamped to the portable workbench. DO NOT clamp or mount stationary power tools directly to table top. This could cause serious bodily injury. DO NOT attempt to assemble or operate your wolfcraft® Quick Jaw® Workbench until you have read the safety instructions in this section.
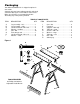
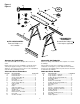
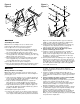
Packaging Your wolfcraft® Workbench is shipped complete in one carton. Separate all parts from packing materials and check each item with Figure 1 and “Table of Loose Parts”. Make sure all items are accounted for before discarding any of the packing material. ITEM A B D E F G H I TABLE OF LOOSE PARTS ITEM DESCRIPTION QTY. DESCRIPTION J K L M N O P Q R Leg assembly – left.............................1 Leg assembly – right ..........................1 Hex Head Screw – M6 x 45................
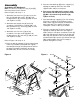
Assembly 5. Place the front table top [M] on the supports [L], aligning the table top holes over the round support knobs and press into place. Assembling the Workbench Note: For correct assembly, the legs, [A] and [B], must have hinges on the outside. Refer to Figure 2 for steps 1 - 3 6. Push on the threaded plastic traverse under the channel and attach top using two screws [N] (M8 x 55) and two large washers [O]. Tighten securely. 1.
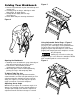
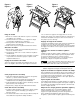
Figure 5 Folding Your Workbench 1. Remove any hand tools or parts from table top and storage rack. 2. Carefully pull up on hinges, with fingers under hinge flange, to unlock hinges. 3. Tilt Stand back slightly onto rear legs. (See Figure 4.) 4. Reach down and push front legs backward. Figure 4 WOLF112-4 Using Adjustable Swivel Pegs – Figure 6 Your workbench is equipped with 4 swivel pegs [R, page 3].
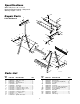
Specifications Work Table Area: 30" x 13-1/4". Maximum Weight Support: 250 pounds. Working Heights: 31-1/2" FF Repair Parts B T 6134 Workbench BB A F EE V BB EE Y Y T EE CC N T O J T F E K V Q O W C M P V R AA W W I G W V T V DD T L O V W V W DD O T I J DD W K W T Q T X WOLF112-6 Parts List KEY NO. A B C E F G I J K L M N O P PART NO.
AVERTISSEMENT: LE NON RESPECT DES CONSIGNES DE SÉCURITÉ, DES INSTRUCTIONS DE FONCTIONNEMENT ET DES AVERTISSEMENTS CONCERNANT L'UTILISATION DE CE PRODUIT RISQUE D'ENTRAÎNER DE GRAVES BLESSURES CORPORELLES. CONSIGNES DE SECURITE fixer ou monter d'outil motorisé fixe directement sur le plateau d e l ' é t a bl i . C e c i p o u r ra i t c a u s e r d e grave s bl e s s u r e s cor porelles.
Figure 1 Figura 1 N O P R M Q H D I F A E L J L B G HERRAMIENTAS REQUERIDAS OUTILS NECESSAIRES Destornillador Phillips No 3 Llave inglesa (ajustable) Tournevis Phillips n° 3 Clé à molette K J K WOLF112-1 Contenu de l’emballage Contenido del Embalaje Votre établi wolfcraft® est livré complet dans une boîte en carton. El Banco de Trabajo wolfcraft® se envía completo en un cartón de embalaje.
Figure 2 Figura 2 Figure 3 Figura 3 D N O J A D H I B G N H O I I F F I L I E F F D E J D L E I K O E Q K WOLF112-2 MONTAGE Assemblage de l'établi 5. Nota: Pour un assemblage correct, les charnières des piétements [A] et [B] doivent se trouver à l'extérieur. Pour les étapes de 1 à 3 se reporter à la Figure 2. 6. 1. Fixer la barre transversale avant [J] aux piétements [A et B] avec deux vis [D) (M6 x 45), des rondelles moyennes [E] et des écrous [F] (M6) de chaque côté.
Figure 4 Figura 4 Figure 5 Figura 5 Figure 6 Figura 6 WOLF112-4 WOLF112-3 WOLF112-5 Pliage de l'établi vers soi. Tourner les poignées de réglage dans le sens des aiguilles d'une montre pour éloigner la mâchoire. (voir Figure 5). La mâchoire de l'établi s'ouvre pour serrer des morceaux de bois jusqu'à 7 pouces de large. 1. Enlever les éventuels outils manuels ou pièces se trouvant sur l'établi et sur le chevalet. 2.
Caracteristiques Surface de l'établi: ........................... 30" x 13-1/4" Charge maximale:................................. 250 livres Hauteur de travail:..................................... 31-1/2" FF Pieces de Rechange B T BB A Etabli 6134 F EE V BB EE excede de la capacidad de la mordaza. Y Y Las clavijas giratorias pueden utilizarse para agarrar la pieza sólo en los casos en que la pieza NO sobrepase la superficie de la mordaza.
GUIDE DE L’UTILISATEUR MODÉLE NO. 6134 wolfcraft OWNER’S MANUAL MODEL NO. 6134 116, 310, 450/04, 01 wolfcraft Inc., Itasca, IL 60143 U.S.A. ® MANUAL DEL USUARIO NO.