USERMANUAL SCB-12 Version 1.
Table of Contents Table of Contents I Copyright Information............................................................................................................... 4 II About this user manual ............................................................................................................ 4 III Symbols in this manual ............................................................................................................ 5 1 1.1 1.2 Precaution....................................
Table of Contents 14.1 14.2 14.3 External WolfVision Lightbox .................................................................................................... 66 Close-Up Lens .......................................................................................................................... 66 Working surface ........................................................................................................................ 66 15 15.1 15.2 15.3 15.4 15.5 Troubleshooting ..................
Copyright I Information Copyright Information Copyright © by WolfVision. All rights reserved. WolfVision, Wofu Vision and 沃 福 视 讯 are registered trademarks of WolfVision Holding AG, Austria. No part of this document may be copied, reproduced, or transmitted by any means, without prior written permission from WolfVision. Except documentation kept by the purchaser for backup purposes.
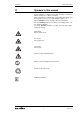
Information III Marks in this manual Symbols in this manual Position numbers are written in bold, italic characters and marked with the symbol "#", i.e. #1 for connections. Safety information is marked with corresponding pictographs and the instruction sequences are marked with the symbol "". The word Danger indicates possible serious personal injury. The word Warning indicates possible personal injury and/or serious equipment damage.
Precaution 1 Information Precaution RISK OF ELECTRIC SHOCK Use this unit only with the correct voltage as shown on the type label. Do not expose the unit to extreme heat or moisture. Do not expose the unit to water, metallic objects or any flammable material. Make sure that sufficient air circulation for cooling the unit is possible! Do not use a damaged power cord / power supply.
Information 1.1 Labels and Approvals Labels on the remote control (optional) Laser Information FDA accession number: 9912688-00 This laser device complies with the restriction: 21 CFR 1040.10 und 1040.11 The remote control is included in the SCB-12 Test set. This label will be found on the underneath of the remote control. Technical data of the laser diode: λ = 635 - 680nm P < 1mW Θ ≤ 2mrad 1.2 Approval marks on the unit As the SCB-12 is a camera module for OEM-customers it has no FCC or CE approvals.
Content of packaging 2 Contents of packaging 2.1 SCB-12 standard set Following components are included in the carton box*: • SCB-12 • Quick manual all signals will be provided through JST and Molex-connectors. 2.
Camera 3 Features Features The SCB-12 is an ultra-compact color-camera-module with SXGA- resolution (1280x960) and 30 frames per second. With the integrated scan converter, the camera is able to output different resolutions and refresh rates for optimum picture reproduction. The SCB-12 has a high quality lens with 12x optical zoom and 4x digital zoom. The camera module has an auto focus and manual focus, auto iris and manual iris and motorized zoom.
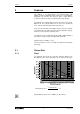
Pin assignment 3.1.2 Camera Picture Size / Distance Camera to Object (examples) Measurements in mm Length x Wide Distance in mm smallest picture with 2x digital zoom smallest picture with optical zoom largest picture 600 22 x 30 44 x 59 392 x 522 800 28 x 37 55 x 73 517 x 589 1.000 33 x 44 66 x 88 642 x 856 1.200 38 x 51 77 x 102 768 x 1.023 1.400 44 x 58 87 x 116 893 x 1.191 1.600 49 x 65 98 x 131 1.143 x 1.525 1.800 54 x 73 109 x 145 1.269 x 1.692 2.
Camera 3.1.3 Pin assignment Online Calculation Program (Java) A very easy method to calculate the exact positioning and the possible image sizes of the SCB-12 is the dedicated calculation program on WolfVision's homepage: www.wolfvision.com/wolf/indexdistance.html 11 Version 1.
Pin assignment 4 Camera Pin assignment For more details regarding the connectors please contact WolfVision Headquarter at support@wolfvision.com Keep cable connections as short as possible to prevent interferences. 4.
Camera 4.
Pin assignment 4.3 Camera Bottom #3 Infrared receiver connector (type: S5B-ZR) pin1 +5VDC pin2 IRX pin3 GND pin4 LED_C pin5 LED_A Keep cable connections as short as possible. IR-receiver Vishay TSOP 38xx will be preferred. Version 1.
Test set 4.4 Pin assignment - Interfacing board Interface Board (optional) The interface board is included in the SCB-12 Test set or optional available.
IR Remote Control 4.5 Test set Infrared Remote Control #12 ZOOM keys Using the ZOOM keys also switches auto iris on again. #13 PRESET keys (user programmable presets) For storing a preset, press one of the PRESET keys for more than 2 seconds. For recalling a preset, press the PRESET key quickly (see page 19). #14 AUTO FOCUS (AF) key Switches the auto focus on and off. #15 WHITE key Activates one push WHITE BALANCE adjustment (see page 20). #16 FREEZE key Captures the current image (see page 21).
Test set IR Remote Control #20 LASER indication LED / IR-Code indication LED For indicating the LASER status of the unit (red=on, dark=off). When changing the IR-code on the IR-remote control, the LED flashes in accordance with the selected IR-code (see page 56). #21 LASER POINTER key Important: Do not stare directly into the beam. This is hazardous for your eyes! #22 IMAGE TURN key For picking up vertical (portrait) pages with higher resolution (see page 22).
Basic functions 5 Functions FUNCTIONS The SCB-12 can be controlled through a key-matrix, IR-remote control (IR-receiver will be required), via Ethernet/LAN, USB or RS-232. 5.1 Zoom The SCB-12 uses a 12x zoom lens: f=5.8 to 69.6 mm (F=2.8 to 3.0) 5.1.1 Digital Zoom The digital zoom is automatically switched on at the tele end of 12x optical zoom range, with progressive effect from 1 to 4, giving a total maximum of 48x zoom ratio.
Functions 5.4 Basic functions Preset Function The SCB-12 offers the possibility to store the current settings as a preset and recall them by just pressing the respective PRESET key (#16) on the remote control. Pressing the FREEZE key (#16) for 2 seconds recalls preset 1. For storing a preset: adjust any function as required and then press any one of the PRESET keys on the remote control for 2 seconds or more. An on-screen message will inform you when the preset is stored.
Basic functions 5.5 Functions White Balance The correct white balance adjustment is important for exact color reproduction. "Auto Tracking" is the default white balance setting when the SCB-12 is shipped. This means that the white balance is continuously adjusted automatically. For an exact white balance, 10% of the recorded image should be white (measurement area is in the center of the image). For a precisely fixed white balance adjustment use the "One Push" white balance.
Functions 5.6 Special functions Image Memory for 9 images The SCB-12 has an image memory from which a stored image can be output as a still image. You can store up to 9 images in the memory. Code Storing an image: Press one of the MEMORY keys (#26) for 2 seconds or more Recalling an image: Press one of the MEMORY keys (#26) quickly View Mode / Splitscreen By pressing the ALL key (#17) a split image with all 9 pictures of the memory can be displayed.
Special functions Functions 5.8 Image Turn Mode for higher resolution Picking up a complete vertical (portrait) document or A4 page has always been a critical issue because the image was always picked up in a horizontal (landscape) format. The camera could only use 50% of its pixels to pick up a vertical (portrait) page. WolfVision's "Image turn" mode solves this problem. Just place your document (or other vertical object) on the working surface horizontally. Zoom in on it completely, so that approx.
Work with the SCB-12 6 Working with the SCB-12 • Connect all necessary cables to the SCB-12 • Set the output resolution and refresh rate to the right setting (depends on the connected display device) (see page 29ff) IMPORTANT Note the hints in the manual of the connected display device regarding resolution and refresh rate. • Switch on the SCB-12 by pressing the power key or sending a power-on command.
Connections 7 Connections 7.1 DVI-I DVI-I socket on the unit (front view) 7.2 D-Sub HD 15pin socket on the unit (front view) The DVI-I port (#10) provides digital and analog signals with adjustable resolution and refresh rate. For using HDMI, a DVI-HDMI cable or adapter will be required. When using digital display devices with LCD-, DLP- or Plasma technology, use the DVI port for getting the best result of image reproduction.
Connections 7.5 External Infrared (IR) Sensor In some rooms, one IR-receiver may not be sufficient. In this case connect the external IR-receiver to the IR-SENSOR plug (#9) and position the IR-sensor somewhere on the ceiling (or in the room) where users normally point the remote control towards. The external IR-receiver is included in the test set and is available as an optional accessory. 7.6 USB The USB device port (#5) can be used for direct connections between the SCB-12 and a computer.
Connections 7.7 Ethernet / LAN Port 10BASE-T/100Base-TX The LAN port (#7) makes the SCB-12 a part of the internal computer network and it can be used for communication over the Internet, if it is assigned an official (WAN) IP address. Administrators of a larger number of Visualizers can use the LAN port to control, support and update all of their units from their local desktop PC. The list of applications for the Visualizers LAN port is constantly increasing.
Connections 7.7.1 Power over Ethernet (PoE) The Ethernet/LAN-port (#7) of the SCB-12 includes Power over Ethernet (PoE) functionality. Power over Ethernet is a popular way of saving cables and installation costs. The SCB-12 is compatible with PoE power injectors or PoE switches (according to the IEEE 802.3af™-2003 industry standard). The supplied Voltage (in the range between 36 and 57V) will be added to a CAT-5 (or higher) Ethernet cable and the camera can receive power via the Ethernet/LAN-cable.
Connections 7.8 Trigger The trigger mode is very useful for surveillance and machine vision applications. For example, a light barrier can simultaneously send out a trigger pulse to the SCB-12 and to a harddisc recorder when somebody enters a room. Most normal recording devices can not start recording within a fraction of a second.
OSD General 8 OSD (On-Screen Menu) OSD Help For experienced users only: For regular use of the SCB-12, it is not necessary to go into the unit's menu and change settings. Inexperienced users should not make any adjustments there. To enter the on-screen menu press the MENU key (#19) for one second. Settings of the SCB-12 basic functions can be made here using the 4 SELECT keys (#18) (the numerical keys with red arrows).
OSD 8.2 Structure and functions of OSD The structure of the menu depends on the installed firmware version. The shown structure conforms to the firmware version v1.20b. 8.2.1 Standard Menu SCB-12 MAIN MENU Exposure Settings Color Settings Output Settings Preset Control Advanced Settings Recall Default Settings Start Quick Setup Guide Exit Exposure Settings Changes Settings which affect brightness of picture. e.g.: Gain, Shutter and Auto Iris settings.
OSD Exposure Settings SCB-12 EXPOSURE SETTINGS Gain AUTO LOW Shutter AUTO Iris Priority AUTO Image Brightness +0 Back Light Compensation OFF Extern Trigger OFF Return Gain There are three auto settings available. Additionally you can set the sensitivity of the camera from 0dB to 18 dB in 1dB steps. Settings affect the depth of focus and noise level. Factory setting is AUTO LOW Possible settings are: • AUTO LOW: adjusts the lowest necessary gain level for best image quality automatically.
OSD Image Brightness Sets brightness of picture when Auto Iris is used (-10 darkest and +10 brightest image). Optimum setting also depends on connected display device. Factory setting is 0 Possible settings are: • -10 to +10 in integer steps Back Light Compensation Changes the behavior of the Auto Iris control to change the brightness reference to darker areas of the image. Optimum setting depends on the recorded image and back light.
OSD Color Settings SCB-12 COLOR SETTINGS White Balance Color Mode Mode Gamma Saturation Pos/Neg/Blue AUTO-TRACKING PRESENTATION 1 105% POSITIVE Return White Balance Factory setting is AUTO-TRACKING Possible settings are: • AUTO-TRACKING: the white balance will be tracked permanently to the picked up object/document.
OSD Adjust the color saturation to desired value. Higher values result in more color full images. • 0% to 150% in integer steps (105%=standard setting) To toggle Black/White mode frequently, program this function to a preset key in the preset control menu (see page 35). Pos/Neg/Blue Alternative image display Select positive/negative conversion (for photo negatives), negative with blue background for good text-readability.
OSD Detail Adjust sharpness of image. Factory setting is HIGH Possible settings are: • HIGH: highest contour sharpness of image with most details • MEDIUM: average contour sharpness • OFF: contour sharpness is de-activated for soft contours with fewer details.
OSD Preset Control SCB-12 PRESET CONTROL Recall Default Presets PRESET 1: PRESET 1 PRESET 2: PRESET 2 PRESET 3: PRESET 3 Return Recall Default Presets To set back all presets to factory default.
OSD Advanced Settings SCB-12 ADVANCED SETTINGS Power Settings Miscellaneous Settings OSD Settings Ethernet Settings Device Info Date/Time Settings Return Power Settings Changes settings which affect behavior of the unit when switched on. Miscellaneous Settings Changes settings which affect OSD, IR code, digital zoom, etc. OSD Settings Changes settings which affect the display of OSD like color and position. Ethernet Settings Adjusts settings of LAN interface like IP address, shows MAC address, etc.
OSD Power Settings SCB-12 POWER SETTINGS Power-On Preset ON Store Power-On Preset Display Logo Mains-On Auto-Power-Off ON POWER-ON OFF Return Power-On Preset Factory setting is ON Possible settings: • ON: Power-On preset will be recalled when switching the unit on • OFF: unit will stay in last zoom position Store Power-On Preset Perform all desired adjustments like zoom, image turn, etc. and select this line to store the Power-On preset.
OSD Miscellaneous Settings SCB-12 MISCELLANEOUS SETTINGS IR Code Erase Memory Image Turn Rotation Digital Zoom Dig. Zoom Warning A MANUALLY CYCLE 2X STOP Return IR Code IR remote code: Helpful when there are IR interferences in the same room as the SCB-12. Factory setting is A Possible settings: • A: IR code A • B: IR code B • C: IR code C Erase Memory • D: IR code D. The IR remote control has to be set to the same IR code as the unit to function correctly (see page 56).
OSD Digital Zoom Changes the behavior of digital zoom. Factory setting is 2X Possible settings: • 4X: digital zoom extension is 4x • 2X: digital zoom extension is 4x Dig. Zoom Warning • DISABLED: digital zoom is disabled Changes the behavior of the unit when reaching the digital zoom extension. Factory setting is MESSAGE Possible settings: • MESSAGE: a message will be displayed on-screen when reaching the digital zoom extension. • STOP: the zoom stops when reaching the digital zoom extension.
OSD Transparency Transparency of OSD window background. Factory setting is ON Possible settings: • ON: background of OSD window will be displayed transparent and the image is still visible • OFF: background of OSD window will be displayed in solid color. Size Changes the size of the OSD window.
OSD Language SCB-12 CHANGE LANGUAGE Language ENGLISH Ok Cancel Language Changes language of the on-screen menu. Factory setting is ENGLISH Possible settings: • ENGLISH • DEUTSCH • TÜRKÇE Change of the language will restart the on-screen menu. Ok Confirms the selected language and returns to previous page. Cancel Returns to previous menu page without any change. Version 1.
OSD Ethernet Settings SCB-12 ETHERNET SETTINGS DHCP ON IP Address FROM DHCP-SERVER Subnet Mask FROM DHCP-SERVER Gateway IP FROM DHCP-SERVER Streaming Settings Security Settings Return IP Address Subnet Mask Gateway IP DHCP 192. 255. 192. 168. 255. 168. 0. 255. 0. 2. 0. 1. If DHCP-server is available, set it to ON.
OSD Streaming Settings SCB-12 MULTICAST SETTINGS Multicast IP 232. 1. 1. 1. Multicast Port Streaming Mode 8800 AUTO Streaming Format VGA Frame Rate LOW Return Multicast IP Changes Multicast IP address of camera. Factory setting is 232.1.1.1 Possible settings are: • 225.1.1.1 to 238.255.255.255 Ask your network administrator for more details regarding the installed network. Multicast Port Changes Multicast destination port. Factory setting is 8800 Possible settings are: • 8800 to 9000.
OSD Streaming Format Distributed resolution Factory setting is VGA Possible settings are: • VGA / 288p / VGA* • XGA / 576p / XGA* • SXGA- / 720p / WXGA* Ask your network administrator for more details regarding the allowed network traffic. The streaming ratio will be changed automatically to the same image ratio as the selected resolution in the Output Settings (4:3, 16:9 or 16:10) (see page 54). Frame Rate Distributed frame rate.
OSD Security Settings SCB-12 SECURITY SETTINGS Admin Password ********** Guest Password Password Ethernet-Mode FW+CTRL+IMG Return Admin Password To prevent un-authorized access. Admin password has to be entered before any changes are possible. Factory setting is Password • Possible characters are: 0-9, a-z and A-Z • 10 digits Write down the passwords and keep it securely. If you forgot the password or lost it, the access through the Ethernet/LAN port may be denied.
OSD • FW+IMG: controls are prohibited. Ethernet connection can be used for firmware updates and image transfers only • FW+CTRL: image transfers are prohibited. Ethernet connection can be used for firmware updates and control purposes only Ask your network administrator for more details regarding the installed network". Firmware updates requires WolfVision connectivity software. Return Returns to previous menu page. Device Info This fields are not changeable.
OSD Date/Time Settings SCB-12 DATE / TIME SETTINGS Time Source INTERNAL Timezone UTC Date Format Date DDMMYYYY/24H FROM DHCP-SERVER Time Return Time Source Select if time is in free running mode or synchronized with a timeserver. Daylight saving time/standard time will be changed automatically by selected timezone. Factory setting is INTERNAL Possible settings are: • INTERNAL: internal clock are used, time and date will be lost by power interruption.
OSD Return Returns to previous menu page. Recall Default Settings SCB-12 AUTO PRESET Are you sure? Ok Cancel Select YES to reset all Settings to factory default. Settings regarding output and communication are not affected (like resolution, IR code, baudrate, IP address). For resetting just the selected item in the OSD, keep the MEMORY 5 key pressed for 4 seconds.
OSD Start Quick Setup Guide After first power-on, the Quick Setup Guide will be started automatically. SCB-12 QUICK SETUP GUIDE Adjust language used in the OSD menu. Setup Language Next Select “Setup Language” to select the desired language (limited different languages are available). – see page 42 Select Next to skip this point. SCB-12 QUICK SETUP GUIDE Adjust Ethernet settings to access your local area network (LAN) or your wide area network (WAN).
OSD SCB-12 QUICK SETUP GUIDE You have successfully finished the Quick Setup Guide. Go to the OSD menu if you want to start over. Finish and Exit Select “Finish and Exit” to complete the Quick Setup Guide. To abort, press the MENU key and the Quick Setup Guide will appear on next hard-power-on again. 51 Version 1.
OSD 8.2.2 Extra Menu Enter the extra menu by keeping pressed the MENU key for 4 seconds. SCB-12 SCB-12 V1.30c Extra Menu Baud Rate Number of IR codes Mounting Position 115200 4 REGULAR Pixel Calibration Noise Suppression Reset Admin Password ON Exit Baud Rate Speed of RS-232 port.
OSD Noise Suppression To activate noise filter. Factory setting is ON Possible settings: • ON: noise filter is switched on for images with little motion • OFF: noise filter is switched off The setting improves the noise reduction of images with little motion. Reset Admin Password Reset password to default “Password” Exit Exits the menu.
Resolution and refresh rate 9 Resolution and refresh rate WARNING Damaging the display device Not specified resolutions and refresh rates can damage the display device! Note the information in the manual of the connected display devices. The SCB-12 has a native resolution of SXGA- (1280x960 pixels), 720p (1280x720 pixels) and WXGA* (1280 x 800). Other resolutions will be converted.
Resolution and refresh rate In order to achieve the best picture quality you must set the outputs of the SCB-12 to match the native resolution of your display unit (e.g. LCD or DLP projector or monitor). Important: What matters is the native resolution of the projector or monitor, not the maximum resolution that it can display (in compressed mode). The native resolution is the actual number of pixels of the built-in LCD display or DLP chip of a projector or monitor.
Maintenance 10 MAINTENANCE 10.1 Firmware Upgrades The software (firmware) of the SCB-12 (including the on-screen HELP) can easily be upgraded to the latest version. The firmware update can be done via USB, Ethernet (LAN) or RS232. Firmware update files can be downloaded for free at www.wolfvision.com/support Updates via USB and Ethernet/LAN can be made with the WolfVision Connectivity Software (version 1.5 and higher) and updates via RS232 can be made with WolfVision's Firmware Update Utility.
Transport 10.4 Cleaning Disconnect the unit from the mains! 10.4.1 Cabinet WARNING Damaging the unit Strong cleaning agents like acetone, benzene or similar damages the finish! Use cleaning agents like display cleaner only. Remove dust and dirt by gently wiping with a soft, lint free cloth. 10.4.
Technical Specification 11 Technical Specifications Camera / Technology Pictures per second (as picked up by the camera) Effective Pixel Total pixels of CCD Pixels processed per second (=effective pixels x frames per second) Color reproduction Native signal output Output signals Resolution (measured) Resolution in Image Turn mode (measured) Image Turn mode (for increased resolution) Vertical image-frequency Horizontal image-frequency Signal format Min.
Technische Daten Ethernet (LAN) port Power Status LED Dimensions (W x H x L) without interfacing board Weight Power Requirements with power supply Power Requirements with Power over Ethernet Operating Temperature Warranty Made in yes, IP-addressable (DHCP-supported), 10/100 Mbps External IR-Sensor (Test set or optional) 62.47mm x 63.8mm x 110.57mm [2 1/2" x 2 1/2" x 4 3/8"] 0.8kg (1.8lbs) 12V DC (+/-10%), 10W PoE class 0, 36-57V, Auto MDI/MDI-X, (IEEE802.
Technical Specification 12 Dimension Dimensions Isometric view Version 1.
Eclipse Installation 13 Installation 13.1 Eclipse The field of view is dependent on the zoom position of the optic: horizontal 4.4° - 45.7° vertical 3.3° - 35.1° 61 Version 1.
Installation 13.2 Cooling Cooling WARNING Damaging the unit! Mount heat sink. For proper function some components of the SCB-12 require a heat sink. In the drawing the relevant components are solid and hatched. The use of a soft silicon gap-pad is necessary to compensate the different height of the components. 13.2.1 Heat Sink Thermal resistance (Rth) 3.62 °C/W 13.2.2 Gap Pad Technical data of the recommended gap pad: i.e. GAP Pad Ultra Soft from Bergquistcompany www. bergquistcompany.
Matrix for Key panel 13.3 Installation Matrix for key panel The drawing shows the matrix of the key panel for connector #1 (see page 12). 63 Version 1.
Position of Light Installation 13.4 Recommended Positioning of Light 13.4.1 General Please consider light positioning for the SCB-12 carefully. Mounting the light too close to the unit will cause reflections, mounting it too far away will cause shadows. The illustration below shows the recommended position of lighting for the SCB-12. The distance from the center of the unit to the center of the light should be identical to the MAXIMUM image size (e.g. vertical image size).
Installation 13.4.2 Position of Light Flash Animation A very easy method to find the ideal light position for the SCB-12 is the dedicated flash animation program on WolfVision's homepage: www.wolfvision.com/wolf/Eye_020.html 65 Version 1.
Accessories Optional 14 OPTIONAL WolfVision Accessories 14.1 External WolfVision Lightbox A optional lightbox (bottom light) is recommended for dark transparent material such as x-rays or for very small transparent material such as slides. When a lightbox is used, the room light should be dimmed or switched off. When light conditions change, a white balance adjustment should be performed to compensate the varying color temperatures of different light sources (see page 20).
Troubleshooting 15 Troubleshooting 15.
Troubleshooting 15.4 Image SYMPTOM POSSIBLE CAUSE SOLUTION no image unit is in stand-by mode - switch on the unit by pressing the POWER-key. Power indication LED has to be green.
Troubleshooting SYMPTOM no color (black/white) flickering image 15.
Warranty 16 Warranty 16.1 General WolfVision guarantees their products to be free from defective materials and faulty workmanship for a period of 36 months from the date of dispatch (date of invoice) for units shipped after the 1st of January 2005 or later (24 months for Visualizers shipped before 2005 and used units).
Warranty 16.4 Transit damage or loss: All shipments are insured by WolfVision up to the first consignee (in most cases the Dealer/Distributor). Reimbursement can only be claimed if the receiver (indicated on the packing list) complies with the following instructions: • All shipments should be inspected upon arrival. Any apparent damage to the packaging and/or product or loss noticeable upon delivery, must be noted and marked appropriately on all copies of the carrier's waybill.
Disposal 17 Disposal of old WolfVision units 17.1 In the European Union Electrical and electronic equipment marked with the symbol on the left, have to be disposed of separately in accordance with the European Union's directive on waste electrical and electronic equipment and local regulations. This also applies to SCB-12 electrical accessories e.g. remote control, power supply and signal cables.
Manufacturer / Worldwide Distribution: WolfVision GmbH, Oberes Ried 14, A-6833 Klaus / AUSTRIA Tel. ++43-5523-52250, Fax. ++43-5523-52249, E-Mail: wolfvision@wolfvision.com Internet Homepage: www.wolfvision.com E-Mail for technical support: support@wolfvision.com Distribution in USA WolfVision USA East Inc., 2055 Sugarloaf Circle, Suite 125; Duluth (near Atlanta), GA 30097 / USA Tel. (770) 931-6802 and (877)-873WOLF, Fax: (770) 931-6906, E-Mail: usa.east@wolfvision.net WolfVision Inc.