R INSTRUCTIONS BEDIENUNGSANLEITUNG VZ-8light³ / VZ-8plus³ ENGLISH / DEUTSCH Check out our internet homepage for additional information www.wolfvision.
ENGLISH Precautions WARNING! Risk of electric shock Dangerous voltage inside Please observe the following: Use this Visualizer only with the correct voltage as shown on the type label ! Do not expose the Visualizer to heat or moisture ! Protect the Visualizer from excessive shocks ! Make sure that sufficient air circulation for cooling the Visualizer is possible! If there is any abnormality (abnormal noise, smell, smoke etc.
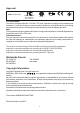
Approval Marks on the unit: C Tested to complywith FCC standards for home or office use US L I ST E D 9902476 FCC information: This device complies with part 15 of the FCC rules. Operation is subject to the following two conditions: (1) this device may not cause harmful interference, and (2) this device must accept any interference received, including interference that may cause undesired operation.
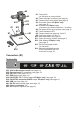
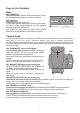
#5 #9 #11 #6 #12 #1 #7 #1 Connectors (on the back as shown below) #2 Power and light on/off key (see page 4) #3 Camera keys, zoom wheel (see page 4) #4 IR-remote control VZ-8plus³ only (see page 5) #5 IR-receiver VZ-8plus³ only (2 receivers on camera head and 1 on base) #6 Pull pad to lift the arm up/down (see page 6) #7 Power indication LED #8 Camera head (see pages 4, 6 and 7) #9 Light (see pages 4, 6 and 7) #10 Working surface (see page 6) #11 Close up lens for camera (see page 7) #12 Slide drawer VZ-
Keys on the Visualizer Base #24 POWER key Switches the unit on and off. When switching the unit on the Visualizer automatically runs power-on preset. #25 LIGHT key Switches the top light on and off. If a separate optional WolfVision light box is connected, the LIGHT switch toggles between top light, external WolfVision light box and light off. The LIGHT key also works as ONE PUSH WHITE BALANCE key if pressed for 2 seconds (see page 8).
Infrared Remote Control VZ-8plus³ only #31 #31 LASER TELE WIDE #32 #33 PRESETS IMAGE TURN 2 1 #35 LIGHT 3 AF A #31 ZOOM keys The ZOOM keys work like the ZOOM WHEEL on the camera head of the Visualizer. Using the ZOOM keys (wheel) also switches auto iris on again. #32 LASER POINTER key Important: Do not stare directly into the beam. This is hazardous for your eyes! #33 PRESET keys (programmable settings) For storing a preset, press one of the PRESET keys for more than 2 seconds.
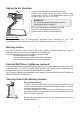
Setting Up the Visualizer 1. Connect the power pack to the power-input (#22). 2. Connect your display device (projector, monitor, video conferencing unit etc.) to the appropriate output of the Visualizer (#16, #17, #18, #19 or #20). IMPORTANT: For choosing the right output please read the detailed description on page 11! 3. Pull the arm upwards by using the pull pad (#6). 4. Turn the camera head to working position. 5. Switch on the Visualizer with the power key.
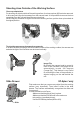
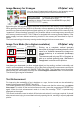
Shooting Area Outside of the Working Surface Close-up adaptor lens For shooting an object outside of the working surface, the close up lens (#5) has to be removed. In this case just hinge the lens away from the camera head. It is impossible to remove the lens completely from the unit and therefore can not get lost. When using the Visualizer to again record on the working surface, put the close up lens back to its original position.
Autofocus Please note that objects with very low contrast (like blank sheet of paper) are difficult to focus. If the autofocus does not work just move the object slightly. For special applications the autofocus can also be switched off using the on/off switch (#28 or #36). The autofocus is also switched off when the manual FOCUS keys (#27 or #37) are used. Digital Zoom Please note that the Visualizer has an optical 12x zoom. The digital 2x zoom increases the overall zoom range to a 24x zoom.
Image Memory for 9 images VZ-8plus³ only You can store 9 images and recall them by just pressing one of the numerical keys (#43) on the infrared remote control: Storing an image: Press one of the MEMORY keys (#43) for 2 seconds or more Recalling an image: Press one of the MEMORY keys (#43) quickly Split image of 9 picture memory By pressing the "All" key (#39) a split image with all 9 pictures of the memory can be displayed.
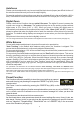
Anti-theft device 1: T-bar lock The Visualizer can be fixed with a security cable T-bar lock (Kensington® Lock), so that it can not be stolen. Follow the instructions from the cable lock manual. Anti-theft device 2: table lock bolt table (sectional view) washer 6.4/17x3 washer 6.4/12x1.6 screw M6 Please note that the usable depth of thread is 8mm, do not screw in more than this. The Visualizer can also be fixed onto a table with the supplied table lock bolt in order to minimize the risk of theft.
Choosing the Correct Output Mode The DVI- and RGB-output (#16 and #17) can output signals in the following formats: VZ-8light³ - XGA - SXGA- WXGA - WXGA* - 720p (4:3 - 1024x768 pixels) at 60Hz (4:3 - 1280x960 pixels) at 60Hz - native image (16:9 Widescreen - 1360x768 pixels) at 60Hz (16:10 Widescreen - 1280x800 pixels) at 60Hz - native image (16:9 Widescreen HD - 1280x720 pixels) at 60Hz - native image VZ-8plus³ - SVGA - XGA - SXGA- SXGA - SXGA+ - XGA 16:9 - WXGA - WXGA* - WXGA+ - 720p (4:3 - 800x600 pix
PAL/NTSC Video Output VZ-8plus³ only Please note, that the PAL/NTSC video outputs (composite and s-video) are switched OFF by default. This is because the picture quality of these outputs is MUCH LOWER then the quality of the DVI and RGB outputs, due to the limitations of the PAL/NTSC video technology. WolfVision wants to prevent that customers accidentally use an output with lower picture quality as the main image output.
The following chapter is for experienced users only: ON-SCREEN MENU / ON-SCREEN HELP For regular use of the WolfVision Visualizer, it is not necessary to go into the Visualizer's menu and change settings. Inexperienced users should not make any adjustments here. To enter the on-screen menu press the MENU-key (#30 or #44) for one second.
Firmware Upgrades The software (firmware) of your Visualizer (including the on-screen HELP) can easily be upgraded to the latest version. The firmware update can be done via USB or RS232. Firmware update files can be downloaded for free at: www.wolfvision.com/wolf/fware.html Updates via USB can be made with the WolfVision USB Software and updates via RS232 can be made with WolfVision's Firmware Update Utility. Both programs can also be found under the same link.
MAINTENANCE Changing the Lamp of the Visualizer 1. Remove the power cord of the Visualizer 2. Open the cover screw by using a coin 3. Turn down the lamp inclusive lamp cover CAUTION: LAMP CAN BE HOT! 4. Change the lamp Place the new lamp very carefully into the socket 5. Mount the lamp cover in reverse order (3 to 1). Lamp type: High Frequency Lamp 9W at 10'000 h average burning life. WolfVision part no. 100040 Cleaning Cabinet: Clean the cabinet by gently wiping it with a soft, lint freecloth.
Technical data VZ-8light³ Output signals 30 frames (=full pictures) 1280 x 960 (=1,228,800) 1,320,000 36,864,000 sRGB, very good colors SXGA- (1280x960), WXGA* (1280x800) and HD 720p (1280x720) Horizontal image-frequency Signal format Iris Shutter White balance adjustment Autofocus (Speed) / Manual focus Text enhancement function (in color) On-screen menu and on-screen help Upgradeable firmware Lens / Zoom Max object height on working surface Max. pick-up area on working surface Max.
#24 #25 WHITE < > #26 ZOOM #27 #28 #29 #30 AUTO HELP EXTERN MENU Remote Control VZ-8plus³ only LASER #31 WIDE #32 PRESETS IMAGE TURN 2 1 #35 LIGHT 3 AF A #33 FOCUS A #34 #37 #36 WHITE FREEZE IRIS ALL #38 #40 #39 MEMORY 1 2 3 4 5 6 #41 HELP 7 #42 EXTERN #44 MENU 8 9 #43 POWER #45 CODES IR-Remote VZ-8plus³ only PRESET 1 FREEZE TELE One Push White Balance: Press the LIGHT key (#25) for 2 seconds to perform one push white balance.
DEUTSCH Vorsichtsmaßnahmen WARNUNG! Elektroschockrisiko gefährliche Spannungen im Geräteinneren Angeführte Vorsichtsmaßnahmen unbedingt beachten: Das Gerät nur mit der auf dem Typenschild angegebenen Spannung betreiben! Das Gerät vor Hitze und Feuchtigkeit schützen! Das Gerät vor Erschütterung schützen! Bitte darauf achten, dass eine ausreichende Luftzirkulation zur Kühlung des Gerätes möglich ist! Bei jeder Art von Störungsanzeichen (abnormale Geräusche, Geruch, Rauchentwicklung, etc.
Prüfungen Aufkleber am Gerät: C Tested to complywith FCC standards for home or office use US L I ST E D 9902476 FCC information (original Text): This device complies with part 15 of the FCC rules. Operation is subject to the following two conditions: (1) this device may not cause harmful interference, and (2) this device must accept any interference received, including interference that may cause undesired operation.
#5 #9 #11 #6 #12 #1 #7 #3 #8 #13 #2 #5 #10 #4 #14 #1 Anschlüsse (auf Geräterückseite, siehe unten) #2 Power und Licht ein/aus Taste (siehe Seite 4) #3 Kameratasten, Zoomrad (siehe Seite 4) #4 IR-Fernbedienung nur VZ-8plus³ (siehe Seite 5) #5 IR-Empfänger nur VZ-8plus³ (2x am Kamerakopf und 1x am Arm, unten) #6 Ziehvorrichtung für den Arm (siehe Seite 6) #7 Betriebsstatus LED #8 Kamerakopf (siehe Seite 4, 6 und 7) #9 Licht (siehe Seite 4, 6 und 7) #10 Arbeitsplatte (siehe Seite 6) #11 Nahlinse für di
Tasten am Visualizer Basis #24 POWER Taste Schaltet das Gerät ein und aus. Beim Einschalten wird der Power-on Preset ausgeführt. #25 LICHT Taste Die LICHT-Taste schaltet das Oberlicht ein und aus. Falls eine externe optionale WolfVision Lichtbox angeschlossen ist, schaltet die LICHT-Taste um zwischen Oberlicht, externer WolfVision Lichtbox und Licht aus. #24 #25 WHITE Durch Drücken der LICHT-Taste für 2 Sekunden wird ein One Push Weißabgleich durchgeführt (siehe Seite 8).
Infrarot Fernbedienung nur VZ-8plus³ A LASER #31 ZOOM-Tasten #31 #31 Die ZOOM-Tasten arbeiten wie das ZOOM-Rad am Kamerakopf des Visualizers. Durch Drücken einer der ZOOMTasten (Rad) wird die Autoiris wieder aktiviert.
Aufstellen des Visualizers 1. Netzgerät am Power-Eingang (#22) anschließen. 2. Ausgabegerät (Projektor, Monitor, Videokonferenzanlage, etc.) an den passenden Ausgang des Visualizers (#16, #17, #18, #19 oder #20) anschließen. WICHTIG: Lesen Sie bitte unbedingt die Hinweise zur Auswahl des richtigen Ausganges auf Seite 11! 3. Arm mit der Ziehvorrichtung (#6) nach oben ziehen. 4. Kamerakopf in die richtige Arbeitsposition drehen. 5. Visualizer mit der POWER-Taste einschalten.
Aufnahmen außerhalb der Arbeitsfläche Nahlinse Um Objekte außerhalb der Arbeitsfläche aufzunehmen, muss die Nahlinse (#5) entfernt werden. In diesem Fall klappen Sie die Nahlinse vom Kamerakopf weg. Es ist nicht möglich, die Linse komplett zu entfernen, somit kann diese nicht verloren gehen. Um wieder Aufnahmen auf der Arbeitsfläche machen zu können, klappen Sie die Nahlinse wieder in die ursprüngliche Position (vor der Kameraoptik).
Autofokus Bitte beachten Sie, dass kontrast-schwache Objekte (z.B. ein leeres Blatt Papier) einem Autofokus immer Probleme bereiten. In einem solchen Fall bewegen Sie das Objekt leicht. Für spezielle Anwendungen kann der Autofokus mit der AF-Taste (#28 oder #36) abgeschaltet werden. Der Autofokus wird ebenfalls abgeschaltet, sobald die manuellen FOKUS-Tasten (#27 oder #37) verwendet werden. .
Bildspeicher für 9 Bilder nur VZ-8plus³ Sie können bis zu 9 Bilder einspeichern und diese durch kurzes Drücken einer der Nummern-Tasten (#43) der Fernbedienung abrufen: Speichern eines Bildes: Aufrufen eines Bildes: Schnellansicht von 9 gesp. Bildern Drücken Sie eine der NummernTasten (#43) länger als 2 Sekunden Drücken Sie kurz die gewünschte Nummern-Taste (#43) Durch Drücken der ALL-Taste (#39) werden alle 9 Bilder als Split-Bild angezeigt.
Diebstahlschutz 1: T-Lock Der Visualizer kann mit einem Kabel T-Lock (Kensington® Lock) vor Diebstahl geschützt werden. Folgen Sie den Anweisungen des Schloss-Herstellers. Diebstahlschutz 2: Tisch Fixiereinheit Arbeitstisch (Schnitt-Zeichnung) Bitte beachten Sie die maximale Einschraubtiefe von 8mm! Weiteres Einschrauben beschädigt das Gerät. Scheibe 6.4/17x3 Scheibe 6.4/12x1.
Auswahl des richtigen Ausgangs-Modus Der DVI- und RGB-Ausgang (#16 and #17) kann folgende Signalformate ausgeben: VZ-8light³ - XGA - SXGA- WXGA - WXGA* - 720p VZ-8plus³ - SVGA - XGA - SXGA- SXGA - SXGA+ - XGA 16:9 - WXGA - WXGA* - WXGA+ - 720p (4:3 - 1024x768 Pixel) bei 60Hz (4:3 - 1280x960 pixels) at 60Hz - tatsächliche Auflösung (16:9 Widescreen - 1360x768 Pixel) bei 60Hz (16:10 Widescreen - 1280x800 pixels) at 60Hz - tatsächliche Auflösung (16:9 Widescreen HD - 1280x720 Pixel) bei 60Hz - tatsächliche Au
PAL/NTSC Video Ausgänge nur VZ-8plus³ Bitte beachten Sie, dass die PAL/NTSC Video-Ausgänge (Composit und S-Video) ab Werk ausgeschaltet sind. Dies deswegen, weil die Bildqualität dieser Ausgänge aufgrund der Limitationen von PAL/NTSC-Video wesentlich schwächer ist, als die des DVI und RGBAusganges. WolfVision möchte damit verhindern, dass diese Anschlüsse versehentlich als Hauptausgang verwendet werden.
Die nachfolgenden Kapitel sind nur für technisch versierte Anwender: ON-SCREEN MENÜ (Kamera Menü) / ON-SCREEN HILFE Für Standardanwendungen des WolfVision Visualizers ist es nicht notwendig, Einstellungen im On-Screen Menü vorzunehmen. Unerfahrene Anwender sollten hier keine Änderungen durchführen. Drücken Sie die MENU-Taste (#30 oder #44) eine Sekunde lang um in das On-Screen Menü zu gelangen.
Firmware Updates Die Firmware (Geräte-Software) Ihres Visualizers (inklusive On-Screen Hilfe-Texte) kann einfach auf die neueste Version aktualisiert werden. Die Firmware kann über die USB- oder RS232-Schnittstelle aktualisiert werden. Firmwareupdates können gratis unter www.wolfvision.com/support herunter geladen werden. Für ein Update über USB benötigen Sie die WolfVision Connectivity Software und für ein Update über RS232 das WolfVision Firmware Update Utility.
WARTUNG Wechseln der Lampe des Visualizers 1. Entfernen Sie den Netzstecker des Visualizers 2. Lösen Sie die Schraube mit Hilfe einer Münze 3. Schwenken Sie die Lampe samt Abdeckung nach unten Achtung: Die Lampe kann sehr heiß sein! 4. Wechseln Sie die Lampe Setzen Sie die Lampe vorsichtig in den Sockel 5. Montieren Sie die Lampenabdeckung in umgekehrter Reihenfolge (3 bis 1). Lampentyp: Hochfrequenzlampe mit 9W bei einer mittleren Lebensdauer von 10.
Technische Daten VZ-8light³ Ausgangssignal 30 Bilder (=Vollbilder) 1280 x 960 (=1.228.800) 1.320.000 36.864.000 sRGB, sehr gute Farben SXGA- (1280x960), WXGA* (1280x800) und HD 720p (1280x720) HD 720p / WXGA / SXGA- / XGA (umschaltbar), USB 2.
#24 #25 WHITE < > #26 ZOOM #27 #28 #29 #30 < > MAN FOCUS AUTO HELP EXTERN MENU Fernbedienung nur VZ-8plus³ #31 LASER TELE WIDE #32 PRESETS IMAGE TURN 2 1 #35 LIGHT 3 AF A #33 FOCUS A #34 #37 #36 WHITE FREEZE IRIS ALL #38 #40 #39 MEMORY 1 2 3 4 5 6 #41 HELP 7 #42 EXTERN #44 MENU 8 9 #43 POWER #45 One Push Weißabgleich: Drücken Sie die LICHT-Taste (#25) für 2 Sekunden um einen OnePush-Weißabgleich durchzuführen.
R CONTACTS Manufacturer / Worldwide Distribution WolfVision GmbH A-6833 Klaus Tel: +43(5523)-52250, Fax: +43(5523)-52249 AUSTRIA E-Mail: wolfvision@wolfvision.com International Distribution Offices USA WolfVision Inc. Duluth (Atlanta) Tel: +1(770)931-6802, Toll free: 877-873-WOLF, Fax: +1(770)931-9606 E-Mail: sales@wolfvision.us / support@wolfvision.us Burlingame (San Francisco) Tel: +1(650)648-0002, Toll free: 800-356-WOLF, Fax: +1(650)648-0009 E-Mail: sales@wolfvision.us / support@wolfvision.