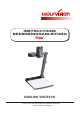
R INSTRUCTIONS BEDIENUNGSANLEITUNG VZ-9plus³ ENGLISH / DEUTSCH Check out our Internet Homepage for additional information www.wolfvision.
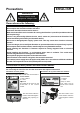
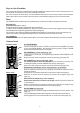
ENGLISH Precautions WARNING! Risk of electric shock Dangerous voltage inside Please observe the following: Use this Visualizer only with the correct voltage as shown on the type label ! Do not expose the Visualizer to heat or moisture ! Protect the Visualizer from excessive shocks ! Make sure that sufficient air circulation for cooling the Visualizer is possible (ventilation slots on the lamp housing)! If there is any abnormality (abnormal noise, smell, smoke etc.
Approval Marks on the unit: C Tested to complywith FCC standards for home or office use US L I ST E D 9902476 FCC information: This device complies with part 15 of the FCC rules. Operation is subject to the following two conditions: (1) this device may not cause harmful interference, and (2) this device must accept any interference received, including interference that may cause undesired operation.
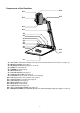
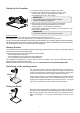
Components of the Visualizer #14 #13 #15 #12 FREEZE PRESET FOCUSFOCUS+ AF ? EXTERN MENU #11 #10 #9 #8 #7 #6 #5 #4 #3 #2 #16 #17 #1 #1 #2 #3 #4 #5 #6 #7 #8 #9 #10 #11 #12 #13 #14 #15 #16 #17 Turn Table / Alternative Antitheft security (found underneath the unit as shown on page 19) Working surface (see page 7) IR-remote control (see pages 4, 5 and 18) LIGHT key (see page 6) POWER key (see page 6) IR-receiver base Preview monitor (see page 7) Light field for slides (see page 7) Connectors (on the back
Connectors (#9) RS-232 USB LAN #19 #18 #18 #19 #20 #21 #22 #23 #24 #25 #26 RGB #21 #20 DVI EXTERN #25 #23 #22 POWER LB #24 #26 RS-232 serial control input RS232 (see page 15) LAN port 10/100 TBase (see page 13) USB port to Client (to peripheral devices, for external storage units) (see pages 11 and 17) USB-port to Host (to computer) (see page 13) RGB output (15pin) (see pages 14 and 15) DVI-I output (see page 14) External Input for Computer RGB-signals (15pin) (see page 15) Power connection 12
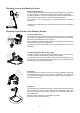
Keys on the IR-Remote Control #27 MENU key Pressing MENU key activates the on-screen menu (see page 16). #28 IMAGE TURN mode key For picking up vertical (portrait) pages with higher resolution (see page 12). #29 HELP/RESET key for on-screen menu (double function of MEMORY key No. 7) While you are in the on-screen menu you can activate the on-screen help by pressing the HELP key. Pressing this key for 2 seconds resets the selected menu item (see page 16).
Keys on the Visualizer One of the great features of WolfVision's Portable Visualizers is that only the most necessary keys are on the unit itself. Therefore anyone can use it without instructions. For more experienced users there are some additional functions on the remote control of the Visualizer. Nearly all functions on the remote control can also be controlled through the keys on the camera head: Base The POWER and the LIGHT keys are capacitive keys, just touch it to switch (keep key area clear).
Setting Up the Visualizer 1. Connect the power pack to the power-input (#25). 2. Connect your display device (projector, monitor, video conferencing unit etc.) to the appropriate output of the Visualizer (#19, #21, #22 or #23). IMPORTANT: For choosing the right output please read the detailed description on page 14! 3. Using the pull pad (#10) only to lift the arm upwards. Camera head and light automatically move into the working position. The VZ-9plus³ is switched on automatically.
Shooting Area on the Working Surface Eliminating reflections In order to eliminate reflections (on high gloss photographs etc.) just turn the light upwards or downwards slightly (default position is horizontal). It is also possible to move the document and rotate the camera head to the center of the desired pick-up area to eliminate reflections. The curvature of the working plate is special designed to eliminate reflections.
Focusing / Autofocus Please note that objects with very low contrast (like blank sheet of paper) are difficult to focus. If the autofocus does not work just move the object slightly. For special applications the autofocus can also be switched off using the on/off switch (#34 or #49). The autofocus is also switched off when the manual FOCUS keys (#35 or #48) are used. Digital Zoom Please note that the Visualizer has an optical 16x zoom. The digital 4x zoom increases the overall zoom range to a 64x zoom.
IMPORTANT White Balance Adjustment Correct white balance adjustment is important for an exact color reproduction! Each time the lighting condition changes, the Visualizer's camera must readjust its white balance, in order to optimize the color reproduction. The lighting condition (color temperature) changes, for example, if changing between the Visualizer's light and an external lightbox (bottom light) or if the room light is turning on or off.
Internal Image Memory You can store 9 images in the internal memory and recall them by just pressing the respective numerical key on the remote control quickly. Storing an image: Press the desired MEMORY key (#42) for at least 2 seconds Recalling an image: Press the respective MEMORY key (#42) quickly The internal memory can be erased or filled automatically in the on-screen menu of the view mode (MEM key #32). Still pictures in the memory can also be digitally zoomed with the zoom keys/wheel.
Image Turn Mode (for higher resolution) Output picture: Working surface: Normal mode: A A Only 50% of the pixels are used to pick up the document A Image turn mode: 90% of the pixels are used to pick up the document A Picking up a complete vertical (portrait) document or A4 page has always been a critical issue for a Visualizer because the image was always picked up in a horizontal (landscape) format. The camera could only use 50% of its pixels to pick up a vertical (portrait) page.
USB Device Port (to the computer) The USB device port can be used for direct connections between the Visualizer and a computer. This way, a Visualizer can be controlled and can be used as a scanner for 3-dimensional objects. Images in JPG, TIF or BMP format can be taken in a fraction of a second - much faster than with a desktop scanner. WolfVision's USB Software (Connectivity Software) works under Windows 2000, XP, Vista and 7 (32 and 64-bit) as well as Apple Macintosh. It is fully TWAIN/WIA compatible.
DVI/RGB Output Choosing the Correct Output Mode The DVI and RGB outputs (#22 and #23) can output signals in following formats: - VGA - SVGA - XGA - SXGA- SXGA - SXGA+ - UXGA - WXGA* - WXGA - WXGA+ - WSXGA+ - 720p - 1080p - WUXGA (4:3 - 640x480 pixels) at 60Hz (4:3 - 800x600 pixels) at 60Hz (4:3 - 1024x768 pixels) at 60Hz (4:3 - 1280x960 pixels) at 60Hz (5:4 - 1280x1024 pixels) at 60Hz (4:3 - 1400x1050 pixels) at 60Hz (4:3 - 1600x1200 pixels) at 60Hz (16:10 Widescreen - 1280x800 pixels) at 60Hz (16:9 Wide
RGB Port The EXTERN input (#24) has the same pin assignment as the RGB output (#22).
The following chapter is for experienced users only: ON-SCREEN MENU / ON-SCREEN HELP For regular use of the WolfVision Visualizer, it is not necessary to go into the Visualizer's menu and change settings. Inexperienced users should not make any adjustments here. To enter the on-screen menu press the MENU key (#27 or #50; when using the key on the camera head, keep it pressed until the menu appears).
Saving Visualizer Settings onto a USB-Stick The Visualizer offers the opportunity to save menu settings and preset settings onto a USB stick (USB storage device) as an XML file. Change the settings to the desired values and store it on the USB stick (in the on-screen menu, Advanced Settings / USB Stick Settings). When you connect the USB stick with the prepared XML-file, an on-screen message will pop-up. As soon as the USB-stick is removed, the previous settings are restored.
MAINTENANCE Changing the Lamp of the Visualizer 1. Remove the power cord of the Visualizer 2. Remove the lamp cover by turning then pulling the case CAUTION HOT - ALLOW THE UNIT TO COOL DOWN! (>60°C / 140°F)! 3. Lift the security ring 4. Change the lamp Place the new lamp very carefully into the socket 5. Mount the lamp cover in reverse order (pt. 3-1). Check position of lightning arm (click-stop device). Lamp type: Halogen lamp 12V/50W at 5000 h average burning life.
Thermostat If the unit gets too hot (improper ventilation, or air extraction or too high ambient temperature) a built in thermal sensor will switch off the light of the Visualizer. Verify that proper ventilation and air extraction is available and allow the unit to cool! The rotation speed of the blower is temperature controlled. Anti-theft device 1: T-bar lock The Visualizer can be fixed with a security cable T-bar lock (Kensington® Lock), so that it can not be stolen.
Technical Data Camera / Technology (Signal format) Pictures per second (as picked up by the camera) Effective Pixel Total pixels of CCD Pixels processed per second (=effective pixels x frames per second) Color reproduction (sRGB color precision) Native signal output Output signals (native and scaled) Resolution (measured) Resolution in Image Turn mode (measured) Image Turn mode (for increased resolution when picking up complete portrait pages) Vertical image-frequency (depending on resolution) Iris / Shutte
CODES - Short Keys Base and Camera head One Push White Balance: Press the LIGHT key (#4) for 2 seconds to perform one push white balance. Activating the on-screen menu: Press the MENU key (#50) (EXTERN key) on the camera head for 2 seconds to activate the on-screen menu. Use the FOCUS keys (#48) to navigate and the FREEZE key (#46), PRESET key (#47) to select. For the help function, press the AF key (#49).
DEUTSCH Vorsichtsmaßnahmen WARNUNG! Elektroschockrisiko gefährliche Spannungen im Geräteinneren Angeführte Vorsichtsmaßnahmen unbedingt beachten: Das Gerät nur mit der auf dem Typenschild angegebenen Spannung betreiben! Das Gerät vor Hitze und Feuchtigkeit schützen! Das Gerät vor Erschütterung schützen! Bitte darauf achten, dass eine ausreichende Luftzirkulation zur Kühlung des Gerätes möglich ist (Lüftungsschlitze am Lampengehäuse)! Bei jeder Art von Störungsanzeichen (abnormale Geräusche, Geruch, Rauche
Prüfungen Aufkleber am Gerät: C Tested to complywith FCC standards for home or office use US L I ST E D 9902476 FCC information (original Text): This device complies with part 15 of the FCC rules. Operation is subject to the following two conditions: (1) this device may not cause harmful interference, and (2) this device must accept any interference received, including interference that may cause undesired operation.
Teile des Visualizers #14 #13 #15 #12 FREEZE PRESET FOCUSFOCUS+ AF ? EXTERN MENU #11 #10 #9 #8 #7 #6 #5 #4 #3 #2 #16 #17 #1 #1 #2 #3 #4 #5 #6 #7 #8 #9 #10 #11 #12 #13 #14 #15 #16 #17 Drehteller / Alternative Diebstahlsicherung (auf der Geräteunterseite, siehe Seite 19) Arbeitsplatte (siehe Seite 7) IR-Fernbedienung (siehe Seiten 4, 5, und 18) LIGHT Taste (siehe Seite 6) POWER Taste (siehe Seite 6) IR-Empfänger Basis Vorschau Monitor (siehe Seite 7) Leuchtfeld für Dias (siehe Seite 7) Anschlüsse (auf
Anschlüsse (#9) RS-232 USB LAN #19 #18 #18 #19 #20 #21 #22 #23 #24 #25 #26 RGB #21 #20 DVI EXTERN #25 #23 #22 POWER LB #24 #26 RS-232 Anschluss für externe Steuerung (siehe Seite 15) LAN 10/100 TBase Anschluss (siehe Seite 13) USB Client Anschluss für externe Massenspeichergeräte (siehe Seiten 11 und 17) USB Host Anschluss zum Computer (siehe Seite 13) RGB Ausgang (15-Pin) (siehe Seiten 14 und 15) DVI-I Ausgang (siehe Seite 14) EXTERN IN Eingang für Computer RGB-Signale (15-Pin) (siehe Seite 1
Tasten auf der Infrarot Fernbedienung #27 MENU Taste Kurzes Drücken aktiviert das On-Screen Menü (siehe Seite 16). #28 IMAGE TURN Modus Taste Um hochformatige Dokumente mit höherer Auflösung darzustellen (siehe Seite 12). #29 HELP/RESET Taste für das ON-SCREEN Menü (Doppelfunktion der MEMORY Taste 7) Im On-Screen Menü Modus erhält man bei Betätigen der HELP-Taste eine Erklärung zum gerade aktiven Menü-Punkt (auf Englisch).
Tasten am Visualizer Das Bedienkonzept der portablen WolfVision Visualizer sieht vor, dass sich am Gerät selbst nur die wichtigsten Tasten befinden. Dadurch kann jeder den Visualizer sofort auch ohne Einschulung bedienen. Für erfahrene Anwender gibt es zusätzliche Funktionen auf der Fernbedienung. Beinahe alle Funktionen der Fernbedienung können durch die Doppelfunktion der Tasten am Gerät aufgerufen werden.
Aufstellen des Visualizers 1. Netzgerät am Power-Eingang (#25) anschließen. 2. Ausgabegerät (Projektor, Monitor, Videokonferenzanlage, etc.) an den passenden Ausgang des Visualizers (#19, 21, #22 oder #23) anschließen. WICHTG: Lesen Sie bitte unbedingt die Hinweise zur Auswahl des richtigen Ausganges auf Seite 14! 3. Arm mit der Ziehvorrichtung nach oben ziehen (#10). Die Kamera und das Licht bewegen sich automatisch in die richtige Arbeitsposition.
Aufnahmen auf der Arbeitsfläche Vermeidung von Reflexionen Um Reflexionen (auf glänzendem Material wie z. B. Fotos) zu vermeiden, muss oft nur das Licht des Visualizers leicht nach oben oder unten geschwenkt werden (Standardposition ist waagrecht). Es kann auch das Objekt verschoben und dann die Kamera dementsprechend gedreht werden um Reflexionen zu vermeiden. Die Wölbung der Arbeitsfläche ist optimiert um Reflexionen zu vermeiden.
Fokussierung / Autofokus Bitte beachten Sie, dass kontrast-schwache Objekte (z.B. ein leeres Blatt Papier) einem Autofokus immer Probleme bereiten. In einem solchen Fall bewegen Sie das Objekt leicht. Für spezielle Anwendungen kann der Autofokus mit der AF Taste (#34 oder #49). Der Autofokus wird ebenfalls abgeschaltet, sobald die manuellen FOKUS Tasten (#35 oder #48) verwendet werden.
WICHTIG Weißabgleich Eine korrekte Weißabgleich-Einstellung ist sehr wichtig für eine exakte Farb-Wiedergabe! Immer wenn sich die Lichtbedingungen ändern, muss die Kamera des Visualizers einen Weißabgleich durchführen um korrekte Farben wiedergeben zu können. Die Lichtbedingungen (Farbtemperatur) ändern sich z.B. wenn zwischen dem Licht des Visualizers und einer externe Lichtbox gewechselt wird, oder wenn die Raumbeleuchtung ein- bzw. ausgeschaltet wird.
Interner Bildspeicher Sie können bis zu 9 Bilder im eingebauten Speicher abspeichern und diese durch kurzes Drücken der entsprechenden MEMORY Taste auf der Fernbedienung wieder aufrufen. Speichern eines Bildes: Drücken Sie die gewünschte MEMORY Taste (#40) für 2 Sekunden (oder länger) Aufrufen eines Bildes: Drücken Sie die gewünschte MEMORY Taste (#40) kurz Der interne Speicher kann im Menü des View Modi gelöscht oder automatisch gefüllt werden (MEM Taste #32).
Bilddrehmodus "Image Turn" (für höhere Auflösung) Ausgegebenes Bild: Arbeitsfläche: Normaler Modus: A A Nur 50% der Pixel werden verwendet um die Vorlage darzustellen. A Image Turn Funktion: 90% der Pixel werden verwendet um die Vorlage darzustellen. A Die Abtastung einer hochformatigen A4 Seite (Portrait) war immer schon eine kritische Anforderung für einen Visualizer, da die Bildwiedergabe stets im Breitformat erfolgt.
USB Anschluss zum Computer (Verbindung zum Host) Der USB Computeranschluss kann für direkte Verbindungen zwischen dem Visualizer und einem Computer verwendet werden. Hier kann der Visualizer als Scanner für 3-dimensionale Objekte verwendet werden. Bilder im JPG-, TIF- oder BMP-Format können in Bruchteilen einer Sekunde aufgenommen werden - wesentlich schneller als mit einem Desktop Scanner.
DVI/RGB Ausgang Wahl des richtigen Ausgangs-Modus Die DVI- und RGB-Ausgänge (#22 und #23) können folgende Signalformate ausgeben: - VGA (4:3 - 640x480 Pixel) bei 60Hz - SVGA (4:3 - 800x600 Pixel) bei 60Hz - XGA (4:3 - 1024x768 Pixel) bei 60Hz - SXGA(4:3 - 1280x960 Pixel) bei 60Hz - tatsächliche Auflösung - SXGA (5:4 - 1280x1024 Pixel) bei 60Hz - SXGA+ (4:3 - 1400x1050 Pixel) bei 60Hz - UXGA (4:3 - 1600x1200 Pixel) bei 60Hz - WXGA* (16:10 Widescreen - 1280x800 Pixel) bei 60Hz - tatsächliche Auflösung - WXG
RGB Anschluss Der EXTERN Eingang (#17) hat dieselbe Pinbelegung wie die RGB Ausgänge (#22).
Die nachfolgenden Kapitel sind nur für technisch versierte Anwender: ON-SCREEN MENÜ (Kamera Menü) / ON-SCREEN HILFE Für normale Standard Anwendungen des WolfVision Visualizers ist es nicht notwendig, im On-Screen Menü Einstellungen vorzunehmen. Unerfahrene Anwender sollten hier keine Änderungen durchführen. Drücken Sie die MENU Taste (#27 oder #50; bei Benutzung der Taste am Kamerakopf, die Taste halten bis das Menü erscheint) um in das On-Screen Menü zu gelangen.
Speichern der Visualizer-Einstellungen auf einem USB-Stick Der Visualizer bietet die Möglichkeit aktuelle Menü- und Preseteinstellungen auf einem USBSpeichermedium als XML-Datei abzuspeichern. Ändern Sie die gewünschten Einstellungen und speichern Sie diese auf dem USB-Speichermedium (im On-Screen Menü, Advanced Settings / USB Settings). Sobald ein USB-Speichermedium mit einer geeigneten XML-Datei angesteckt wird, erscheint eine entsprechende Pop-Up Meldung auf dem Bildschirm.
WARTUNG Tausch der Halogenlampe 1. Entfernen Sie den Netzstecker des Visualizers 2. Entfernen Sie die Lampenabdeckung durch Drehen und anschließendes Ziehen des Gehäuses ACHTUNG HEISS - GERÄT ABKÜHLEN LASSEN! (>60°C) 3. Entfernen Sie den Sicherungsring 4. Wechseln Sie die Lampe Setzten Sie die Lampe vorsichtig in die Fassung 5. Montieren Sie die Lampenabdeckung in umgekehrter Reihenfolge Punkt 3-1). Prüfen Sie die Position des Lampenarmes (Rastung).
Thermostat Ist das Gerät überhitzt (z.B. abgedeckte Lüftungsschlitze, zu hohe Umgebungstemperatur), wird die Beleuchtung des Visualizers über einen Temperaturfühler abgeschaltet. In diesem Fall Zu- und Abluft freilegen und das Gerät abkühlen lassen! Die Geschwindigkeit des Lüfters ist temperaturgesteuert. Diebstahlschutz 1: T-Lock Der Visualizer kann mit einem Kabel T-Lock (Kensington® Lock) vor Diebstahl geschützt werden. Folgen Sie den Anweisungen des Schloss-Herstellers.
Technische Daten Kamera / Technologie (Signal Format) Bilder pro Sekunde (von der Kamera aufgenommen) Effektive Pixel Gesamte Pixel auf dem CCD Verarbeitete Pixel pro Sekunde (=effektive Pixel x Bilder pro Sekunde) Farbwiedergabe (sRGB Farbpräzision) Original Ausgangssignal von der Kamera (Native) Ausgangssignal (native und skaliert) Auflösung (gemessen) Auflösung im Image Turn Modus (gemessen) Image Turn Modus (für höhere Auflösung bei Abtastung von kompletten Hochformatseiten) Vertikale Bildfrequenz (Aufl
CODES - Tastenkombinationen am Gerät (Basis und Kamerakopf) One Push Weißabgleich: Drücken Sie die LIGHT Taste (#4) für 2 Sekunden um einen One-Push-Weißabgleich durchzuführen. Aktivieren des On-Screen Menüs: Drücken Sie die MENU Taste (#50) (EXTERN Taste) am Kamerakopf für 2 Sekunden um das On-Screen Menu zu aktivieren. Verwenden Sie die FOCUS Tasten (#48) zum Navigieren und die FREEZE Taste (#46) und PRESET Taste (#47) zum Auswählen. Für die Hilfefunktion drücken Sie die HILFE Taste (#49).
R CONTACTS Manufacturer / Worldwide Distribution WolfVision GmbH A-6833 Klaus Tel: +43(5523)-52250, Fax: +43(5523)-52249 AUSTRIA E-Mail: wolfvision@wolfvision.com International Distribution Offices USA WolfVision Inc. Duluth (Atlanta) Tel: +1(770)931-6802, Toll free: 877-873-WOLF, Fax: +1(770)931-9606 E-Mail: sales@wolfvision.us / support@wolfvision.us Burlingame (San Francisco) Tel: +1(650)648-0002, Toll free: 800-356-WOLF, Fax: +1(650)648-0009 E-Mail: sales@wolfvision.us / support@wolfvision.