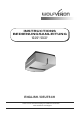
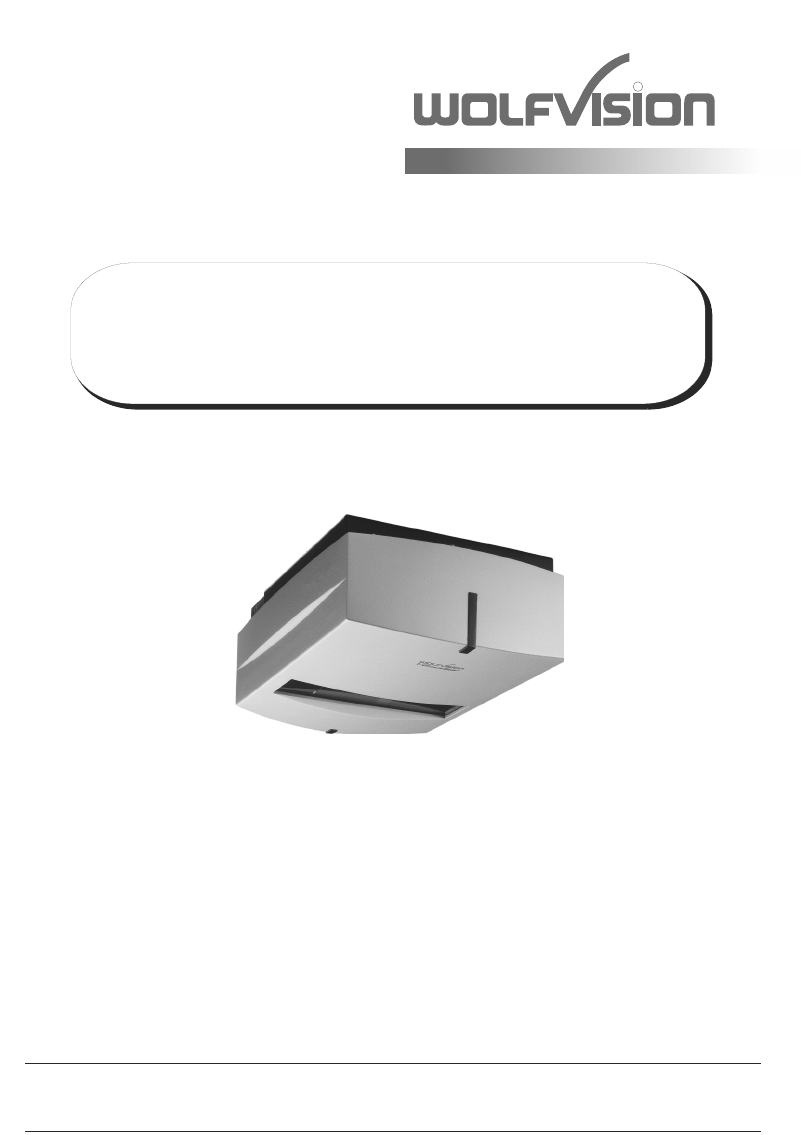
R INSTRUCTIONS BEDIENUNGSANLEITUNG VZ-C12³ / VZ-C32³ ENGLISH / DEUTSCH Check out our Internet Homepage for additional information www.wolfvision.
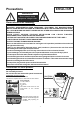
ENGLISH Precautions WARNING! Risk of electric shock Dangerous voltage inside Please observe the following: CAUTION! INSTALLATION AND SERVICING OF THE VISUALIZER MUST BE PERFORMED BY QUALIFIED SERVICE/INSTALLATION PERSONNEL FOLLOWING THE MANUFACTURER'S INSTALLATION INSTRUCTIONS AND IN COMPLIANCE WITH THE NATIONAL ELECTRIC CODE, ALL LOCAL BUILDING AND SAFETY CODES AND ALL OTHER APPLICABLE CODE PROVISIONS OR REGULATIONS. PINCH POINT! MOVING FOLDING MECHANISM CAN CRUSH FINGERS. KEEP HANDS CLEAR.
Approval Marks on the unit: C Tested to complywith FCC standards for home or office use US L I ST E D 9902476 FCC information: This device complies with part 15 of the FCC rules. Operation is subject to the following two conditions: (1) this device may not cause harmful interference, and (2) this device must accept any interference received, including interference that may cause undesired operation.
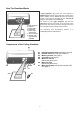
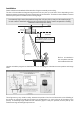
How The Visualizer Works A light projector (a) inside the unit projects a lightfield (g) the same size as the pick-up area of the built-in camera via the mirror (e) onto the working surface. The image is recorded by the camera (b) using the same path via the mirror (f). The lenses of the light projector (a) and the camera (b) are synchronized. Thus the size of the light field on the working surface changes when the user changes the zoom range of the camera.
Connectors (#5) and Main Switch (#7) #8 #9 #10 #11 #12 RGB T 3.
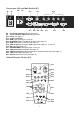
Keys on the IR-Remote Control #22 MENU key Pressing MENU key activates the on-screen menu (see page 16). #23 IMAGE TURN mode key For picking up vertical (portrait) pages with higher resolution (see page 12). #24 HELP/RESET key for on-screen menu (double function of MEMORY key No. 7) While you are in the on-screen menu you can activate the on-screen help by pressing the HELP key. Pressing this key for 2 seconds resets the selected menu item (see page 16).
Basic Preparations 1. Connect the power cable to the unit (#11) and plug it in 2. If you would like to use a control monitor, connect it to the PREVIEW RGB output (#17) 3. Connect a large viewing monitor or a projector to one of the outputs of the Visualizer For choosing the right output mode please see page 15! 4. Turn the main power switch (#8) on the unit to "I". The power indication LED on the unit is illuminated red to indicate that power is supplied. 5.
Installation Please read first the Installation Manual before fixing the assembly to the ceiling. The size of the smallest and largest image that the unit can pick up is not fixed. This is depending on the distance between the working surface and the bottom of the Visualizer. The tables in the installation manual show the pick-up sizes in relation to the mounting height: In extremely high rooms the smallest image the unit can pick-up may not be small enough.
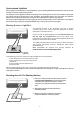
Synchronized Lightfield If the top light of the Visualizer is used (default) a synchronized lightfield always marks the pick-up area of the built-in camera on the working surface. The alignment of this lightfield is made for working on the working surface. Due to the oblique mounting of the camera and the light projector of the Visualizer, the lightfield shifts to the right when the distance between the Visualizer and the scanned object is decreased (when capturing high objects).
Focusing / One-Push Autofocus When the Visualizer is turned on the focus automatically adjusts to the working surface level. As a result it is not necessary to readjust the focus, if you are only working with flat material (text, photos etc.). Due to the Visualizer's extreme depth of focus, the focus rarely needs to be adjusted. Only very high objects require a focus adjustment. To activate the One-Push Auto focus, press the AF key (#29).
IMPORTANT White Balance Adjustment Correct white balance adjustment is important for an exact color reproduction! Each time the lighting condition changes, the Visualizer's camera must readjust its white balance, in order to optimize the color reproduction. The lighting condition (color temperature) changes, for example, if changing between the Visualizer's light and an external lightbox (bottom light) or if the room light is turning on or off.
Internal Image Memory You can store 9 images in the internal memory and recall them by just pressing the respective numerical key on the remote control quickly. Storing an image: Press the desired MEMORY key (#37) for at least 2 seconds Recalling an image: Press the respective MEMORY key (#37) quickly The internal memory can be erased or filled automatically in the on-screen menu of the view mode (MEM key #27). Still pictures in the memory can also be digitally zoomed with the zoom keys.
A IMAGE TURN Image Turn Mode (for higher resolution) A Output picture: Working surface: Normal mode: A A Only 50% of the pixels are used to pick up the document A Image turn mode: 90% of the pixels are used to pick up the document A Picking up a complete vertical (portrait) document or A4 page has always been a critical issue for a Visualizer because the image was always picked up in a horizontal (landscape) format.
USB Device Port (to the computer) The USB device port can be used for direct connections between the Visualizer and a computer. This way, a Visualizer can be controlled and can be used as a scanner for 3-dimensional objects. Images in JPG, TIF or BMP format can be taken in a fraction of a second - much faster than with a desktop scanner. WolfVision's USB Software (Connectivity Software) works under Windows 2000, XP, Vista and 7 (32 and 64-bit) as well as Apple Macintosh. It is fully TWAIN/WIA compatible.
DVI/RGB Output Choosing the Correct Output Mode The DVI and RGB outputs (#12, #14, #16 and #17) can output signals in following formats: - VGA - SVGA - XGA - SXGA- SXGA - SXGA+ - UXGA - WXGA* - WXGA - WXGA+ - WSXGA+ - 720p - 1080p - WUXGA (4:3 - 640x480 pixels) at 60Hz (4:3 - 800x600 pixels) at 60Hz (4:3 - 1024x768 pixels) at 60Hz (4:3 - 1280x960 pixels) at 60Hz - native image (5:4 - 1280x1024 pixels) at 60Hz (4:3 - 1400x1050 pixels) at 60Hz (4:3 - 1600x1200 pixels) at 60Hz (16:10 - 1280x800 pixels) at 6
RGB Port The EXTERN input (#15) has the same pin assignment as the RGB output (#12 and #17).
The following chapter is for experienced users only: ON-SCREEN MENU / ON-SCREEN HELP For regular use of the WolfVision Visualizer, it is not necessary to go into the Visualizer's menu and change settings. Inexperienced users should not make any adjustments here. To enter the on-screen menu press the MENU key (#22). Settings of the Visualizer's basic functions and the built-in camera can be made here using the 4 SELECT keys on the remote control (=the numerical keys with arrows #25).
MAINTENANCE release button CAUTION! Pinch Point! security lock mechanism Exchanging Fuses Disconnect the power cord (#11) before changing the fuses! The fuses (#10) are situated behind a small lid at the power socket. It can easily be opened with a small screwdriver etc.. Remove the socket, exchange the fuse(s) carefully, and put back the socket the right way round into the socket holder. The type of fuse is: F 1.5A. Do not use any other type ! Change the fuses for new ones and switch the unit on.
Firmware Upgrades The software (firmware) of your Visualizer (including the on-screen HELP) can easily be upgraded to the latest version. The firmware update can be done via USB, Ethernet (LAN) or RS232. Firmware update files can be downloaded for free at www.wolfvision.com/support. Updates via USB or Ethernet/LAN can be made with the WolfVision Connectivity Software, updates via RS232 can be made with WolfVision's Firmware Update Utility.
Technical Data VZ-C12³ Camera / Technology (Signal format) Pictures per second (as picked up by the camera) Effective Pixel Total pixels of CCD Pixels processed per second (=effective pixels x frames per sec.
IMPORTANT Packaging / Transportation Please make sure that you pack up the Visualizer in the supplied box as explained in this graphic.
Codes - Short Keys Storing Presets: Press one of the PRESET keys (#26) for 2 seconds. Activating the on-screen menu: Press the MENU key (#22). One-push auto focus: Press the AF key (#29). #31 #30 #32 #29 #28 #33 #34 #35 #27 #36 #26 #25 #37 #24 #38 #23 #22 #39 #40 Storing Images: Press one of the MEMORY keys (#37) for 2 seconds. Filling the Image Memory quickly: By pressing the SNAPSHOT key (#35) the image is stored in the next free memory (1-9).
DEUTSCH Vorsichtsmaßnahmen WARNUNG! Elektroschockrisiko gefährliche Spannungen im Geräteinneren Angeführte Vorsichtsmaßnahmen unbedingt beachten: DAS GERÄT DARF NUR VON AUTORISIERTEN UND GESCHULTEN FACHKRÄFTEN MONTIERT UND GEWARTET WERDEN. QUETSCHGEFAHR! SCHWENKEINHEIT KANN FINGER QUETSCHEN. NICHT IN DEN SCHWENKMECHANISMUS GREIFEN. VOR SERVICEARBEITEN SICHERHEITSVERRIEGELUNGSMECHANISMUS KONTROLLIEREN.
Prüfungen Aufkleber am Gerät: C Tested to complywith FCC standards for home or office use US L I ST E D 9902476 FCC information (original Text): This device complies with part 15 of the FCC rules. Operation is subject to the following two conditions: (1) This device may not cause harmful interference, and (2) this device must accept any interference received, including interference that may cause undesired operation.
Funktionsweise des Visualizers f b a e c d g a) Lichtprojektor b) Kamera c) Bildweg d) Lichtweg e) Spiegel-Licht (motorisiert) f) Spiegel-Kamera g) Aufnahmebereich / synchronisiertes Lichtfeld Ein Lichtprojektor (a) im Geräteinneren projiziert ein Lichtfeld (g) in derselben Größe wie der Aufnahmebereich der eingebauten Kamera über den Spiegel (e) auf die Arbeitsfläche. Die Kamera (b) nimmt das Bild über den Spiegel (f) auf. Die Objektive des Lichtprojektors (a) und die Kamera (b) sind synchronisiert.
Anschlüsse (#5) und Hauptschalter (#7) #8 #9 #10 #11 #12 RGB T 3.
Tasten auf der Infrarot Fernbedienung #27 MENU Taste Kurzes Drücken aktiviert das On-Screen Menü (siehe Seite 16). #28 IMAGE TURN Modus Taste Um hochformatige Dokumente mit höherer Auflösung darzustellen (siehe Seite 12). #29 HELP/RESET Taste für das ON-SCREEN Menü (Doppelfunktion der MEMORY Taste 7) Im On-Screen Menü Modus erhält man bei Betätigen der HELP-Taste eine Erklärung zum gerade aktiven Menü-Punkt (auf Englisch).
Inbetriebnahme des Visualizers 1. Netzkabel am Gerät (#11) anstecken und am Netz anschließen. 2. Wenn ein Kontrollmonitor verwendet werden soll, verwenden Sie bitte den PREVIEW RGB Ausgang (#17). 3. Hauptmonitor oder Projektor an einem der Ausgänge anschließen. Zur Wahl des richtigen / besten Ausgangsmodus lesen Sie bitte die Seite 15! 4. Den Hauptnetzschalter (#8) auf "I" stellen (Die POWER LED blinkt nun rot). 5. Die POWER-Taste (#40) der Fernbedienung betätigen um das Gerät einzuschalten.
Installation Bitte lesen Sie zuerst die Montageanleitung zur Installation des Gerätes an der Decke durch. Die Bildgrößen, die das Gerät aufnehmen kann, sind nicht fix. Sie sind abhängig vom Abstand zwischen der Arbeitsfläche und der Unterseite des Visualizers. Die Tabelle in der Montageanleitung zeigt das Verhältnis zwischen Montagehöhe und Aufnahmegröße: In extrem hohen Räumen ist das kleinste Bild, welches das Gerät abtasten kann, möglicherweise nicht klein genug.
Synchronisiertes Lichtfeld Bei Verwendung des Visualizer-Lichtes markiert ein synchronisiertes Lichtfeld den Auf-nahmebereich der eingebauten Kamera auf der Arbeitsfläche. Das Lichtfeld dient zur einfachen Positionierung von Objekten auf der Arbeitsfläche. Da die Kamera und der Lichtprojektor in einem bestimmten Winkel zueinander stehen, verschiebt sich das Lichtfeld nach rechts wenn sich der Abstand des aufgenommen Objektes zum Gerät verkürzt (bei Aufnahme hoher Objekte).
Fokussierung / One-Push Autofokus Beim Einschalten des Visualizers wird automatisch auf die Höhe der Arbeitsfläche fokussiert. Daher ist es nicht notwendig, die FOCUS Tasten (#30) zu verwenden, wenn nur mit flachen Objekten (Texte, Fotos, etc.) gearbeitet wird. Darüber hinaus ist es aufgrund der extrem hohen Tiefenschärfe der WolfVision Visualizer nur sehr selten notwendig, die Bildschärfe (Fokus) nachzustellen. Nur bei sehr hohen Gegenständen ist dies notwendig.
WICHTIG Weißabgleich Eine korrekte Weißabgleich-Einstellung ist sehr wichtig für eine exakte Farb-Wiedergabe! Immer wenn sich die Lichtbedingungen ändern, muss die Kamera des Visualizers einen Weißabgleich durchführen um korrekte Farben wiedergeben zu können. Die Lichtbedingungen (Farbtemperatur) ändern sich z.B. wenn zwischen dem Licht des Visualizers und einer externe Lichtbox gewechselt wird, oder wenn die Raumbeleuchtung ein- bzw. ausgeschaltet wird.
Interner Bildspeicher Sie können bis zu 9 Bilder im eingebauten Speicher abspeichern und diese durch kurzes Drücken der entsprechenden MEMORY Taste auf der Fernbedienung wieder aufrufen. Speichern eines Bildes: Drücken Sie die gewünschte MEMORY Taste (#35) für 2 Sekunden (oder länger) Aufrufen eines Bildes: Drücken Sie die gewünschte MEMORY Taste (#35) kurz Der interne Speicher kann im Menü des View Modi gelöscht oder automatisch gefüllt werden (MEM Taste #27).
A IMAGE TURN Bilddrehmodus "Image Turn" (für höhere Auflösung) A Ausgegebenes Bild: Arbeitsfläche: Normaler Modus: A A Nur 50% der Pixel werden verwendet um die Vorlage darzustellen. A Image Turn Funktion: 90% der Pixel werden verwendet um die Vorlage darzustellen. A Die Abtastung einer hochformatigen A4 Seite (Portrait) war immer schon eine kritische Anforderung für einen Visualizer, da die Bildwiedergabe stets im Breitformat erfolgt.
USB Anschluss zum Computer (Verbindung zum Host) Der USB Computeranschluss kann für direkte Verbindungen zwischen dem Visualizer und einem Computer verwendet werden. Hier kann der Visualizer als Scanner für 3-dimensionale Objekte verwendet werden. Bilder im JPG-, TIF- oder BMP-Format können in Bruchteilen einer Sekunde aufgenommen werden - wesentlich schneller als mit einem Desktop Scanner.
DVI/RGB Ausgang Wahl des richtigen Ausgangs-Modus Die DVI- und RGB-Ausgänge (#12, #14, #16 und #17) können folgende Signalformate ausgeben: - VGA (4:3 - 640x480 Pixel) bei 60Hz - SVGA (4:3 - 800x600 Pixel) bei 60Hz - XGA (4:3 - 1024x768 Pixel) bei 60Hz - SXGA(4:3 - 1280x960 Pixel) bei 60Hz - tatsächliche Auflösung (Native) - SXGA (5:4 - 1280x1024 Pixel) bei 60Hz - SXGA+ (4:3 - 1400x1050 Pixel) bei 60Hz - UXGA (4:3 - 1600x1200 Pixel) bei 60Hz - WXGA* (16:10 - 1280x800 Pixel) bei 60Hz - tatsächliche Auflösu
RGB Anschluss Der EXTERN Eingang (#15) hat dieselbe Pinbelegung wie die RGB Ausgänge (#1 und 17).
Die nachfolgenden Kapitel sind nur für technisch versierte Anwender: ON-SCREEN MENÜ (Kamera Menü) / ON-SCREEN HILFE Für normale Standard Anwendungen des WolfVision Visualizers ist es nicht notwendig, im On-Screen Menü Einstellungen vorzunehmen. Unerfahrene Anwender sollten hier keine Änderungen durchführen. Drücken Sie die MENU Taste (#22) um in das On-Screen Menü zu gelangen.
WARTUNG Auslöseknopf ACHTUNG! Quetschgefahr! Sicherheitsveriegelungsmechanismus Austausch der Sicherungen Ziehen Sie das Netzkabel (#11) vor dem Tausch der Sicherungen! Die Sicherungen (#10) befinden sich hinter einer Abdeckung über dem Netzanschluss. Die Abdeckung kann mit einem Schraubendreher (etc.) einfach geöffnet werden. Die Sicherungen sind vorsichtig in den Sockel einzulegen und der Sockel muss korrekt in den Halter gesteckt werden. Sicherungs-Typ: F 1,5A.
Firmware Updates Die Firmware (Geräte-Software) Ihres Visualizers (inklusive On-Screen Hilfe-Texte) kann einfach auf die aktuellste Version aktualisiert werden. Die Firmware kann über die USB-, Ethernet- (LAN) oder RS232Schnittstelle aktualisiert werden. Firmwareupdates können gratis unter www.wolfvision.com/support herunter geladen werden. Für ein Update über USB / Ethernet/LAN benötigen Sie die WolfVision Connectivity Software und für ein Update über RS232 das WolfVision Firmware Update Utility.
Technische Daten Kamera / Technologie (Signalformat) Bilder pro Sekunde (von der Kamera aufgenommen) Effektive Pixel Gesamte Pixel auf dem CCD Verarbeitete Pixel pro Sekunde (=effektive Pixel x Bilder pro Sekunde) Farbwiedergabe (sRGB Farbpräzision) Original Ausgangssignal der Kamera (Native) Ausgangssignal (native und skaliert) Auflösung (gemessen) Auflösung im Image Turn Mode (gemessen) Image Turn Mode (für höhere Auflösung bei der Abtastung von kompletten Hochformatseiten) Vertikale Bildfrequenz (Auflösu
WICHTIG Verpackung / Transport Bitte vergewissern Sie sich vor dem Transport des Decken Visualizers, dass dieser wie unten abgebildet verpackt wurde. Dies ist sehr wichtig um eine Beschädigung empfindlicher Teile durch den Transport zu verhindern.
CODES - Tastenkombinationen #31 #30 #32 #29 #28 #33 #34 #35 #27 #36 #26 #25 #37 #24 #38 #23 #22 #39 #40 Preset speichern: Drücken Sie die gewünschte PRESET Taste (#26) für 2 Sekunden. Aktivieren des On-Screen Menüs: Drücken Sie die MENU Taste (#22). One-Push Autofokus (auf Tastendruck): Drücken Sie die AF Taste (#29). Bilder speichern: Drücken Sie die gewünschte MEMORY Taste (#37) für 2 Sekunden.
R CONTACTS Manufacturer / Worldwide Distribution WolfVision GmbH A-6833 Klaus Tel: +43(5523)-52250, Fax: +43(5523)-52249 AUSTRIA E-Mail: wolfvision@wolfvision.com International Distribution Offices USA WolfVision Inc. Duluth (Atlanta) Tel: +1(770)931-6802, Toll free: 877-873-WOLF, Fax: +1(770)931-9606 E-Mail: sales@wolfvision.us / support@wolfvision.us Burlingame (San Francisco) Tel: +1(650)648-0002, Toll free: 800-356-WOLF, Fax: +1(650)648-0009 E-Mail: sales@wolfvision.us / support@wolfvision.