
User guide

INSTALLATION INSTRUCTIONS
Model 125 DOMINATOR
Your choice of a Wolo horn is a perfect choice to compliment your vessel or vehicle. Wolo horn’s are manufactured with the
finest quality materials and every horn is inspected and tested before being packaged. Precision workmanship and quality
components will assure years of dependable service. If you need help installing your new Wolo horn, or have any questions,
our technicians are available to answer your questions, Monday through Friday from 9 AM to 4 PM EST at
1-888-550-HORN (4676)
MOUNTING
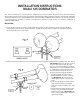
1. Locate the desired area you wish to mount the Dominator Horn. For best results, the front of the horn should be
unobstructed so that the horn’s sound can project straight ahead. Use the horn’s gasket as a template, mark hole
locations and drill to size. (See Fig. A.)
2. Mark the wire hole location if the horn’s wire is going to pass through the mounting surface and drill to size. (See Fig. C)
IMPORTANT: Make sure the hole is free of
any burrs that could cut into the horn’s
wire. For roof mount mounting, to prevent
water leaks, it is recommended that silicon
or a waterproof sealer be placed on the
wire at the point of entry into the roof.
3. Secure the horn using the hardware
provided. Tighten screws evenly to
prevent damage to the horn. (See Fig.
A.) IMPORTANT: Be sure to use the
rubber gasket to protect against water
leaks.
4. Push the front bracket forward until it is
tight. Use the bracket as a template,
mark hole location and drill to size. (See
Fig. B).
5. Secure the front trumpet bracket to the
location using the hardware provided.
Tighten screw evenly. IMPORTANT: Be
sure to use the rubber gasket to protect
against water leaks.