
Product Manual

ANY EXPRESSED WARRANTY NOT PROVIDED HEREIN IS EXCLUDED AND DISCLAIMED. THE IMPLIED WARRANTIES OF
MERCHANTABILITY AND OF FITNESS FOR A PARTICULAR PURPOSE ARE EXPRESSLY LIMITED TO A TERM OF THREE (3) MONTHS.
UNDER NO CIRCUMSTANCES SHALL WOLO BE LIABLE TO PURCHASER OR ANY OTHER PERSON FOR ANY SPECIAL OR
CONSEQUENTIAL DAMAGES, WHETHER ARISING OUT OF BREACH OF WARRANTY OR OTHERWISE.
To obtain warranty service, return the product prepaid, and include the original bill of sale showing the date of purchase. Provide with the return a brief
description of the problem. Also, include with the return a check or money order in the amount of $20.00 to cover return shipping. Mail to:
Wolo Manufacturing Corp.
One Saxwood Street, Deer Park, NY 11729
Attn: Warranty Service
Warranty
Wolo Manufacturing Corporation (“Wolo”) warranties to the original purchaser, for three months from the date of purchase, that this
product is free from defects in workmanship and materials. If there is such a proven defect, Wolo, at its option, will either repair or
replace the item free of charge, if it is returned to Wolo within three months from the date of purchase together with proof of purchase
as described below. Wolo reserves the right to inspect any defect prior to settling any warranty claim by repair or replacement. This
warranty is limited as above provided and Wolo will not be responsible for fire or other casualty or accident, due to neglect, abuse,
abnormal use, modifications, faulty installation of this product, or natural causes.
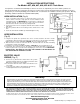
HORN INSTALLATION (Fig. A)
1. Locate a mounting location that is a solid metal surface such as the
vehicle’s frame or chassis to help prevent excessive vibration, which
could damage the horn. IMPORTANT: Do not mount horn on fender well
or flexible material. For best results, the front of the horn should be
unobstructed so that the sound can carry straight ahead.
2. Use the base of the horn as a template, mark the hole locations and drill
5/16" holes.
3. Place the gasket between the mounting surface and the base of the
horn.
4. Secure the horn with the hardware provided and tighten evenly.
HOSE INSTALLATION
(Fig. B)
5. Using the 1/4" plastic hose provided, cut to size to connect the tank to the horn’s electric
solenoid valve. Place the brass nut onto the hose. Push the hose onto the tank’s male fitting.
tighten the brass nut onto outlet fitting. CAUTION: Do not over tighten brass nut.
6. Place the brass nut onto the end of the air hose. Push the tube onto the male inlet fitting
located on the electric solenoid valve.
7. Thread brass nut onto the inlet fitting and tighten. CAUTION: Do not over tighten brass nut.
8. Connect the other end of the hose to the vehicle’s on-board air tank. Make sure that the on-
board air system has no pressure before attempting to connect hose to tank. IMPORTANT:
NEVER INSTALL THE HORN TO A AIR TANK THAT CONTROLS THE AIR BRAKES OR
ANY OTHER CRITICAL OPERATING SYSTEM.
ELECTRIC VALVE
WIRING (Fig. C)
9. Connect one (1) wire from the electric valve to the positive
(+) battery terminal, alternator, etc. Always protect this circuit
with a three (3) amp fuse (not included).
10. Connect the other wire of the electric solenoid valve to the
horn switch.
11. Connect the horn switch’s other terminal to ground, any
metal body bolt that is clean of paint and rust.
INSTALLATION INSTRUCTIONS
For Models 837, 838, 847, 848, 850 & 851 Train Horns
Your purchase of a Wolo Cannon Ball Express Horn is the choice to compliment your vehicle. Wolo’s products are
manufactured with the finest materials. Each horn is tested to insure it meets all manufacturing specifications, before it is
packaged. If you need help installing your new Wolo horn, our technicians are available to answer your questions, Monday
thru Friday, 9 AM to 4 PM EST at 1-888-550-HORN (4676).
© 2008 Wolo Mfg. Corp All Rights Reserved.