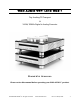
WOO AUDIO WTP-1AND WDS-1 Top-Loading CD Transport & 24-Bit/192kHz Digital to Analog Convertor Owner’s Manual Please review this manual before operating your WOO AUDIO™ product. tm ©2012 WOO AUDIO Inc. All rights reserved. www.wooaudio.com Rev 1.1.
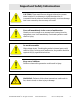
Important Safety Information CAUTION: These amplifiers are shipped without the vacuum tubes installed. It is necessary to install the tubes first. It is essential that the tubes are installed correctly or serious damage that is not covered by the warranty will result. Turn off immediately in the event of malfunction Should you notice smoke or an unusual smell coming from the equipments, turn it off immediately. Continued operation could result in injury. Do not disassemble High voltage circuit.
Table of Contents IMPORTANT SAFETY INFORMATION 2 TABLE OF CONTENTS 3 OVERVIEW 4 GETTING STARTED 6 QUICK INSTALLATION 10 OPERATIONS 14 FAQ - FREQUENTLY ASKED QUESTIONS 16 WARRANTY AND SERVICE 17 PRODUCT SPECIFICATION WDS-1 18 PRODUCT SPECIFICATION WTP-1 tm ©2012 WOO AUDIO Inc. All rights reserved. www.wooaudio.com 19 Rev 1.1.
WTP-1 Overview Thank you for choosing a Woo Audio product. The WTP-1 is finely hand-crafted TopLoading CD Transport that delivers uncompromised performance and superior listening experience.
WDS-1 Overview Thank you for choosing a Woo Audio product. The WDS-1 is finely hand-crafted Digital to Analog Converter that delivers uncompromised performance and superior listening experience. 24-Bit, 192kHz high resolution playback Ultra-low jitter USB 2.
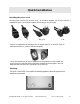
Getting Started What’s in the box? WTP-1 ① WTP-1 Top-Loading CD Transport 1 ② Premium Remote Control 4 ③ Magnetic Disc Clamp 2 ④ Rubber Transport Plate 3 WTP-1 ① WDS-1 Digital to Analog Converter 1 Power cord and AC Umbilical cord are not included and can be purchased separately. Foot Stands may also be purchased separately to allow for stacking of the 2 units. The Premium Remote Control may be purchased separately to accompany the WDS-1 tm ©2012 WOO AUDIO Inc. All rights reserved. www.
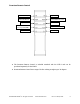
Back Panel Diagram 2 1 WTP-1 4 7 5 6 9 3 WDS-1 10 8 ① AC Inlet ② AC Umbilical Cord Female Outlet ③ AC Umbilical Cord Male Inlet ④ Fuse Port ⑤ Optical Output(Top) and Input(Bottom) ⑥AES/EBU Output(Top) and Input(Bottom) ⑦Coaxial BNC Output(Top) and BNC Input(Bottom) ⑧ USB 2.0 Input ⑨ XLR Balanced Outputs ⑩ RCA Unbalanced Outputs tm ©2012 WOO AUDIO Inc. All rights reserved. www.wooaudio.com Rev 1.1.
Front Panel Diagram 11 13 14 15 16 WTP-1 12 WDS-1 17 18 19 20 ⑪ WTP-1 Power Button/Simultaneous Power button when units are stacked ⑫ WDS-1 Power Button ⑬ Play/Pause Button ⑭ Stop Button ⑮ Rev/Rewind(Hold down) Button ⑯ Next/Fast Forward(Hold Down) Button ⑰ Input Button ⑱ Filter Button ⑲ Volume Down ⑳ Volume Up tm ©2012 WOO AUDIO Inc. All rights reserved. www.wooaudio.com Rev 1.1.
Premium Remote Control Play/Pause Button Stop Button Last Track/Rewind Next Track/Fast Forward Repeat 1/all/off Time Selector Input selector USB/ Coaxial/Optical/AES/EBU Filter Selector Slow/Sharp Volume Down Volume Up The Premium Remote Control is included standard with the WTP-1 and can be purchased separately for the WDS-1 Premium Remote Control has a range of 10 feet working at angles up to 30 degrees tm ©2012 WOO AUDIO Inc. All rights reserved. www.wooaudio.com Rev 1.1.
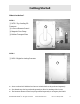
Quick Installation Installing the power cord: Plug the power cord into the AC inlet; see ① in the above diagram. The AC inlet socket is a standard IEC type. You will need to obtain the correct type for your region. U.S. European U.K. Take the AC umbilical cord and plug it into AC Female Outlet ② of the WTP-1 and AC Male Inlet of WDS-1 ③. Refer to the above diagram.
Powering Up To power up on the WTP-1 press the power button⑪ until pressure is felt and the VFD screen should turn on. To power up on the WDS-1 press the power button⑫ until pressure is felt and the VFD screen should turn on. If you buy both WTP-1 and WDS-1 and decide to stack them. The power button on the WTP-1 ⑪ becomes a simultaneous power button and will be able to power up both WTP-1 and WDS-1 at the same time. Refer to Installing the Power Cord on how to do this.
Using the Asynchronous USB 2.0 port: The WDS-1 offers a fourth source of music input, a USB 2.0 port ⑧ refer to the above diagram, which allows for usage of the WDS-1 DAC with Windows or Mac OS computer. Installing the USB driver *These steps only apply for Windows XP/Vista/7/8. 1. Plug in the USB 2.0 cable to the WA7 Fireflies and your computer. 2. Install the WA7 Fireflies Driver from the downloaded file from https://www.dropbox.com/s/2c8n0d01c2b1c10/wds1-driver-1.01.zip 3. Unzip the downloaded file.
Configuring media player TIPS: It is strongly recommended to use a media player that supports ASIO output mode for the highest playback quality. Changing Output mode Example is given for JRiver Media Center. Tools -> Options -> Audio Output -> Output mode -> select ASIO IMPORTANT: In JRiver Media Center, disable “Use large hardware buffers” option by unchecking the box. Buffering error will occur if this option is enable.
Operations Using the WTP-1 CD Transport: Before you begin using your WTP-1 make sure you remove the rubber transport plate from the CD tray. Opening of the CD tray on the WTP-1 is done by sliding the cover horizontally until it rotates to the left and the CD tray is revealed. Refer to the picture. *Remember to replace the magnetic disc clamp onto the CD tray after putting in the CD.
Using the WDS-1 Digital to Analog Converter: Now that we have everything properly connected and setup we can begin to enjoy the music. Buttons Input: Allow for the selection of input device. Coaxial -> Optical -> AES/EBU -> USB Filter: Choose one of two of our filter settings Slow -> Sharp Vol -: Lowers Volume Maximum->Minimum (100->0) Vol +: Increases Volume Minimum->Maximum (0->100) Remember to choose the proper input of music source and set the volume to your preference.
FAQ - Frequently Asked Questions When the Simultaneous power button is pressed, only the WTP-1 turned on but not the WDS-1. o To protect the circuitry of the WDS-1 there is a 10 second delay in between power ups. o Make sure the WDS-1 power button is in the on position before connecting the AC umbilical cord and using the simultaneous power button. No sound is coming out of the WDS. o Check you have selected the correct input. Pressed the play button on the CD transport but nothing plays.
Warranty and Service Woo Audio warrants this product free from defects in materials and workmanship for 1 year from the original date of purchase. The tubes are warranted for 30 days unless otherwise stated. In the event that your Woo Audio product requires servicing, please contact us directly to get a return instruction. If the equipment needs to be shipped back, please use the original packaging and include a copy of the sales purchase along with detail explanation of the problem(s).
Product Specification Model: WDS-1 Chipset: PCM1795 D/A USB receiving chipset: C-Media 6631A Sampling Rate: Up to 24-Bit, 192kHz for all inputs Inputs: Asynchronous USB 2.0, Optical, AES/EBU, Coaxial BNC Outputs: 1 RCA unbalanced, 1 XLR balanced Max Output: 2.2vRMS@RCA, 4.4vRMS@XLR Frequency response: 10Hz to 20kHz, +/- 0.5dB Distortion: <0.
Product Specification Model: WTP-1 Optical pick up Philips Outputs: 1 Coaxial BNC, 1 Optical, 1 AES/EBU Output Voltage: 500mV p-p Crystal Oscillator Stability: 0.