
Operator`s manual


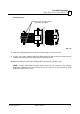

Sawmill Alignment
Blade Guide Arm Vertical Adjustment
Sawmill Alignment HD92doc042701 5-11
5
5.7 Blade Guide Arm Vertical Adjustment
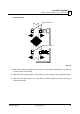
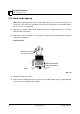
1. Move the saw head so that the blade guide arm is directly over a bed rail.
2. Adjust the blade guide arm out to within 1/2" (15 mm) of full open.
3. Put a block of wood between the bed rail and the arm. Lower the carriage so that the arm
just rests on the block.
See Figure 5-8.
4. Adjust the blade guide arm in to within 1/2" (15 mm) of full closed. Put the block under the
arm as before.
5. When the arm is parallel to the bed, it will touch the block in the open and closed position
with no adjustment of the saw head height.
6. If the arm is too low in the closed position, loosen the lower outside roller and tighten the
upper outside roller (See Step 8.)
7. If the arm is too high in the closed position, loosen the upper outside roller and tighten the
lower outside roller (See Step 8.)
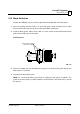
8. The rollers are mounted on cam bolts that raise or lower the arm when turned. To adjust
the rollers, loosen the nut against the blade housing. Locate the cam bolt head inside the
housing and turn until the arm is lowered or raised as needed. Recheck the arm in both
the open and closed positions. Repeat adjustments until the arm is the same distance
from the bed rail in the open and closed position.
9. The blade guide arm should be snug, but not too tight, in the rollers. You should be able to
move it in and out with firm hand pressure. There should be no side-to-side play.
FIG. 5-8
Turn outside rollers to raise
or lower end of blade guide arm
SM0065B