
Owner Manual


R
WOODBRIDGE
R
WOODBRIDGE
R
WOODBRIDGE
R
WOODBRIDGE
R
WOODBRIDGE
R
WOODBRIDGE
R
WOODBRIDGE
R
WOODBRIDGE
www.woodbridgebath.com
16
R
WOODBRIDGE
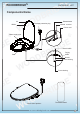
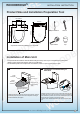
Installation of Main Unit
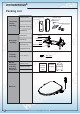
Product Size and Installation Preparation Tool
403mm
380mm
130-190mm
517mm
434-493mm
>490mm
>25<90
WrenchPhillips screwdriver
+
Cup
Tape measure
* This product has been tested for water flow before leaving the factory. There may be a small amount of residual water
dripping out when removing the product, which is not a malfunction.
* Do not install this product in a wet place such as a bathroom, and do not put it in a place prone to water.
* Tips: Please confirm this seat fitting your current toilet.
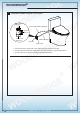
1
2
Screws
Fixed piece
Expansion nut
Installation of base
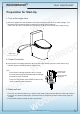
Installation and disassembly of
Main Unit
Install
Base plate
Toilet mounting
holes
IInstall
Mounting
Cardboard
The black latch faces
Forward, Groove up
Install the expansion nuts into the toilet mounting holes first, and then
install base plate, fixed piece and screws in sequence according to
the above illustration, then tighten.
Disassemble
Click
click
Installation of Main Unit: Align main unit to base plate and push it into
the base plate, and a “click” sound means the main unit is installed in
place.Disassembly of Main Unit: Press the "Disassemble button", and
pull out the main unit when a "click" sound is heard.
* Hand can leave “Disassemble button” after press it to pull out main
unit.