S1488 INSTRUCTION BOOKLET WOODLAND SCENICS®
Contents Introduction............................................................................................................. 3 Kit Contents............................................................................................................. 3 Additional Items...................................................................................................... 4 Special Note............................................................................................................
Introduction River Pass Scenery Kit is a complete landscaping kit, created especially as a companion kit for the River Pass HO Scale Layout Kit, but can be used to landscape any 4x8-foot layout. Included in this kit are: materials to make rocks; base colors and textures to cover your terrain; our Road System; low, medium and high ground covers; Tree Armatures and foliage products for making trees; realistic, one-part water products; and other great scenery products.
Additional Items • • • • • • scissors newspaper liquid detergent measuring cup-16 oz. masking tape mixing bowl • • • • • • Additional Items Needed But Not Included 120, 220 and 600-grit sandpaper sanding block cake pan or paint roller tray drinking straw or eyedropper paintbrush (approx. 2" wide) paintbrush (approx. 1/2" wide) • • • • • • 5 disposable cups-12 oz.
Make Rock Castings Rocks, Tunnel Portals and Culverts A. Turn Lightweight Hydrocal carton sideways and shake back and forth for 30 seconds, rotating carton several times. Open carton and set aside 2 (8 ounce) cups to use later to attach rocks. B. Make a solution of “wet water” by mixing two drops of liquid dish soap with 1 cup of water in Scenic Sprayer. C. Spray the “wet water” inside molds and pour out excess. This will prevent air bubbles in the rock casting.
Install Rock Castings Decide on locations (Page, Fig. 3) and test fit rocks. Push in or cut Plaster Cloth so rocks will fit horizontally (Fig. 4). Remember the rocks look more natural on a steep hillside with strata layers running horizontally. A. Break castings into as many pieces as you wish. This provides variety and gives a natural look. B. Install rocks using the 2 cups of Lightweight Hydrocal you set aside earlier.
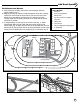
Add Road System Build Roads and Streets A. Plan placement of roads, town areas, road crossings and town square median (Fig. 7). B. Begin by drawing an outline of roads and paved areas with a writing utensil [we recommend the Foam Pencil]. Do this over level areas where you want buildings and wherever you want paved roads. Country roads (for HO scale) should be 2 1/2" wide and city streets should be 4 1/8"wide. C. If using buildings on your layout, test fit them now (Fig. 7).
D. Where roads cross the railroad Fig. 10 tracks, butt strips of Paving Tape Paving Tape up to rails (Fig. 10). E. Also cut strips of Paving Tape to Between fit tightly between the rails Rail (Fig. 10). F. Mix 2 cups of Smooth-it with 3/4 cup water. Riser Incline Track-Bed Track G. Starting at railroad crossings, fill the areas between the Paving Tape with Smooth-It (Fig. 11). H. If mixture seems too thick, add a few drops of water.
B. Where curbs, sidewalks and building foundations are planned, stack two new strips of Paving Tape parallel with the outside edge of the street. Keep Paving Tape strips within 4" of the street edge, because spreader can only accommodate a four-inch strip. C. Mix Smooth-It and begin filling between all roads, streets, curbs and sidewalks. Use Spreader to smooth level with the top of the Paving Tape. D. Allow Smooth-It to dry 30 minutes, then remove all Paving Tape. E.
Landscaping Items Needed • Various Turfs • Talus • Tree Armatures • Bushes/Underbrush • Clump-Foliage • Fine-Leaf Foliage • Field Grass • Hob-e-Tac Fig. 16 ® • Scenic Glue • Sifter cup • Scissors • Eyedropper or straw • Wet water • Scenic Cement Concentrate and sprayer Fig.
Low Ground Cover To create a realistic landscape, add low ground cover. This includes adding the smallest plants, grasses and soil. Initially, use these products sparingly. Later, you may add more to cover up seams, exposed Plaster Cloth and other areas. Sprinkle Blended Turf A. Spray a few square feet of terrain with a mist of Scenic Cement (Fig.18). B. Sprinkle Green Blend Blended Turf over desired areas, allowing portions of Earth Undercoat to be visible (Fig. 19).
Bushes and Underbrush These products are used for creating bushes and shrubs. Bushes tend to grow in “family groups” of one color, so it is best to place like colors in separate bush or shrub arrangements. A. Place Bushes and Underbrush to test appearance. When satisfied with placement, glue into place with Scenic Glue (Fig. 21 and 22). B. Sprinkle on Yellow Grass Fine Turf for highlighting (Fig. 23). C. Lightly spray with Scenic Cement (Fig. 24). Fig. 21 Fig. 22 Fig. 23 Fig.
Fine-Leaf Foliage Trees Fig. 30 A. Repeat Steps A and B under Clump-Foliage Trees. B. For Fine-Leaf Foliage trees, pick, cut or strip pieces off Fine-Leaf Foliage stems (Fig. 30) and press onto branches (Fig. 31). Add Fine-Leaf Foliage until you are satisfied with the look and fullness of the tree. Use some for bushes, shrubs and saplings. C. Sprinkle on Yellow Grass Fine Turf for highlighting (Page 12, Fig. 28). D. Lightly spray the tops of trees with Scenic Cement (Page 12, Fig. 29).
Pour Water Fig. 35 Tape Realistic Water is a one-part product. A. You will need to prevent the Realistic Water from running off the side of the layout. To do so, place a piece of masking tape large enough to catch the water on the side of the layout (Fig. 35). After the water has dried, pull the tape off. B. Pour Realistic Water to a depth of no more than 1/8-inch in the prepared water area. To help coax Realistic Water into small areas, it can be gently pulled or pushed with a toothpick.
Finishing Touches Detailing Your Layout Put more detail on your layout by adding finishing touches. Step back and take a critical look at the layout. Many modelers find that the more landscaping products they add to their layouts, the better. Adding Ballast to the shoulders of the roads, litter in the wooded areas, trash and debris along fence rows, bushes and shrubs around the foundations of buildings, can add realism to your layout.
Flyspecking Dirt and soil collect in many areas, including rock faces and in grassy areas. Woodland Scenics has a special technique called “Flyspecking” that makes adding these details easy. Fig. 45 A. Spray the rock casting with Scenic Cement. Bend a sheet of paper into an “L” shape. B. Place a small amount of Soil Fine Turf on the paper. C. Hold the paper near the rock castings and gently puff on the paper (Fig. 45). This will blow flyspecks of Soil onto the rock castings.
Add Buildings And Details Now that the layout is finished, and you have added your special touches and details, it is time to add buildings. If you have purchased the companion River Pass Building Kits (Fig. 48), you can follow our recommendations for setting the 15 buildings on the layout. Remember, any HO scale buildings may be used, but the River Pass Building Kit has been created especially for the River Pass HO scale layout. Fig.
A Final Word River Pass is the first complete layout kit offered in three separate kits. River Pass Layout Kit #1 (ST1484) is a 4x8-foot lightweight SubTerrain base, which utilizes the foam components of the SubTerrain Lightweight Layout System . Use Risers, Inclines, Profile Boards, Foam Sheets and Plaster Cloth to build the terrain contours. It also includes TrackBed. River Pass Scenery Kit #2 (S1488) includes all the scenery material needed to completely landscape any 4x8-foot layout.
For more information about the complete line of Woodland Scenics products, go to your favorite hobby shop, call 573-346-5555 or visit our Web site at www.woodlandscenics.com. ® Products If you desire additional products, refer to the list below for the Woodland Scenics products that were used to construct the River Pass Scenery Kit. ® Description Item No. Page Description Item No. Page LANDSCAPING SYSTEM ITEMS ROAD SYSTEM ITEMS Paving Tape .........................................
Woodland Scenics • PO Box 98 • Linn Creek, MO 65052 • www.woodlandscenics.