
User Manual


12
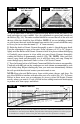
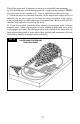
TERRAIN
Terrain can be defined as the earth contours or physical features of a tract of
land. Terrain can include rolling hills and broad valleys, mountains and narrow
canyons, flat plateaus and undulating prairies. The techniques you learn with this
kit can be applied to any layout or model.
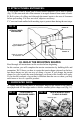
II. CONSTRUCT TERRAIN SUBSTRUCTURE
Before beginning this section, lay out pattern sheets 1 and 2. This will make steps 1-4
easy to understand. Read through all instructions in this section before beginning.
In this section, you will trace and cut out the mountain profiles, gussets, tunnel,
tunnel entrances, and tunnel access support using the patterns provided (on
enclosed pattern sheets) and corrugated cardboard for profile material or Profile
Boards. These pieces will become the substructure or skeleton on which the
terrain features are constructed. (Other materials may be used for mountain
profiles - see Tech Tip below.)
Next, you will glue the profiles in place. Finally, you will attach the tunnel,
tunnel entrances, and tunnel access support to the layout. When the layout is
complete, the tunnel will act as a view block, allowing the train to play peek-a-
boo with the viewer.
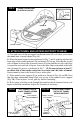
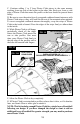
1. TRACE AND CUT OUT TERRAIN PROFILES:
A. Cut out all pattern pieces (A-H) from pattern sheets. NOTE: Cut pattern H on
outside edge only. Fig. 6B.
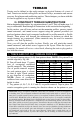
B. You will need about 17 square
feet of corrugated cardboard
(profile material). The minimum
size of profile material required
for each pattern piece is shown
in chart at right. Check patterns
to see direction of corrugation.
NOTE: Grain of corrugated
cardboard runs same direction as
height in chart.
C. Lay pattern (A, B, C, D, E, F and G) on profile material. Tape in place. Be
certain corrugation grain is running the direction shown on the pattern or your
TECH TIP: Large, corrugated cardboard cartons may be available at your local appliance
or bedding store. Cut corrugated cardboard with utility knife, hobby knife or scissors. If you
must piece a profile together from two pieces of corrugated cardboard, butt the joint and tape
on both sides. Hardboard (such as Masonite) may be used in place of corrugated cardboard
for mountain profiles. Woodland Scenics Profile Boards are the perfect product for the profiles.
Add 1/2 inch all around the pattern to compensate for the interlocking feature. You can trim
later. There will be no need to create gussets. Just interlock the pieces and glue all around with
Low Temp Foam Glue Gun (ST1445). Only corrugated cardboard or 1/4" Woodland Scenics
Foam Sheets should be used for the tunnels, due to the need for flexibility. If using hardboard
or foamboard, do not include glue tabs indicated on patterns. Cut hardboard with a saw.
Cut foamboard with a knife or hot wire cutter. Warning: Utility knife or hobby knife can cut
surface under profile material, so protect the surface you are working on with an extra layer
of cardboard.
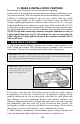
PROFILE MATERIAL REQUIREMENTS
Pattern Width Height
A 18" 8"
B 28" 8"
C 67" 13"
D 28" 13"
E 30" 13"
F 13" 19"
G (2) 4 3/4" 5"
H 6" 5"