
User Manual


19
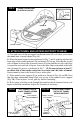
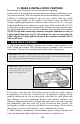
C. Continue adding 1' to 2' long Plaster Cloth pieces in the same manner,
working from one side of the layout to the other side. Each rear, front or side
edge of Plaster Cloth that meets the profile or the base should be pressed down
firmly.
D. Be sure to cover the entire face of corrugated cardboard tunnel entrances with
Plaster Cloth strips so they will look like the rest of the mountain when painted.
To cover corrugated cardboard entrance thoroughly, wrap the strips of Plaster
Cloth to the inside of tunnel. Press the edges of the strips firmly to adhere them
to the inside.
E. While Plaster Cloth is still damp,
periodically check all the edges
where the Plaster Cloth meets the
rear or side profiles. One more
time, press Plaster Cloth firmly to
the top edge of the profiles and to
the base and smooth with fingers.
F. Allow the Plaster Cloth to dry completely.
G. If Plaster Cloth is not attached to profiles or base after it dries, or if it detaches
later, use Scenic Glue or white glue to attach it.
NOTE: This kit includes enough Plaster Cloth for a single layer of hardshell
following our design. If you have changed the design or want to add an
additional layer of hardshell for greater strength, you may need to purchase
more Plaster Cloth.
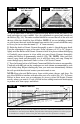
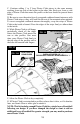
FIG. 14
FIG. 15
FIG. 15A
DIP PLASTER CLOTH
IN WATER
OVERLAP PIECES 1/2" - 1"
REAR EDGE OVERLAP APPROXIMATELY 1"
FOLD OVER ON
REAR EDGES