
Company Brush Cutter User Manual

Dealer Service 29
MAN0963 (2/16/2012)
GEARBOX MAINTENANCE - STYLE B
NOTE: Read this entire section (pages 29- 31) before
starting any repair. Many steps are dependent on each
other. See parts list on pages 62 thru 65 to determine
gearbox style. Style "A" has a crowned top. Style"B"
has a flat top.
1. Fill gearbox with SAE 80W or 90W gear lube.
Proper oil level is between lowest ring and end of
dipstick.
NOTE: Repair to this gearbox is limited to replac-
ing bearings, seals, and gaskets. Replacing gears,
shafts, and a housing is not cost effective. Pur-
chasing a complete gearbox is more economical.
2. Inspect gearbox for leakage and bad bearings.
Leakage is a very serious problem and must be
corrected immediately.
NOTE: Bearing failure is indicated by excessive
noise and side-to-side or end-play in gear shafts.
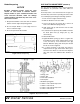
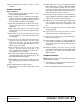
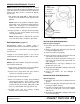
Seal Replacement (Figure 13)
Recommended sealant for gearbox repair is
Permatex
®
Aviation 3D Form-A-Gasket or equivalent.
Leakage can occur at the vertical or horizontal gaskets
and shaft seals.
Leakage at the horizontal gasket or seal can be
repaired without removing the gearbox from the cutter.
Seal Installation
NOTE: Proper seal installation is important. An improp-
erly installed seal will leak.
1. Clean area in housing where seal outer diameter
(OD) seats. Apply a thin coat of Permatex.
2. Inspect area of shaft where seal seats. Remove
any burrs or nicks with an emery cloth.
3. Lubricate gear shaft and seal lips.
4. Place seal squarely on housing, spring-loaded lip
toward housing. Select a piece of pipe or tubing
with an OD that will sit on the outside edge of the
seal but will clear the housing. Tubing with an OD
that is too small will bow seal cage and ruin seal.
5. Carefully press seal into housing, avoiding
distortion to the metal seal cage.
Figure 13. Seal Installation
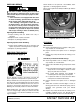
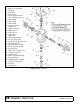
Vertical Shaft Seal Replacement
Refer to Figure 14, page 31.
1. Disconnect and remove the rear driveline from the
gearbox.
2. Remove vent plug (24) and siphon gear lube from
housing through this opening.
3. Remove crossbar (see page 36).
4. Remove protective seal (8) and vertical shaft seal
(18). Replace seal (18) with new seal.
Vertical seal should be recessed in housing. Hori-
zontal seal (19) should be pressed flush with out-
side of housing.
NOTE: Distortion to seal cage or damage to seal
lip will cause seal to leak.
5. Fill gearbox with SAE 80W or 90W gear lube until it
runs out the level plug.
6. Remove and replace any seal damaged in
installation.
Horizontal Shaft Seal Replacement
Refer to Figure 14.
1. Disconnect and remove the rear driveline from the
gearbox.
2. Remove vent plug (24) and siphon gear lube from
housing through this opening.
3. If the leak occurred at either end of horizontal shaft,
remove oil cap (20) and/or oil seal (19). Replace
with new one.
4. Fill gearbox with SAE 80W or 90W gear lube until it
runs out the level plug.
1. Seal
2. Pipe or tube
3. Seal seat
4. Casting
Pipe or tube must
press at outer
edge of seal.
Incorrect
Installation