
Company Chipper User Manual
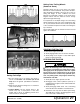


24 Service & Maintenance
MAN0506 (Rev. 9/5/2008)
SERVICE & MAINTENANCE
Before dismounting power unit or performing
any service or maintenance, follow these steps:
disengage power to equipment, lower the 3-point
hitch and all raised components to the ground,
operate valve levers to release any hydraulic pres-
sure, set parking brake, stop engine, remove key,
and unfasten seat belt.
Before working underneath, read manual
instructions, securely block up, and check stability.
Secure blocking prevents equipment from drop-
ping due to hydraulic leak down, hydraulic system
failure, or mechanical component failure.
Keep all persons away from operator control
area while performing adjustments, service, or
maintenance.
Do not handle knives with bare hands. Careless
or improper handling may result in serious injury.
Make sure shields and guards are properly
installed and in good condition. Replace if damaged.
Always wear relatively tight and belted clothing
to avoid getting caught in moving parts. Wear
sturdy, rough-soled work shoes and protective
equipment for eyes, hair, hands, hearing, and head;
and respirator or filter mask where appropriate.
Make certain all movement of equipment com-
ponents has stopped before approaching for ser-
vice.
LUBRICANTS
1. Grease
Use an SAE multi-purpose high temperature
grease with extreme pressure (EP) performance.
An SAE multi-purpose lithium-based grease is also
acceptable.
2. Gearbox Oil
Use an SAE 85W90 gear oil for all operating
conditions. Capacity: 2-1/2 U.S. quarts (110 oz.).
Storing Lubricants
Your unit can operate at top efficiency only if clean
lubricants are used. Use clean containers to handle all
lubricants. Store them in an area protected from dust,
moisture, and other contaminants.
GREASING
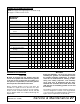
NOTE: Use the Lubrication Service Record, page 27 to
keep a record of all scheduled maintenance.
1. Use a hand-held grease gun for all greasing.
2. Wipe grease fitting with a clean cloth before
greasing to avoid injecting dirt and grit.
3. Replace and repair broken fittings immediately.
4. If fittings will not take grease, remove and clean
thoroughly. Also clean lubricant passageway.
Replace fitting if necessary.
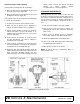
LUBRICATION SCHEDULE
NOTE: Recommendations are based on normal oper-
ating conditions. Severe or unusual conditions may
require more frequent lubrication or oil changes. Refer
to Figure 23.
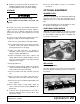
Daily or every 8 hours of operation
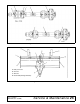
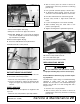
PTO Driveline Lubricate daily or every 8 hours of oper-
ation (every 4 hours if U-joints run at angles). See Fig-
ure 22 for lubrication points.
CAUTION