
Company Chipper User Manual


Assembly 39
MAN0506 (Rev. 9/5/2008)
7. Attach front top link spacer, bolts, and lock nuts to
front of upper mast assembly.
NOTE:
For Quick Hitch Cat II, use spacer in front lower
hole of upper mast assembly.
For Quick Hitch Cat III, use spacer in front upper
hole of upper mast assembly.
Without Quick Hitch, use spacer through top link
pivot in front upper hole of upper mast assembly.
8. Assemble lower 3-point hitch pin assembly,
spacers, and klik pin to lower mast (both sides).
NOTE: For Quick Hitch Cat II & III, place 1-3/4
OD spacer on the inside and 1-7/16 OD spacer on
the outside.
Figure 42. Floating Upper Mast Installed
ALL UNITS
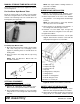
1. Install PTO driveline by sliding the yoke with the
slip clutch over the input shaft (Figure 43).
2. Tighten interlocking clamp bolts to their specified
torque.
Figure 43. Gearbox Input Shaft
3. Install front parking stands (Figure 44), using L-pin
and hair pin cotter.
Figure 44. Front Stands Installed
PULL-TYPE HITCH INSTALLATION
(Pull-type units only)
1. Mount hitch to 3-point lower mounts, using pins
and Klik pins.
2. Install ratchet. Be sure to install retaining pins.
3. Attach clevis or pin to hitch tongue (See page 48
for parts breakdown.)
4. Attach tow chain to hitch.
Figure 45. Pull-Type Hitch Installed
1
7082Z