
Operator`s manual


22 Owner Service
MAN0500 (3/24/2006)
NOTE: Blade should be snug but should swivel on pin
without having to exert excessive force. Blade should
not move more than a 1/4 inch up or down at the tip.
Keep any spacers not used in the installation as
replacements or for future installation.
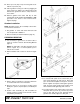
Blade Sharpening
IMPORTANT
■ When sharpening blades, grind the same
amount on each blade to maintain balance.
Replace blades in pairs. Unbalanced blades will
cause excessive vibration, which can damage
gearbox bearings. Vibration may also cause struc-
tural cracks to cutter.
1. Sharpen both blades at the same time to maintain
balance. Follow original sharpening pattern.
2. Do not sharpen blade to a razor edge—leave at
least a 1/16" blunt edge.
3. Do not sharpen back side of blade.
Figure 8. Blade Sharpening
SHIELD REPAIR
Full chain or rubber shielding, designed to
reduce the possibility of thrown objects, must be
installed when operating in populated areas or
other areas where thrown objects could injure peo-
ple or damage property. If this machine is not
equipped with full chain or rubber shielding, opera-
tion must be stopped when anyone comes within
several hundred feet.
Repairing Rubber Shielding
1. Inspect belting and rear bands each day of
operation.
2. Replace if bent, cracked, or broken.
Repairing Chain Shielding
Inspect chain shielding each day of operation and
replace any broken or missing chains as required.
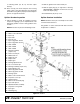
SLIP CLUTCH ADJUSTMENT
The slip clutch is designed to slip so that the gearbox
and driveline are protected if the cutter strikes an
obstruction.
A new slip clutch or one that has been in storage over
the winter may seize. Before operating the cutter, make
sure it will slip by performing the following operation:
1. Turn off tractor engine and remove key.
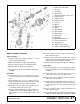
2. Tighten four nuts (12) to remove pressure from the
clutch plates (2). Repeat for all three clutches.
3. Start tractor at low throttle and slowly engage PTO
and allow clutches to slip for 5 seconds. Disengage
PTO and turn off tractor engine.
4. If clutches slip freely, completely loosen nuts (12).
5. If clutch does not slip freely, disassemble and clean
plates (4, 6, & 7), flange yoke (1), and clutch hub
(3).
6. Reassemble clutch.
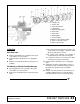
7. Tighten Belleville spring (5) with nuts (11) until it is
against the thrust plate (4) of the clutch. Back off
each of the four nuts (11) until gap between
Belleville spring and thrust plate is 1/8" as shown in
Figure 9.
8. If a clutch continues to slip when the spring is
compressed to 1/8" gap, check friction discs (2) for
excessive wear. Discs are 1/8" when new. Replace
discs after 1/16" wear. Minimum disc thickness is
1/16".
NOTE: When storing cutter for long periods of time,
relieve the pressure on the clutch discs by tightening
the four nuts (12) on each clutch. Completely loosen
nuts (12) to return to service.
(Rev. 7/10/2006)