
Specifications


-27-
Model W1811 (For Machines Mfd. Since 6/14)
SETUP
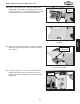
34. Install the splitter/riving knife as shown in Figure
36, but do not tighten the mounting bolt yet.
Note: While the mounting bolt is loose, the splitter/
riving knife can be adjusted up or down.
Figure 36. Installing splitter/riving knife.
Figure 37. Adjusting splitter/riving knife
spacing.
35. Adjust the splitter/riving knife approximately
1
⁄8"
away from the main blade, using a
1
⁄8" or 3mm hex
wrench as a guide (Figure 37), and make sure the
top of the splitter/riving knife is positioned below
the blade's highest point of rotation, as shown in
Figure 51 on Page 35.
36. Use a straightedge to make sure the splitter/riving
knife and scoring blade are aligned with the main
blade.
— The splitter/riving knife position can be changed
by adjusting the set screws at the splitter/riving
knife mounting block. Refer to Page 73 for more
details.
— The scoring blade alignment can be changed by
adjusting the set screws accessible through the
table top (see Figure 38 or refer to Page 42).
Figure 38. Access holes for scoring blade
adjustment controls.
Scoring Controls Lock
Scoring Blade Elevation
Scoring Blade
Alignment