
User manual


-31-
M1109 Combo Lathe/Mill
OPERATIONS
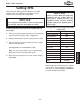
Figure 48. Headstock handle.
The quill feed is controlled by the handle on the right
of the headstock, and a lock bolt on the left side of the
headstock (Figure
49).
To use the quill, do these steps
:
1. Unlock the quill feed lock bolt to release the quill.
2. For drilling, pull the handle toward you and the quill
will feed down toward the workpiece.
Note: The quill feed handle is spring loaded so that
it will automatically return to its upmost vertical
position. DO NOT let go of the handle at the end of
an operation to prevent damage to the quill.
3. For milling, hold the quill at a particular depth and
tighten the quill lock bolt.
Figure
49. Quill lock.
Quill Travel
The mill headstock head can be raised and lowered verti-
cally, or rotated left or right up to 90º degrees to position
the cutting tool next to the workpiece.
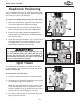
To position the spindle head vertically, do these steps:
1. Make sure the spindle is stopped and the work area
is free from obstructions before proceeding.
2. Loosen both column lock levers so that the head-
stock can freely slide on the column (
Figure 47).
3. Rotate the mill height handwheel (Figure 47) to
raise or lower the headstock to the desired position
then lock the levers.
4. While supporting the headstock, use a 17mm wrench
and loosen both left and right headstock tilt lock
nuts (
Figure 47), then tilt the headstock to your
desired angle. Retighten the lock nuts.
Headstock Positioning
Figure 47. Headstock lock levers.
Headstock
Tilt Lock Nut
Lock
Levers
Tilt
Scale
The headstock is heavy. Make sure that you sup-
port the headstock before you loosen the lock nuts.
Ignoring this warning may allow the headstock to
uncontrollably swing over to the right or left causing
injury or severe lathe/mill damage.
Quill
Lock Bolt