
International, Inc. Saw User Manual


-12-
Model W1706 (Mfg. Since 8/10)
SETUP
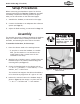
5. Remove the insert and the table slot locking pin
from the table.
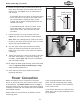
6. Line up the table slot with the blade, position the
table so that the blade is in the center cut-out.
7. Rotate the table so that the table slot faces to
the right, then insert the table bolts through the
mounting holes in the trunnion base, as shown in
Figure 9.
8. Secure the table by fully threading the two trunnion
lock knobs onto the table bolts.
9. Replace the table insert and locking pin.
Important: Make sure you re-install the table slot
locking pin. This pin keeps the table surfaces on
either side of the slot even with the changes in
operating pressures and temperature changes.
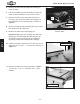
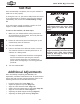
10. Attach the smaller rear fence rail to the rear of the
table with (2) 1/4"-20 x
5
⁄8" cap screws, as shown in
Figure 10.
Figure 9. Installing the table onto the
trunnion base.
Table
Bolt
Lock Knob
Figure 10. Installing rear fence rail.
Rear Fence Rail
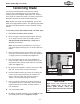
Figure 11. Installing front fence rail.
Front Fence Rail
11. Attach the larger front fence rail shown in Figure
11, with (2)
1
⁄4"-20 x
3
⁄4" hex bolts and
1
⁄4" flat
washers.