MODEL W1776 2" NAILER KIT OWNER'S MANUAL Phone: (360) 734-3482 • Online Technical Support: tech-support@shopfox.biz COPYRIGHT © JUNE, 2007 BY WOODSTOCK INTERNATIONAL, INC., REVISED DECEMBER, 2007 (JM) WARNING: NO PORTION OF THIS MANUAL MAY BE REPRODUCED IN ANY SHAPE OR FORM WITHOUT THE WRITTEN APPROVAL OF WOODSTOCK INTERNATIONAL, INC.
This manual provides critical safety instructions on the proper setup, operation, maintenance, and service of this machine/equipment. Failure to read, understand, and follow the instructions given in this manual may result in serious personal injury, including amputation, electrocution, or death. The owner of this machine/equipment is solely responsible for its safe use.
Model W1776 2" Nailer Kit SAFETY For Your Own Safety Read Instruction Manual Before Operating This Equipment The purpose of safety symbols is to attract your attention to possible hazardous conditions. This manual uses a series of symbols and signal words which are intended to convey the level of importance of the safety messages. The progression of symbols is described below.
Model W1776 2" Nailer Kit Safety Instructions for Pneumatic Tools 10. USE PROPER AIR HOSE for the tool. Make sure your air hose is in good condition and is long enough to reach your work without stretching. 17. DISCONNECT TOOLS before servicing, changing accessories, or moving to another location. 11. WEAR PROPER APPAREL. Do not wear loose clothing, gloves, neckties, rings, bracelets, or other jewelry which may get caught in moving parts. Non-slip footwear is recommended.
Model W1776 2" Nailer Kit Additional Safety for Nailers/Staplers 1. HAND INJURIES: Do not place your hands near the nail point of entry. A nail can deflect and tear through the surface of the workpiece, puncturing your hand or fingers. 5. HOSE USAGE: Make sure your air hose is designed for the tool in use, is in good condition, and is long enough to reach your work without stretching. However, an overly long air hose in the work area may be a tripping hazard. 2.
Model W1776 2" Nailer Kit INTRODUCTION Woodstock Technical Support Tool Data Nail Size ............................. 18 Gauge Nail Length.............................. 5⁄8"–2" Magazine Capacity ................. 100 Nails Air Inlet................................ 1⁄4" NPT Weight ................................. 3.4 lbs. Operating Pressure ............... 60–100 PSI This Model W1776 2" Nailer Kit has been specially designed to provide many years of trouble-free service.
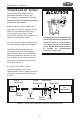
Model W1776 2" Nailer Kit Compressed Air System The Model W1776 is designed to be operated at 60-100 PSI using clean, dry, regulated, compressed air. Do not exceed the 120 PSI maximum operating pressure for your model. Before using your nailer, regulate the air pressure to find the optimum setting within the specified operating range. Start by testing the nailer at a low setting, then increase the air pressure as needed for satisfactory results.
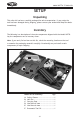
Model W1776 2" Nailer Kit SETUP Unpacking This nailer kit has been carefully packaged for safe transportation. If you notice the tool has been damaged during shipping, please contact your authorized Shop Fox dealer immediately. Inventory The following is a description of the main components shipped with the Model W1776. Lay the components out to inventory them. Note: If you can't find an item on this list, check the mounting location on the tool or examine the packaging materials carefully.
Safety Nose Model W1776 2" Nailer Kit Safety Nose Mechanism — If the nailer fires when the trigger is pulled, without the safety nose mechanism being depressed, then the nailer is not working properly. A safety mechanism on the nose of the nailer protects against accidental firing. When the trigger is pressed, the nailer will not fire until the safety nose mechanism is depressed. — If you find that the safety nose mechanism is not working properly, check the lubrication of its sliding components.
Model W1776 2" Nailer Kit OPERATIONS Loading When replacing nails in your Model W1776, follow these guidelines: Gauge: ........................................18 Length: .................................. 5⁄8"–2" Capacity: ................................... 100 To load your nailer, do these steps: Figure 3. Loading nails into magazine. 1. DISCONNECT NAILER FROM THE AIR SUPPLY! 4. Slide the nails all the way down to the nose of the nailer. 2.
Model W1776 2" Nailer Kit Adjusting Depth 3. Depress the safety nose mechanism against your workpiece. A depth adjustment knob is attached to the nose for setting the nail depth. 4. Before pulling the trigger, make sure your free hand and other body parts are positioned out of the way of a potential path of a nail in case of deflection. To adjust the nail depth, do these steps: 1.
Model W1776 2" Nailer Kit Clearing Jammed Nails Nose Release Lever A jammed nail must be cleared before using the nailer again. To clear a jammed nail from the discharge area, do these steps: 1. DISCONNECT NAILER FROM THE AIR SUPPLY! Nose Cover Figure 6. Nose opened to clear jam. 2. Unlatch and pull the magazine all the way back. 5. Remove the jammed nail with a tool that will fit in the slot on the underside of the nose, such as needle nose pliers. 3. Remove the nail stick from the magazine. 6.
Model W1776 2" Nailer Kit Replacing Pistons/ O-Rings 6. Open the nose cover as if to clear a jammed nail. 7. Watch the discharge area and push the top of the piston with your finger. You will see the piston shaft slide down the discharge area. Under heavy use, a piston or piston shaft may wear out. Replacement is quick and easy. Contact your authorized Shop Fox dealer to obtain the Piston Repair Kit (Part Number X1776087) or the complete O-Ring Repair Kit (Part Number X1776088). 8.
Model W1776 2" Nailer Kit CLEANING & LUBRICATION Cleaning Lubricating Standard pneumatic tool oil has been included with your new Shop Fox nailer to help maintain its useful life. Place two to six drops of oil in the nailer air inlet (as shown in Figure 7) before every use, or after 2 hours of continuous use. Use a good solvent to clean the nose assembly of the nailer. Always be sure that the nailer is dry before using it again. Do not allow dust, chips, sand, etc.
Model W1776 2" Nailer Kit W1776 PARTS BREAKDOWN �� �� �� �� � �� �� �� �� �� �� �� �� �� �� �� �� �� �� �� �� �� �� �� �� �� �� �� �� �� �� �� �� �� �� �� �� �� �� �� �� �� �� �� �� �� �� �� �� � �� �� �� �� �� �� �� �� �� �� � � � � �� �� �� �� �� �� �� �� �� �� �� �� �� �� �� �� �� �� �� �� �� �� �� �� � � � �� �� �� -13-
Model W1776 2" Nailer Kit W1776 PARTS LIST REF PART�# DESCRIPTION REF PART�# DESCRIPTION 1 XPAW04M HEX�WRENCH�4MM 45 COMPRESSION�SPRING 2 XPAW03M HEX�WRENCH�3MM 46 X1776046 O-RING�13.2�X�1.9 3 X1776003 CARRYING�CASE 47 X1776047 TRIGGER�VALVE�SEAT 4 X1776004 AIR�INLET�PLUG�1/4"�NPT 48 X1776048 O-RING�11.2�X�1.6 5 X1776005 END�CAP 49 X1776049 SWITCH�SHAFT 6 X1776006 O-RING�40�X�2.65 50 X1776050 O-RING�1.9�X�1.
Model W1776 2" Nailer Kit Troubleshooting Symptom Possible Cause Possible Solution Air leaking at trigger valve area. 1. O-rings in trigger valve housing are damaged. 1. O-rings must be replaced & operation of safety nose must be checked. Air leaking between 1. Loose screws in housing. housing and hose 2. Damaged O-ring. 3. Loose air fitting. 1. Tighten screws. 2. Replace O-ring 3. Tighten air fitting & use teflon tape. Air leaking between 1. Damaged seal. housing and cap. 1.
�������������������� ������������������������������������������������������������������������������������� �������������������������������������������������������������������������������� ����������������������������������������������������������������������������������������� �������������������������������������������������������������������������������� ��������������������������������������������������������������������������������������� �����������������������������������������������������������������
Warranty Registration Name ___________________________________________________________________________________ Street __________________________________________________________________________________ City _________________________ State ___________________________Zip ________________________ Phone # ______________________ Email __________________________Invoice # ___________________ Model #_________Serial #______________Dealer Name__________________Purchase Date___________ CUT ALONG DOTTED LINE The follo
FOLD ALONG DOTTED LINE Place Stamp Here WOODSTOCK INTERNATIONAL INC. P.O.