
International, Inc. Biscuit Joiner User Manual


Shop Fox
®
Fence
-5-
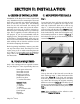
SSEECCTTIIOONN IIII:: IINNSSTTAALLLLAATTIIOONN
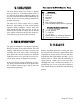
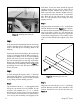
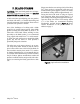
FFiigguurree 11..
Attaching the back rail.
CC.. MMOOUUNNTTIINNGG TTHHEE RRAAIILLSS
SStteepp 11..
Locate the back fence rail (the rail with the oval
cut-outs) and set it against the rear edge of the
table saw. Position the back rail so that its top
edge is
1
⁄16" below the table top and the oval cut-
outs are in line with the miter slots.
FFiigguurree 11..
If the
back rail mounting holes line up with the existing
holes in the table top, attach the rail using the orig-
inal mounting hardware as shown in
FFiigguurree 33..
If
the holes do not line up, use the mounting method
covered in
SStteeppss 33--66..
AA.. OORRDDEERR OOFF IINNSSTTAALLLLAATTIIOONN
Installation of the Shop Fox
®
Fence is quick and
easy. Installation involves mounting the front and
back rails to your table saw and then attaching the
fence to the rails. On some saws, the mounting
holes for the rails will match the existing rail
mounting holes. On other saws where the mount-
ing holes do not line up, it will be necessary to
drill and tap new mounting holes in your table top
edge. We’ve supplied you with a drill and tap for
this purpose. If you are uncomfortable with the
tapping process, through-bolting may be used as
an alternative. If through-bolting, make sure you
have access to the backside of the hole and that the
table webbing will not interfere with the nut and
bolt before attempting this method.
Before beginning installation, measure your table
saw top from front to back. The Shop Fox
®
Fence
comes preset to fit on tables measuring between
26
5
⁄8'' and 27
1
⁄4''. If your table top is not within this
range, refer to the
TTrroouubblleesshhoooottiinngg GGuuiiddee
for fur-
ther instruction.
BB.. TTOOOOLLSS RREEQQUUIIRREEDD
Only a few common tools are required to assem-
ble your Shop Fox
®
Fence. Specifically, these are:
14mm open end wrench
5mm Allen wrench
3mm Allen wrench
Regular screwdriver
6" adjustable wrench
Needle nose pliers
7
⁄16'' socket and ratchet
OOppttiioonnaall TToooollss::
3
⁄8''-16 tap
5
⁄16'' drill bit
1
⁄8'' drill bit
3
⁄8'' or
1
⁄2'' Electric drill
Center punch
Hammer
Tap handle
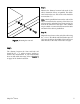
SStteepp 22..
Line up the ends of the front rail even with the
back. Set the top edge
1
⁄
16" below the bottom of the
miter slots.
FFiigguurree 22..
If the front rail mounting
holes line up with the existing holes in the table
top, attach the rail using the original mounting
hardware as shown in
FFiigguurree 33..
If the holes do not
line up, use the mounting method covered in
SStteeppss
33--66..
If both rails are mounted at this point, skip to
SStteepp 77..
NNoottee::
Delay installation of the adhesive scale
(#56) until
SSeeccttiioonn IIIIII PPaarrtt GG..