
International, Inc. Biscuit Joiner User Manual


-8- Shop Fox
®
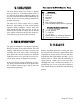
Fence
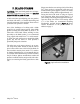
FFiigguurree 55..
Extension table.
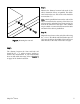
FFiigguurree 66..
Extension table and extension rails
assembled.
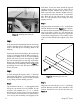
DD.. OOPPTTIIOONNAALL EEXXTT.. RRAAIILLSS
An extended rail set is available for the Shop Fox
®
Fence increasing the rip capacity to the right of the
blade to 49''. They are mounted in the same man-
ner as the standard rails.
An extension table (
FFiigguurree 55..
) must be mounted
between the fence extension rails to properly sup-
port the rails as well as the workpiece. The exten-
sion table must fit in the gap between the rails per-
fectly or the rails will be bowed. Remove the right
side table saw wing and bolt the extension table in
place using the existing holes for the wing. Extra
holes will need to be drilled in the rails to secure
the extension table at the right end.
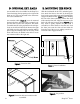
FFiigguurree 77..
Fence installation.
27"±
1
⁄4"
FFiigguurree 88..
Jaw position.
EE.. MMOOUUNNTTIINNGG TTHHEE FFEENNCCEE
With the lock handle in the ''UP'' (unlocked) posi-
tion, attach the fence to the rails by skewing the
fence so the groove in the rear spring loaded roller
engages the back rail first.
FFiigguurree 77..
Then, holding
the rear of the fence stationary, roll the first front
roller onto the front rail. Align the rear jaws so the
back rail will pass between them.
FFiigguurree 88..
You
may need to gently separate the jaws with a
screwdriver to allow them to clear the rail. Feed
the front jaws onto the front rail and slide the
fence the rest of the way on, making sure the sec-
ond front roller engages securely.