
User Manual
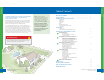

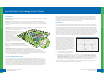
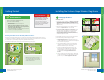

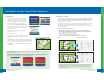


Table Of Contents

START
END
13
Placing Fence Boundary Training Flags: ( See Illustration E )
1. Use the blue flag to mark your starting point. Place boundary flags in the
ground, 6 feet apart from one another to establish the desired perimeter
of your boundary. You do not need to place flags across driveways.
2. Using the Controller, select “Fence” from the main menu (see Screen 3.3).
3. Select “Add Fence” (see Screen 3.4).
4. Once you have confirmed that all flags are in the proper position, press
“Complete” (see Screen 3.5).
NOTE : These flags represent the desired location of your wireless
fence and will be used later to train your dog. Be sure that the flags
form an enclosed area and that your house is inside the boundary.
14
Screen 3.3
Screen 3.4
When recording your fence boundary, keep the Controller over the flags at all times
and between your body and the Bases as your body may affect the signal and
cause the boundary to shift (see Factors Affecting Signal Strength on Page 36).
1. Starting at the blue flag, hold the Controller at waist level over the flag, wait 5
seconds and press “Record” (see Screen 3.6).
2. Walk the flag line (see Illustration E) at a SLOW deliberate pace until you reach
the blue flag and press “Done” (see Screen 3.7). Slow down coming around
corners. Stop for 1 second at each corner if you want the system to make a sharp
corner point.
3. A Congratulatory screen will appear. Press “NEXT”.
4. When viewing the Wireless Fence Tracker, the Fence Boundary will be in green.
The blue circles track your Controller and should closely, but not perfectly overlay
the green line where you recorded the fence (see Figure 3.0). You should
confirm your Fence Boundary location before making any decisions to remove
and re-record your fence. You will confirm your Fence Boundary location after
you install a Collar.
Screen 3.5
Recording the Fence Boundary/Trigger Zone:
PAUSE FEATURE NOTE : During fence recording, you can press “Pause”
(see Screen 3.7) to stop, go around an object (such as a shed or
other large object), and record the Fence Boundary through the object
(see Illustration D). After you walk around the object, wait 5 seconds and
then press “Continue” to continue recording your Fence (see Screen 3.8).
Screen 3.8
Screen 3.7
Screen 3.6
Setting Up the Fence Boundary/
Trigger Zone
2
Setting Up the Fence Boundary/Trigger Zone
Setting Up the Fence Boundary/Trigger Zone
Illustration E
Installing the Custom-Shape Wireless Dog Fence
Havahart
®
Custom-Shape Wireless Dog Fence
www.HavahartWireless.com
Havahart
®
Custom-Shape Wireless Dog Fence
1-800-800-1819, Option 1
Your Fence Boundary / Trigger Zone
should be NO closer than 10 feet to ANY
ROAD, SIDEWALK OR THOROUGHFARE
FOR YOUR DOG’S SAFETY.
!
IMPORTANT MESSAGE
Removing the Fence Boundary/Trigger Zone:
Should you have the need to remove your Fence Boundary (you add another building to
your property or simply want to change your Fence Boundary), follow these steps:
1. Using the Controller, select “Fence” from the main menu (see Screen 4.2).
2. Select “Remove Fence” (see Screen 4.0).
3. Press “Yes” (see Screen 4.1a). A Congratulatory screen will appear
briefly (see Screen 4.1b) and return you to adding a fence.
Screen 4.2
Screen 4.0
Screen 4.1a
Screen 4.1b
Illustration D
SHED
Pause
Wait 5 seconds,
then Continue
The Pause feature enables you to walk around objects and
close your fence boundary through them.
Figure 3.0