
User's Manual


PAGE 5
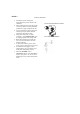
MODE GUIDE
(DIAGRAM OF BACK OF UNIT WITH #S THAT CORRESPOND TO LIST BELOW)
(NEED DIAGRAM)
1. SPRINKLER Mode: Spray Away immediately and continuously sprays water. You may choose
to STOP the sprinkler, or set a 15, 30, or 60-minute timer with your remote control, after which
time the sprinkler will automatically stop. Spray Away does not detect movement in this mode.
2. ON Mode: Spray Away acts as a motion-activated sprinkler, and also responds to remote
sprinkler commands.
• To use as a motion-activated sprinkler, choose your ideal sensitivity based upon the charts on page
(#). Spray Away will always remember your most recently selected sensitivity, unless you replace
the batteries, in which case the sensitivity is automatically set to 5.
• To use as a sprinkler, select the amount of time you wish for Spray Away to continuously spray
(15, 30 or 60 minutes). Stop the sprinkler by pressing STOP or selecting a sensitivity, and Spray
Away will go back to detecting and repelling animals.
3. OFF Mode: Spray Away is off and does not respond to the remote control.
PAGE 6
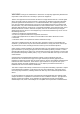
REMOTE GUIDE
(DIAGRAM OF REMOTE WITH #S THAT CORRESPOND TO LIST BELOW)
(NEED DIAGRAM)
(SPRINKLER)
1. STOP: Stops the sprinkler from continuously spraying.
2. (mins): Commands Spray Away to continuously spray for 15, 30 or 60 minutes, unless interrupted
by another remote command.
(SENSITIVITY)
3. ON/OFF: Turns the infrared sensor on or off, only for use in ON mode.
4. Sensitivity: Communicates proper sensitivity level to Spray Away. See chart on page (#). Only for
use in ON mode.
5. LED light: Illuminates when a signal is sent to the unit. If you do not see illumination when a
button is pressed, replace the batteries.
Note: The remote control best communicates with Spray Away at a distance of 0-90 feet. When the
unit successfully receives a signal from the remote, the indicator light will blink for one second to
acknowledge the signal. If the indicator light does not blink when you press a button on your
remote, try communicating closer to the unit. If that does not work, check the batteries of your unit
and of the remote control.
PAGE 7
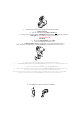
ASSEMBLY GUIDE
1. Attach Sprinkler Head
• Attach sprinkler head lightly by hand to the top of unit body.
• Fully tighten sprinkler head by turning clockwise with the provided plastic wrench.
Note: Using tools other than the provided wrench will damage the unit and result in leaking and
malfunction.