MODEL PORTI-P340 WOOSIM SYSTEMS Inc. #501, Daerung Technotown 3th, 448, Gasan-Dong, GeumChun-Ku, Seoul, Korea Tel : +82-2-2107-3700 Fax : +82-2-2107-3707 URL: http://www.woosim.
Copyright PORTI-P340 THERMAL PRINTER operator’s manual. Copyright ⓒ2007 by Woosim Systems Inc. All rights reserved. The information contained in this manual is the property of Woosim Systems Inc. And may not be reproduced in whole or in part without the prior written permission of Woosim System Inc. Trademark a registered trademark of Woosim Systems Inc. All other trademark are the properties of their respective companies. Caution Some semiconductor devices are easily damaged by static electricity.
Introduction The PORTI-P340 is an extremely simple and functional thermal printer. It is the ideal solution for applications which require the immediate printing of data on a paper, whether they be of an industrial,professional or laboratory nature. Medical analyzer, Industrial instrument, Recorder, Geological analyzer, Underground analyzer, Chemical analyzer, Metallic analyzer, etc. The general features of PORTI-P340 printer are as follows: X Ultra small size rack mount printer.
Operating Precautions Please follow the precautions below to enjoy and maintain the full performance of the printer. X Using the Printer ● Be careful not to drop or bump the printer on a hard surface. ● Do not install the printer in direct sunlight or such areas.
CONTENTS 1. Outline ............................................................................................................................................6 1.1. Model classifications .................................................................................................................6 1.2. Product Part Number System.....................................................................................................6 1.3. Specifications ......................................................
1. Outline 1.1. Model classifications ( PORTI–P340 ) ( ) Model name Interface None : UART Power None : DC 9V 1.2. Product Part Number System Model name 2. PORTI-SC30 Interface Spec. Wired S40 SC30 W25 . . . Example) 1. PORTI-S40 / Serial/Bluetooth Wireless A RS-232C 1 Bluetooth B TTL 2 IrDA C USB 3 HPIR D RS-485 0 None E Parallel Z None Part No. ⇒ S40/A1 Bluetooth Only Part No. ⇒ SC30/Z1 http://www.woosim.
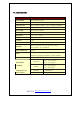
1.3. Specifications Item Specification Print method Direct thermal line printing Characters per line 64cpl (MAX) Character size Eng. : 9×24dots, 12×24dots Resolution 203dpi, 8dots/mm Print width 3-inch (72mm, 576dots) Print speed 40mm/sec Dimension 110 × 77.7 × 48 mm Weight 300g (including paper roll) Interface UART Paper roll Thermal paper roll (80mm wide, 38ø) Kor.
2. Setting up the printer 2.1. Printer & Accessories When unpacking your printer box make sure it contains the printer and all accessories. If any accessories are missing or damage, please contact your dealer for assistance. Roll paper PORTI-P340 http://www.woosim.
2.2. Printer Features http://www.woosim.
2.3. Installation http://www.woosim.
2.4. Replacing paper roll Note : Be sure to use paper rolls that meet the specifications. Do not use paper rolls that have the paper glued to the core because the printer cannot detect the paper end correctly. 1. Make sure that the printer is not receiving data; otherwise, data may be lost. 2. Open the paper roll cover using your finger on both side of printer and remove the remaining paper. 3. Insert a new paper roll as shown. 4. Tear the excess paper off using the edge of paper door as a tear bar.
2.5. Set operation mode 1. Press the Mode Button until the Error Lamp twinkles 5 times 2.
→ Press the Mode Button one time, the Error Lamp twinkles 2 times. (The Parity bit has set to even parity bit.) Press the Feed Button one time, the Power Lamp twinkles 5 times and the Error Lamp twinkles 1 time.
MODE Communication Port Baud Rate Data Bit Parity Bit Stop Bit Density Mark Sensor POWER Lamp ERROR Lamp (Green) (Red) 1 2 3 4 5 6 7 8 Option 1 UART 2 Protocol UART 1 9600 bps 2 19200 bps 3 38400 bps 4 57600 bps 5 115200 bps 1 7 Data bit 2 8 Data bit 1 No Parity 2 Even Parity 3 Odd Parity 1 1 Stop Bit 2 2 Stop Bit 1 Density Low 2 Density Medium 3 Density High 1 No use 2 Use 1 Low 2 Medium1 3 Medium2 4 High TABLE 1 http://www.woosim.
2.6. Specified power supply The following specifications are requested for power supply. Input : DC 9V / Max 3A Avoid using power supply which its power capacity of power current is extremely high. http://www.woosim.
3. Interface 3.1. UART The PORTI-P340 printer has UART interface and power connector is connected by 6 pin female connector. In the following table, the signals present on the connector are listed: Pin no. Signal name Direction Function 1 INPUT 2 TxD Output Transmit Data 3 RxD Input Receive Data 4 N.C 5 N.C 6 GND 9VDC/3A Ground Applicable connector : MOLEX 5264-06P or equivalent. WARNING A wrong connection of power supply connector could be damage the printer.
4. Using the printer 4.1. Control panel X Button - FEED : When the printer is on, paper can be feed manually by pressing and holding the FEED button for more than one second. - MODE : MODE Button is for use to change communication mode. Do not operate the mode button without instructions. X Panel lamp - Power(Green) : Printer is ON and ready to receive data. - Error (Red) : Indicates a fault condition or a printer error. (i.e : no paper, paper cover opened. etc.) http://www.woosim.
4.2. The self test The Self-Test checks whether the printer has any problems. If the printer does not function properly, contact your dealer. For Self-Test, turn on the power while holding down the FEED Button. The Self-Test checks the following : 1) Make sure paper roll has been installed properly. 2) The Self-Test prints the current printer status, which provides the control ROM version and the communication method setting.
5. Consumable Parts 5.1. Recommended paper Type : Thermal Paper Paper width : 80mm Paper thickness : 60±5㎛ Outer diameter : Ø38mm or less Recording side : Outside of roll Cautions 1. Do not paste the paper to the core. And the roll paper which has near end mark printing on its near end is recommended. 2. Chemicals or oil may change the color of paper, or printed characters may fade. 3. Change of paper color starts from approx . 70℃. Pay attention to heat, humidity and sun light. 4.