GGGGGGGGGG G G GG G G MODEL G G PORTI-WP40 (PANEL PRINTER) G G G G G G G G G G G G G G G G G G G G G G G G G G WOOSIM SYSTEMS Inc. #501, Daerung Technotown 3th, 448, Gasan-Dong, GeumChun-Ku, Seoul, Korea Tel : +82-2-2107-3700 Fax : +82-2-2107-3707 URL: http://www.woosim.
G G Copyright PORTI-WP40 panel printer operator’s manual. G Copyright Ꮧ2006 by Woosim System Inc. G All rights reserved. G The information contained in this manual is the property of Woosim System Inc. G And may not be reproduced in whole or in part without the prior written permission of G Woosim System Inc࣋ G G G Trademark G a registered trademark of Woosim System Inc. G G All other trademark are the properties of their respective companies.
FCC Compliance Statements Note: This equipment has been tested and found to comply with the limits for a Class B digital device, pursuant to part 15 of the FCC Rules. These limits are designed to provide reasonable protection against harmful interference in a residential installation. This equipment generates, uses and can radiate radio frequency energy and, if not installed and used in accordance with the instructions, may cause harmful interference to radio communications.
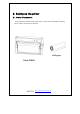
G G Introduction The PORTI-WP40 is an extremely simple and functional panel printer. G It is the ideal solution for applications which require the immediate printing of data on G a paper, whether they be of an industrial, G professional or laboratory nature. G G Medical analyzer, Industrial instrument, Recorder, Geological analyzer, Underground G analyzer, Chemical analyzer, Metallic analyzer, etc.
G Operating Precautions G G Please follow the precautions below to enjoy and maintain the full performance of the printer. G G X Using the Printer G G G Ɣ Be careful not to drop or bump the printer on a hard surface. Ɣ Do not install the printer in direct sunlight or such areas.
CONTENTS 1. Outline ............................................................................................................................................6G 1.1. Model classifications .................................................................................................................6G 1.2. Specifications ............................................................................................................................7G 2. Setting up the printer .................................
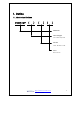
XUGvG XUXUGtGG G G G G G G wvy{pˀ~wG G OG G G PG G G OG G G PG G OG G G PG G G Model name G G Size of roll paper G 40 : 113mm wide, 40 Ø G G Interface G None : RS-232C or TTL G G Power G None : DC 9V G G G G G G G G G G G G G G G G G aVVUUG YWW^TWZTY]G ]
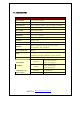
XUYUGzG G G G G G G G Item Specification Print method Direct thermal line printing Characters per line 92cpl (MAX) Character size Eng. : 9Ý24dots, 12Ý24dots Resolution 203dpi, 8dots/mm Print width 4-inch (104mm, 832dots) Print speed 40mm/sec Dimension 143 Ý 77.7 Ý 46.7 mm Weight 340g (including paper roll) Interface RS-232C or TTL Paper roll Thermal paper roll (113mm wide, 40ø) Kor.
YUGzGGGG YUXUGwGMGhG G G G G Your printer box should include these items. If any items are damaged or missing, please contact your dealer for assistance.
YUYUGwGmG G G G G G G G G G G G G G G G G G G G G G G G G G G G G G G G G aVVUUG YWW^TWZTY]G `
YUZUGwGpG G G G G G G G G G G G G G G G G G G G G G G G G G G G G G G G aVVUUG YWW^TWZTY]G XW
YU[UGyGGG G Note : Be sure to use paper rolls that meet the specifications. G G Do not use paper rolls that have the paper glued to the G core because the printer cannot detect the paper end G correctly. G 1. Make sure that the printer is not receiving data; otherwise, data may be lost. G 2. Open the paper roll cover using your finger on both side of printer and remove G the remaining paper. G G G G G G G G G G G G G 3. Insert a new paper roll as shown.
YU\UGzGGG G 1. Press the Mode Button until the Error Lamp twinkles 5 times G 2.
G G G G G o Press the Mode Button one time, the Error Lamp twinkles 2 times. (The Parity bit has set to even parity bit.) Press the Feed Button one time, the Power Lamp twinkles 5 times and the Error Lamp twinkles 1 time.
G G MODE LED OPTION 1 1 RS-232C 1 1200BPS 2 2400BPS 3 4800BPS 4 9600BPS G 5 19200BPS G 6 38400BPS G 7 57600BPS G 8 115200BPS 1 7 DATA BIT G 2 8 DATA BIT G 1 NO PARITY 2 EVEN PARITY G 3 ODD PARITY G 1 DENSITY LOW 2 DENSITY MEDIUM 3 DENSITY HIGH 1 Not Used 2 Not Used G G G G G G G G G 2 3 4 5 G G G G 6
G G G GGGGGG G G G G G G aVVUUG YWW^TWZTY]G X[G YU]UGzGG G G G G G The following specifications are requested for power supply. Input Voltage : DC 9V Standby 60mA and Max 3A Avoid using a different power supply(extremely high) may cause damage to the printerG G G G G G G G G G G G G G G G G G G G G G G G G G G G G aVVUUG YWW^TWZTY]G X\
ZUGpG ZUXUGyzTYZYjG G GG GG GG GG GG GG GG GG GG G G The Porti-WP40 printer has RS-232C or TTL interface and power connector is connected by 8 pin G female connector. G In the following table, the signals present on the connector are listed:G G Pin no. Signal name G 1 VPPO 9VDC/3A G 2 VPPO 9VDC/3A G 3 TxD Output Transmit Data G 4 RxD Input Receive Data G 5 N.C G 6 N.
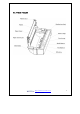
[UG|GGG G G G G G G G G G G G G G G G G G G G G G G G G G G G G G [UXUGjGG G G G G G G G G G G X Button G - FEED : When the printer is on, paper can be feed manually by pressing and holding the G FEED button for more than one second. G - MODE : MODE Button is for use to change communication mode. G Do not operate the mode button without instructions. G G X Panel lamp G - Power(Green) : Printer is ON and ready to receive data.
[UYUG{GGG G The Self-Test checks whether the printer has any problems. If the printer does not function G properly, contact your dealer. For Self-Test, turn on the power while holding down the FEED G Button. The Self-Test checks the following : G 1) Make sure paper roll has been installed properly. G 2) The Self-Test prints the current printer status, which provides the control ROM G version and the communication method setting.
\UGjGwG \UXUGyGG G Type : Thermal Paper G Paper width : 113mm G Paper thickness : 60±5༁ G Outer diameter : Ø40mm or less G Recording side : Outside of roll G G G G Cautions 1. Do not paste the paper to the core. And the roll paper which has G near end mark printing on its near end is recommended. G 2. Chemicals or oil may change the color of paper, or printed characters may fade. G 3. Change of paper color starts from approx . 70.