
Use and Care Manual


• Keep one set of brushes for
latex or acrylics and another
set for oils. This will make
cleaning uncomplicated and
extend the life of the brushes.
• Never dip the brush more
than halfway into the
paint—it gums up the brush
and makes cleaning more
difficult.
• Every coating is different—refer to the paint label for the
manufacturer’s cleaning instructions.
• Prime the applicator before painting for faster loading and
easier cleanup. Wet it thoroughly with fresh water, then
spin it out and blot with a paper towel until it is slightly
damp. Wooster recommends “breaking in” a brush or roller
like this only for water-based paints, using water.
• Always clean immediately after use, and it will take much
less time and be more effective.
• Do not allow brushes to soak for long periods. Soaking
may cause the adhesive that holds the filaments to fail,
damage the filaments themselves, make wooden handles
swell or crack, or trigger ferrules to rust.
General Advice
C-201114 8/11
Proper care greatly extends the life
of high-quality brushes. Most
painters today do not clean and reuse roller covers,
but we’ve included that topic in case the situation
calls for it. If you choose to invest the time in
cleaning your applicators, here are some tips from
Wooster to improve the results.
Keep one set of brushes for
extend the life of the brushes.
swell or crack, or trigger ferrules to rust.
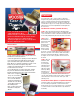
STEP 2 Add a
liberal amount of
hand cleaner with
pumice to the
brush and work it
in completely.
There are many
brands of hand
cleaner that will
do the job—some are liquid, while others are a thick paste
that are scooped out of the container. Hand cleaner that is
petroleum or lanolin based will help condition the brush,
too. Again, use the comb to get paint out of the interior of
the brush.
It isn’t the brush’s fault…many of today’s coatings are
designed to dry quickly, making them problematic when it
comes to cleanup. The paint resins bind to brush filaments
within a very short period of time. To improve cleanup, we
recommend a 3-step process. It helps preserve the filaments
and fine tips in professional paintbrushes and lengthen the
life of the tools.
STEP 1 Rinse the paint from the brush with warm water
while combing out the brush from base to end with both sides
of our 1832 Painter’s Comb
™
. This will ensure that you have
loosened all partially dried paint from the inside of the brush.
Oil-based coatings are exceptionally difficult to clean. Due to
the cost and disposal problems of solvents and the time
involved for the process, it may not make sense economically
to clean the brushes. Instead, allow them to dry and throw
them away.
STEP 3 Rinse the
brush well, until
the water runs
clear of all paint
and hand cleaner.
You may need to
add some regular
hand soap during
this final process
for very hard-to-
clean primers, paints, and stains. After the final rinse, do
one last comb-through to make sure the paint is completely
removed from the center of the brush. Then spin, comb,
and hang to dry.
Paintbrushes
For Oil-Based Paints (Bristle or Synthetic Brushes)
For Water-Based Paints (Synthetic Brushes)
Car &
Cleanin
p
Car &
Cleanin
p
Cleanin
Cleanin
Cleanin
p
p
p
Cleanin
p
Cleanin
p
Cleanin
p
Cleanin
Cleanin
Cleanin
Cleanin
p
Cleanin
Cleanin
Cleanin
Cleanin
p
Cleanin
Cleanin
Cleanin
p
Cleanin
p
Cleanin
p
Cleanin
Cleanin
Cleanin
p
Cleanin