PN: 67-1465, REV: A, 3/13
Introduction Congratulations on your purchase of the Workhorse Products Mercury Compact Dryer. Check the crate for damage, DO NOT accept the crate if damaged due to improper handling during shipping. Report any damage to the carrier at once as well as Workhorse Products at 800-778-8779. Inspect the crate contents IMMEDIATELY while the carrier is still there. Our packaging has been carefully designed to handle normal shipping conditions. However, we cannot be responsible for damage by the carrier.
Safety Procedures WARNING! RISK OF ELECTRICAL SHOCK! Turn ALL power to unit OFF before service. All service should be done by or under the supervision of a trained technician 1. For your safety, do not store or use gasoline or other flammable vapors and liquids in the vicinity (at least 3’ (1 Meter)) of this or any other appliance. 2. Vent lines to the outdoors must be installed by a qualified HVAC engineer on all air exhaust and gas line components equipped with a vent fitting. 3.
Assembly Parts Parts Bags 16-Washers 16-Flanged Lock Nuts 16-Leg Bolts (5/16-18 x 3/4) 4-Leg Leveling Bolts Carton Contents 4-Legs 2 Cross Braces Power Cord Dryer Body 2 Belt Roller Assemblies 1 Belt 4
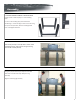
Assembly The MECURY INFRARED COMPACT CONVEYOR DRYER may be used as a table top dryer or a self standing dryer. To use as a self standing dryer please attach the included legs. Fasten two legs to each cross brace using four 5/16 -18 x 3/4" bolts, washers and flanged lock nuts. Hand tighten fasteners. Place the dryer body on a sturdy table as shown. After assembling the legs, align both sets of legs to the leg mount tabs on the dryer body.
Assembly With help from an assistant ensure that all four leg tabs are fully engaged with the leg assemblies. Fasten the legs to the leg tabs using eight 5/16 -18 x 3/4" bolts, washers and flanged lock nuts. Hand tighten fasteners. Using a 1/2” wrench, securely tighten the fasteners used to attach the cross braces to the legs and securely tighten the fasteners used to affix the legs to the leg tabs. Install the leg leveling bolts with the aid of an assistant.
Belt Installation Thread the belt over the lower cross brace and through the lower slot on the roller/rail assembly. Guide the belt through the oven chamber, through the lower slot and over the lower cross brace on the opposite roller/rail assembly. Pull the belt around the outside of the roller and over the top of the upper cross brace. Thread the belt through the oven chamber and over the upper cross brace until both ends of the belt meet.
Belt Tracking After the belt is centered on the rubber portion of the rollers, evenly adjust the tension bolts on all four corners of the dryer to tighten the belt until the belt can be deflected by approximately two inches. Start the dryer with the belt speed set at 35%. As the belt heats up make very small adjustments to maintain the belt in the center of the rollers.
Controls With the On/Off toggle Switch in the OFF position, plug in the unit. Set the Belt Speed to approximately 35% and push the ON/OFF Toggle Switch to the ON position. The Indicator Light will come on, the belt will start to turn and the elements will heat. Adjust the sliding doors by loosening both knobs on each door. Position the door to allow the substrate you are drying to pass easily under the doors. IF THE DOORS ARE TOO LOW THE SUBSTRATE MAY BE TRAPPED IN THE HEATED CHAMBER.
Spare Parts Part Number Description 76003 Power Switch 76194 Speed Control Board 76198 Speed Control Resistor 390978 Speed Control Potentiometer 76195 Speed Control Knob 31-76004 Fan 115V 76005 Fan 230V 20602R Heating Element 115V 20603R Heating Element 230V 390981 Belt Drive Motor 60186 Belt 75024 Roller Bearing 10
Wire Diagram Wiring Diagram: 115/220V Mercury Compact Dryer NOTE: The diagrams for the 115V and 220V models are the same, with variations in the components only. Shown Below with 115V components ; Power Cord, Fan, Element. Questions? Give us a call! 800.778.8779 Visit our website at workhorseproducts.
Limited Warranty Although every effort has been made to provide accurate specifications, Workhorse Products does not assume any liability for damages, whether consequential or incidental, that may result from the use or misuse of the indicated specifications. Workhorse Products requires the use of a licensed industrial electrician for the installation of electrical service to equipment requiring electrical power.