Workrite Fundamentals Assembly Instructions for 2-leg Workcenters 30”–48” Wide #1500211- Rev A
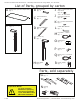
Workrite Fundamentals Workcenters - Assembly Instructions for 2-leg Tables, 30”–48” Wide A List of Parts, grouped by carton B I Short Bracket Qty: 4 Worksurface (size and shape differ) Qty: 1 C F Companion Leg Qty: 1 D E H #M6 × 14 mm Flat Head Cap Screw Qty: 20 J Left End Bracket Qty: 1 Right End Bracket Qty: 1 Control Leg Qty: 1 Feet Glides Qty: 4 #12 × ¾" Pan Head Laminate Top Screw Qty: 20 K #8 × ⅝" Pan Head Screw Qty: 7 L 4 mm Allen Wrench Qty: 1 M Leg Cable - 1 meter Qty: 1 O Cab
Workrite Fundamentals Workcenters - Assembly Instructions for 2-leg Tables, 30”–48” Wide 1 a Verify that you have all the hardware and tools needed for the assembly. Check your cartons against the list on page 2 to verify that you have all the parts needed.
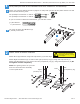
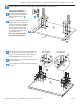
Workrite Fundamentals Workcenters - Assembly Instructions for 2-leg Tables, 30”–48” Wide 3 Attach Base to Worksurface and Tighten Screws 3 screws per Short Bracket If you do not have a Workrite worksurface skip to step 4 4 screws per End Bracket J J Needs feet attached a If you have a Workrite worksurface: Position leg assemblies to align mounting holes in brackets to pre-drilled holes in Top (A) then attach loosely using Pan Head Top Screws (J).
Workrite Fundamentals Workcenters - Assembly Instructions for 2-leg Tables, 30”–48” Wide 4 a b Attach Base to Worksurface and Tighten Screws (continued) If you do not have a Workrite worksurface: Position leg assemblies on bottom side of worksurface using measurements a below. Mark placement of mounting holes, then use ⅛" drill bit to drill pilot holes at marked locations. You may wish to mark your drill bit so you do not drill any more than ¾" deep and damage your worksurface top.
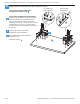
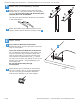
Workrite Fundamentals Workcenters - Assembly Instructions for 2-leg Tables, 30”–48” Wide 5 a Attach Feet (sold separately) & Slides Attach Feet (G) to bottom of legs with Flat Head Cap Screws (I), using Allen Wrench (K) and tighten securely. Be sure the longer end of the foot goes towards the front of the table. H G G You may have purchased the Styled Feet, that attach in the same fashion. b 6 a Attach Feet Glides (H) to bottom of feet.
Workrite Fundamentals Workcenters - Assembly Instructions for 2-leg Tables, 30”–48” Wide 7 Attach Cable Spools and Cable Loops Attach Cable Spool (O) with the #12 × ¾"Pan Head Laminate screw (J) and Cable Loops (P) to underside of worksurface using #8 × ⅝"Pan Head Screw (K) making sure to wrap the Cable Loop around the cable prior to attaching. If you do NOT have a Workrite worksurface, mount cable spools in a convenient location between legs and control box.
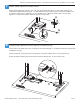
Workrite Fundamentals Workcenters - Assembly Instructions for 2-leg Tables, 30”–48” Wide 9 a b c Connect Power Cord to the Power Supply and put workcenter upright Connect the Power Cord (Q) to the Power Supply (R). Turn the table over into an upright position. Plug the Power Cord into the power outlet. R a b c Q 10 Adjust Feet Guides If necessary, adjust leveling guides on table feet to level the worksurface. Unscrew to increase height, screw in to decrease height.