Workrite Sierra HX™ Pin Assembly Instructions for 2-Leg Pin models #1500167 - Rev b
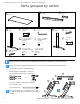
Workrite Sierra HX™ 2-Leg Pin Workcenters - Assembly Instructions Parts grouped by carton A Tabletop (size and shape differ for each model) Qty: 1 D Leg Qty: 1 F Leg Cap Qty: 1 G ¼-20 x ⅝” Button Head Machine Screws Qty: 8 H #12 x ¾" Pan Head Sheetmetal Screw OR Qty: 32 I J B C Long Brace Qty: 1 " Allen Wrench Qty: 1 5/32 D Leg Qty: 1 #12 x ½" Button Head Machine Screws Qty: 12 Short Brace Qty: 2 E Medium Brace Qty: 1 F Leg Cap Qty: 1 #10 x ⅜" Pan Head Type 23 Screw Qty: 36 E Mediu
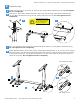
Workrite Sierra HX™ 2-Leg Pin Workcenters - Assembly Instructions 2 Assemble Legs a Attach one Leg Cap (F) to the top of each Leg (D) using Button Head Screws (G). Do not tighten screws completely. b With legs on their sides, attach Long Brace (B) to top of both Legs using Button Head Screws (J). The Brace should have the lip on top, facing away from the leg. Do not tighten screws completely.
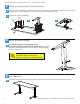
Workrite Sierra HX™ 2-Leg Pin Workcenters - Assembly Instructions 3 Attach the leg assembly to the worksurface a Lay out the leg assembly in the proper location. Adjust the leg assembly to make it line up with the locating holes. Attach assembly to Top (A) using 20 Pan Head Screws (H). b Tighten all screws completely. a H b A 4 a Adjust Workcenter Height For safety and ease of adjustment, set workcenter height while table is upside down.