RETRO MUSIC CENTRE RECORDING MUSIC CENTRE Copy from vinyl, cassette, CD or Bluetooth onto SD card. INSTRUCTION MANUAL Please read and retain this info for future reference.
Are you a vinyl connoisseur, or perhaps a budding music entrepreneur? Whether you’re making memories, or on a quest for that perfect, new sound – our Retro Bluetooth Music Centre offers a treasure trove of entertainment possibilities, just waiting to be opened and discovered. Our vintage-inspired music centre boasts a modest, retro exterior, perfect for a centrepiece in your home or office.
* Cassette player * FM radio * USB/SD CARD for recording * Aux in * 3.5mm earphone socket * 2 x 5 Watts * Accessories: remote control, 45 RPM adaptor General Safety Instructions Read this manual thoroughly before first use and keep it in a safe place for future reference, along with the completed warranty card, purchase receipt and carton. The safety precautions enclosed herein reduce the risk of fire, electric shock and injury when correctly adhered to.
CAUTION: To reduce the risk of fire or electric shock, do not expose this equipment, the cord or plug to rain or moisture; do not use it anywhere near water or where water splashes or drips; do not touch the plug with wet hands. In the event of water or other liquids entering the device, unplug it immediately and clean and dry it as best as possible. Then have it checked for damage by a qualified technician, or contact the after-sales support line. • Do not repair the unit yourself.
• The equipment is not intended for use by persons (including children) with reduced physical, sensory or mental capabilities, or lack of experience and knowledge, unless they have been given supervision or instruction concerning use of the equipment by a person responsible for their safety. • Young children should be supervised to ensure they do not play with the equipment. Close supervision is always necessary when an appliance is used by or near children.
• Keep this manual in a safe place for future reference. • During playback, the disc rotates at high speeds. Do not move or lift the unit during playback as this may damage the unit and the disc. • When moving the unit to a different location or packing the unit away, be sure to remove the record or disc. Moving the unit with a disc or record inside may cause damage to the unit.
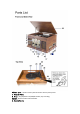
*Please note: actual unit front plate decoration will vary from picture. 1. Display Panel 2. Stop: Stop playback in CD/USB/SD modes; stop recording. USB/SD: Switch to USB or SD card modes. 3.
4. Repeat/Program 5. Speakers (Stereo) 6. Function Knob: Rotate the knob to select PHONO, CD, AUX, or RADIO. 7. Power 8. Compact Disc Tray 9. Band: Select FM/BT in RADIO mode. 10. Tuning Knob: Tune to a radio station in RADIO mode. 11. Earphone Jack 12. 3.5mm AUX-IN Jack 13. Volume Knob 14. OPEN/CLOSE CD Tray 15.<< : Press to select previous track or press and hold to fast reverse. 16. >>: Press to select next track or press and hold to fast forward in CD/USB/SD modes. 17.
33. Power cord Instructions Compact Discs • The unit is compatible with conventional audio CD’s and properly finalised CD-R and CD-RW discs. • Always place the disc in the disc tray with the label side facing up. (Compact discs can be played or recorded on one side only.) • To remove the disc from its storage case, press down on the centre of the case and lift the disc out, holding it carefully by the edges.
Head Maintenance The head and tape path should be cleaned and demagnetised on a regular basis. Use cassette tape head cleaner and demagnitiser. For special details on the proper use of these items, read each item’s instruction manual. Vinyl Records • Do not touch the records grooves. Only handle records by their edges or the label. Ensure that your hands are clean, as skin oil will gradually deteriorate the record. • Keep your records away from dust and store in a dry, cool place.
• Hold the tip of the stylus and insert the other edge by pressing towards direction “C”. • Push the stylus up towards direction “D” until it locks at the tip. Connections FM Antenna While in FM mode, tune in to an FM station and extend the antenna to find a position that provides the best reception. The antenna may need to be repositioned if you move the unit to a new location. AC Power Cord Plug the AC power cord into an AC wall socket.
Set the Auto stop switch to ON if you are playing a 33 RPM record and you want the turntable to stop turning when the record is finished. If the switch is set to OFF, the turntable will continue turning. • Remove the stylus guard and unlock the Tone Arm lock. • Push the Lift Lever up to raise the Tone Arm and then gently move the Tone Arm to the desired position over the record. The platter will begin to spin when the Tone Arm is moved toward the record.
and the cassette will be ejected. Playing a CD • Turn the unit ON by pressing the Power button. • Set the Function knob (PHONO/CD/AUX/ RADIO) to CD. • “- -” will blink for a few seconds. When no disc is loaded “no” will appear on the display screen. • Place a disc on the tray with the printed label facing up. • Do not place more than one disc in the tray at a time. • The disc must be placed in the centre of the disc tray.
( ▶▶ ▎/ ▎◀◀) until the desired track is found. The selected track will play from the beginning. • In STOP mode, press the NEXT/PREVIOUS buttons (▶▶ ▎/ ▎◀◀) repeatedly until the desired track is found. Press the PLAY/PAUSE button ( ▶‖ ) within 5 seconds to start playback from the selected track. • When the PREVIOUS ( ▎◀◀ ) button is pressed during playback, the track being played will restart from the beginning. To return to the beginning of the previous track, press the PREVIOUS button ( ▎◀◀ ) twice.
・ Turn the function knob to the “RADIO” position and Slide the band switch to BT the LED display window will show ‘bt’. ・ Turn on your smart device and access the devices Bluetooth settings. Set your smart device to search for Bluetooth devices. The Bluetooth device name for this unit is Stadio. Select this device on the list on your smart device and when pairing has been made successfully, you will hear a connection tone sound.
- insert a cassette tape into the cassette slot - insert a CD into the CD player disc tray - begin playback from your Bluetooth device - connect an Aux in device to the AUX IN socket • Set the function switch to the appropriate music playback method. NOTE: If you are recording via Cassette, make sure an AUX IN cable is not connected to AUX socket. • Press the REC button to start recording. “rE” will appear on the display screen and the “REC” LED will illuminate.
FAQ’s Problem Solution Unit will not power on Make sure that the unit’s power cord is connected to an appropriate electrical outlet and the wall socket is switched on. Rotate the power/volume knob clockwise to increase the volume. If volume is low when using Bluetooth mode, you can also adjust your smart devices volume settings. Make sure the function knob is set to your desired function. Make sure the cassette is inserted correctly. Make sure the function knob is set to your de-sired function.
POWER Power input AC 110-120V Power Consumption 13W Dimensions 460mm x 335mm x 245mm (L x W x H) AMPLIFIER AND SPEAKER Output Power 2 x 5W Frequency Response 60-20, 000 Hz Speaker Impedance 4 Ω S/N ratio 50dB TUNER FM frequency range 88MHz-108MHz AM frequency range 530KHz-1600KHz USB AND SD CARD Maximum Capacity 64GB Playback file format MP3, WMA File system playback FAT 32 Recording file format MP3 RECORD PLAYER Cartridge type Ceramic stereo cartridge Speed 33 1/3, 45, 78 RPM
Federal Communications Commission (FCC) Statement. This device complies with part 15 of the FCC Rules. Operation is subject to the following twoconditions: (1) This device may not cause harmful interference, and (2) this device must accept any interference received, including interference that may cause undesired operation. Note: This equipment has been tested and found to comply with the limits for a Class B digital device, pursuant to part 15 of the FCC Rules.