
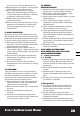
User's Manual


1514
1514
3-in-1 Cordless Lawn Mower
EN
the handle as shown in Fig C1.
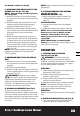
3. ATTACHING THE GRASS BAG TO THE
MOWER (See Fig D1, D2, D3)
NOTE: The grass bag is held in place by
the safety flap.
1) Switch the mower off, remove the safety
key (5) and wait until the mower blade has
stopped.
2) Raise the safety flap (9) and hold it in the
upward position while the grass bag is
properly located below it (Fig. D1)
3) Position the lower edge of the grass bag
on the plastic tabs (c) found below the rear
discharge chute on the mower deck.
(Fig. D2)
4) While holding the grass bag in position
lower the safety flap into its’ final position.
It should rest on top of the grass bag with
the tabs of the grass bag being inserted
into the safety flap. Ensure the safety flap
locks securely into position with the grass
bag. (Fig. D3)
NOTE: The two parts should smoothly slide
together with little force. They WILL NOT
“click” together.
4. REMOVING/EMPTYING THE GRASS
BAG
1) Switch the mower off, remove the safety
key (5) and wait until the mower blade has
stopped.
2) Hold the grass bag handle.
3) Raise the safety flap (9) upward and hold it
in the upward position until the grass bag is
removed (Fig. D1).
WARNING! Before each use, always
check that the safety flap closes securely
over the rear discharge chute. Never lift the
safety flap (9) when the lawn mower is in
operation. The blade must be completely at
rest before handling the safety flap.
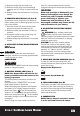
5. HANDLE ADJUSTMENT (See Fig E)
The upper handle can be adjusted to 3
different height positions. Release the locking
cam lever, set the upper handle to one of the
three height positions, and make sure to insert
the pin into the hole. Then reset the locking
cam lever.
NOTE: Always check that the upper handle is
fixed firmly.
6. FITTING/REMOVING THE BATTERY
(See F1, F2, F3, F4)
REMOVING BATTERY (10)
1) While gripping the battery handle lift it
upward without twisting or turning it.
(See F1)
FITTING BATTERY
1) Locate the front and rear of the battery
(Fig F2)
2) Lower the battery into position. (See F3)
NOTE: For a secure fit, make sure the
battery tray is free of debris and the
contacts on the battery and in the
battery tray are clean (use a dry cloth to
clean) (F4)
NOTE: When fitting or removing the
battery be careful not to drop the battery onto
your foot or the ground.
OPERATION
1. STARTING AND STOPPING
(See Fig G1, G2, G3)
WARNING! The blade continues
to rotate for a few seconds after the
machine is switched off. Allow the motor/blade
to stop rotating before switching “on” again.
Do not rapidly switch off and on.
STARTING
1) Insert safety key(5) into the housing of the
switch box. (See Fig G1)
2) Slide the key to the right and hold in
position. (See Fig G2)
3) Pull the switch lever towards the handle bar
and the mower will start.
4) Release the safety key and begin mowing.
NOTE: The safety key will stay in the “on”
position as long as the operator holds the
lever tightly against the handlebar.
STOPPING
Release the switch lever and remove the safety
key.
2. INSTALLING MULCH PLUG (13) (See H)
1) Turn the mower off, wait until the blade
stops and remove the safety key (5).