SAFETY AND OPERATING MANUAL Lawn Mowing Robot WG794E
Original instructions TABLE OF CONTENTS 2 1. Safety Instruction 1.1 General & Additional safety instructionr 1.2 Information on the Landroid®M 3 3 5 2. Technical Data and Component List 2.1 Technical data 2.2 Component list 7 7 8 3. Understanding Your Landroid®M 3.1 How does my Landroid®M know what to mow? 3.2 How does my Landroid®M know where to go? A. Finding the charging base B. Rain sensors C. Sensing the boundary wire D. Starting and stopping while mowing 3.
1. Product Safety 1.1 Safety Warnings for power tool WARNING: Read all safety warnings and all instructions. Failure to follow the warnings and instructions may result in electric shock, fire and/or serious injury. Carefully read the instructions for the safe operation of the machine. Save all warnings and instructions for future reference.
e) use extreme caution when reversing the appliance towards you; f) always switch on the motor according to instructions with feet well away from the blades(s); Maintenance and storage WARNING! When the mower is turned upside down the main switch must always be set to the OFF position The main switch should be set to the OFF position during all work on the mower’s underframe, such as cleaning or replacing the blades.
1.2 Information on the Landroid®M WARNING - robotic lawnmower can be dangerous if incorrectly used. Read through the Operator’s manual carefully and understand the content before using your robotic lawnmower. WARNING - Keep a safe distance from the machine when operating. WARNING - Operate the disabling device before working on or lifting the machine. Keep your hands and feet away from the rotating blades. Never place your hands or feet close to or under the body when robotic lawnmower is in operation.
Do not wash the machine with a high pressure washer This product has been marked with a symbol relating to removing electric and electronic waste. This means that this product shall not be discarded with household waste but that it shall be returned to a collection system which conforms to the European Directive 2002/96/CE. It will then be recycled or dismantled in order to reduce the impact on the environment.
2. Technical Data and Component List 2.1 Technical data Type: WG794E (790-799-Designation of machinery, representative of lawn mowing robot) Rated voltage No load speed Cutting diameter Cutting height 28V Max* 2800/min 180mm 20-60mm Cutting height positions Battery type 5 Lithium-ion Battery model WA3225 Charging time 1.5h approx. Charger model Charger rating WA3716 Input: 100-240V~50/60Hz, 50W, Output: 24-28V DC, 1.5A Machinery weight 8.
2.
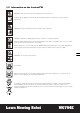
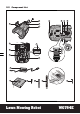
1. HANDLE BAR 2. LOW VOLTAGE CABLE 3. CONTACT PINS 4. CHARGING BASE 5. CHARGING STRIP 6. DISPLAY WINDOW 7. control panel cover 8. STOP BUTTON 9. RAIN SENSOR 10. REAR DRIVING WHEEL 11. HANDLE 12. BATTERY PACK 13. BLADE TURNING DISC 14. CUTTING BLADE 15. FRONT WHEEL 16. START KEY 17. DISPLAY 18. KEYPAD 19. ON/OFF KEY 20. POWER ADAPTOR 9 21. BOUNDARY WIRE(180m) 22. WIRE PEGS 23. CHARGING BASE FIXING NAILS 24. BOUNDARY WIRE DISTANCE GAUGE 25.
Understanding Your Landroid®M 3. We would like to congratulate you on your new purchase of the Landroid®M and entering into the care-free life of automatic mowing. In the following, we would like to help you better understand how your Landroid®M thinks. 3.1 How does my Landroid®M know what to mow? 10 The Landroid®M chooses its direction at random. It will make sure your entire lawn is evenly mowed without leaving behind any unattractive mowing paths (See Fig. A).
3.2 How does my Landroid®M know where to go? Your Landroid®M is capable of doing things on its own. The Landroid®M knows when it needs to go to its Charging Base (4) to charge, can sense when it is raining, can stop itself if it senses a problem, and knows to stop, draw back, and then turn around when it bumps into something blocking its path, such as a person, pet, or other object.
If the Landroid®M senses that something is wrong, it will display a fault message on the Display (16), and will turn itself off if it does not receive any input from the user within 20 min (for information on fault messages refer to the Programming and Troubleshooting Guide). To resume: • Press the STOP Key to correct the problems. • Press ON/OFF Key (19) twice to restart the machine. • Press START Key. • Now the Landroid®M will begin to mow! 3.
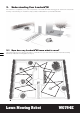
(14) to be kept in good condition to cut at its best. The Landroid®M can do most things by itself, but will need your help sometimes to prevent damage to itself. • Never let the Landroid®M travel over gravel. • Remove or block off obstacles that the Landroid®M could accidentally climb on and damage its Blade Turning Disc. • Remove all debris and foreign objects from your lawn. 4. Boundary Wire Basics 4.
4.4 Turn on and test installation If the charger light does not come on, then check the power connections. If the charger base LED is flashing green, check if the boundary wire is connected correctly. Red light on: charging. Red light flashing: error message, refer to Trouble Shooting and correct the problems. Green light flashing: check if the boundary wire is connected correctly.
Before attempting to replace your Landroid®M’s Blades, turn the power off and put on protective gloves. Then follow these steps: 1. Gently flip the Landroid®M over 2. Take the screws off the Blades with a screwdriver 3. Firmly screw on the new Blades (See Fig. K) Important: After screwing the Blade to the Blade Disc, make sure the Blade is able to spin freely. 5.2 Keep it clean WARNING: Before cleaning turn your Landroid®M OFF by pressing the ON/OFF Button.
5.3 Battery life The heart of the Landroid®M is its 28-volt lithium-ion battery. No maintenance is required. For proper storage of the battery, make sure it is fully charged in kept in a cool dry place between (20°C-60°C).
PIN Code Area: Lawn Mowing Robot WG794E
Copyright © 2014, Positec. All Rights Reserved.