WG101E/WG104E CRA-WG101E WG104E -M-070104.
CRA-WG101E WG104E -M-070104.
CRA-WG101E WG104E -M-070104.
5 CRA-WG101E WG104E -M-070104.
A B C D E F G H I �� �� �� �� �� J CRA-WG101E WG104E -M-070104.
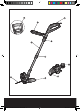
1. REAR HANDLE 2. AUXILIARY HANDLE 3. UPPER LOCKING KNOB 4. LOWER LOCKING KNOB 5. AUXILIARY HANDLE LOCKING LEVER 6. SAFETY GUARD 7. SPACER GUARD 8. EDGER WHEEL 9. LINE CUTTER 10. TELESCOPIC SHAFT 11. CUTTING HEAD COVER (See J) 12. CAP RELEASE LATCH (See J) 13. SPOOL (See J) 14. CUTTING HEAD (See J) 15. EYELET (See J) 16. LINE FEED BUTTON (See I) 6 TECHNICAL DATA Model no.
SAFETY INSTRUCTIONS WARNING! When using the machine the safety rules must be followed. For your own safety and bystanders please read these instructions before operating the machine. Please keep the instructions safe for later use. If the supply cord is damaged, it must be replaced by the manufacturer, its service agent or similarly qualified persons in order to avoid a hazard. Instructions for preparation and correct and safe use shall include where appropriate the substance of the following: 1.
SYMBOLS Read the manual Warning Double insulation Wear eye protection Wear ear protection To avoid possibility of electric shock, do not use in damp or wet conditions. 8 Switch off! Remove plug from mains before adjusting, cleaning or if cable is entangled or damaged. Keep all other people, including children, pets and bystanders outside the 15 meters hazard zone, stop the trimmer immediately if you are approached. OPERATING INSTRUCTIONS 1.
force to adjust the trimmer head to the most comfortable position. The ratchet mechanism will make a heavy clicking sound which is normal and not a defect (See G). 8. ON/OFF SWITCH To start, press and hold the switch. Release the switch to stop. Warning: The cutting head continues to rotate after the trimmer has been switched off, wait until it has stopped then lay down the tool. OPERATION Warning: Always wear the eye protection. Never lean over the trimmer head.
TO REMOVE THE CAP Press and hold in the two latches (12) (See J). Pull cap away from the spool holder. WHEN REFITTING THE SPOOL CAP Keep all areas of the cap and spool holder clean. Replace the cap, pressing firmly down towards the spool holder to ensure cap is fully located. Check that the cap is correctly fitted by trying to remove it without depressing the two latches. TO REPLACE CUT LINE For your convenience it is recommended you buy spool and line complete.
13 Amp fuse approved to BS1362 Connect Blue to N (neutral) Outer sleeve firmly clamped Brown L (live) Cable grip DECLARATION OF CONFORMITY we, POSITEC Power Tools (Suzhou) Co., Ltd. No. 11 Yangqing Road, Loufeng Area, Suzhou Industrial Park, Jiangsu 215021, P. R.
Grass Trimmer CRA-WG101E WG104E -M-070104.
CRA-WG101E WG104E -M-070104.
CRA-WG101E WG104E -M-070104.