Line Trimmer Débroussailleuse Desmalezadora ENG Pag 02 F Pag 12 ES Pag 20 WG150 CTC-WG150-M-060418.
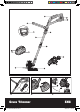
�� �� � �� �� �� A Grass Trimmer CTC-WG150-M-060418.
� �� �� � �� D E F G H I J K L �� �� �� �� �� M Grass Trimmer CTC-WG150-M-060418.
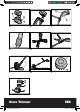
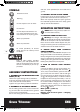
1. MAIN HANDLE 2. AUXILIARY HANDLE 3. UPPER LOCKING KNOB 4. LOWER LOCKING KNOB 5. AUXILIARY HANDLE LOCKING LEVER 6. SAFETY GUARD 7. SPACER GUARD 8. EDGER WHEEL 9. LINE CUTTER 10. TELESCOPIC SHAFT 11. CUTTING HEAD COVER (See M) 12. CAP RELEASE LATCH (See M) 13. SPOOL (See M) 14. CUTTING HEAD (See M) 15. EYELET (See M) 16. LINE FEED BUTTON (See L) 17. BATTERY PACK 18. BATTERY PACK RELEASE LATCH 05 19. CHARGER 20. CHARGED INDICATOR LIGHT(GREEN) 21. CHARGING INDICATOR LIGHT(RED) TECHNICAL DATA Model No.
SAFETY INSTRUCTIONS WARNING! When using electric gardening appliances, basic safety precautions must always be followed to reduce the risk of fire, electric shock, and serious injury, including the following: 06 READ ALL INSTRUCTIONS 1. FOR ALL DOUBLE-INSULATED APPLIANCES a) Replacement parts. When servicing use only identical replacement parts. b) Polarized appliance connections.
j) Avoid unintentional starting. Don’t carry plugged-in appliance with finger on switch. Be sure switch is off when plugging in. k) Don’t abuse cord. Never carry appliance by cord or yank it to disconnect from receptacle. Keep cord from heat, oil, and sharp edges. l) Don’t grasp the exposed cutting blades or cutting edges when picking up or holding the appliance. m) Don’t force appliance. It will do the job better and with less risk of injury at the rate for which it was designed. n) Don’t overreach.
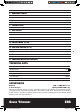
SYMBOLS Read the manual Do not expose to rain or water 3. ASSEMBLY OF THE SPACER GUARD Locate and snap fit the pivot bracket of spacer guard into the hole of trimmer head (See C). When not required, rotate the spacer guard to the underside opposite side of the safety guard and clip into the two locations. Do not burn OPERATION INSTRUCTIONS Warning Do not dispose of batteries. Return exhausted batteries to your local collection or recycling point.
The battery pack can then be removed for use in your trimmer. The charger timer circuit and battery pack temperature safety cut-out device prevent overcharge of your battery pack. Warning: After long usage the battery will become hot, let the hot battery cool down for 1 hour before recharging. 4. TO REMOVE OR INSTALL BATTERY PACK Locate latches on side of battery pack and depress both sides to release battery pack from your grass trimmer. Remove battery pack from your grass trimmer (See E).
white line guides to indicate the cutting line position. Align these marks with the edge of your lawn. While edging allow the tip of the line to make contact. Do not force the line. The rotation wheel helps protect the unit and keeps the unit from contacting the ground. Take extra caution while edging as objects can be thrown from the trimmer line. AUTOMATIC LINE FEED SYSTEM When initially switching on the trimmer, a small length of line is fed out.
WARRANTY STATEMENT 30 DAY Satisfaction Guarantee If for any reason you are dissatisfied with any WORX product, you can return the product, along with proof of purchase, within 30 days for a full refund. of the warranty period from the date of the original purchase. All repairs must use genuine spare parts. If your WORX product becomes defective due to faulty materials or workmanship within the specified warranty period of; • 24 months for DIY and light trade use, from the date of purchase.
Designed in Italy. Made in China Conçu en Italie. Fabriqué en Chine Diseñado en Italia. Fabricado en China CTC-WG150-M-060418.