SAFETY AND OPERATING MANUAL Cordless Lawn Trimmer Lawn Edge Trimmer WG168E
General Power Tool Safety Warnings WARNING: Read all safety warnings and all instructions. Failure to follow the warnings and instructions may result in electric shock, fire and/or serious injury. Save all warnings and instructions for future reference. The term “power tool” in the warnings refers to your mains-operated (corded) power tool or battery-operated (cordless) power tool. 2 1) Work area safety a) Keep work area clean and well lit. Cluttered or dark areas invite accidents.
4) Power tool use and care a) Do not force the power tool. Use the correct power tool for your application. The correct power tool will do the job better and safer at the rate for which it was designed. b) Do not use the power tool if the switch does not turn it on and off. Any power tool that cannot be controlled with the switch is dangerous and must be repaired.
This appliance is not intended for use by persons (including children) with reduced physical, sensory or mental capabilities, or lack of experience and knowledge, unless they have been given supervision or instruction concerning use of the appliance by a person responsible for their safety. Children should be supervised to ensure that they do not play with the appliance.
h) Wipe the battery pack terminals with a clean dry cloth if they become dirty. i) Battery pack needs to be charged before use. Always refer to this instruction and use the correct charging procedure. j) Do not maintain battery pack on charge when not in use. k) After extended periods of storage, it may be necessary to charge and discharge the battery pack several times to obtain maximum performance. l) Battery pack gives its best performance when it is operated at normal room temperature (20°C ± 5°C).
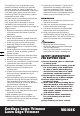
Symbol Edging Read instruction sheet Trimming Keep bystanders away Wear eye protection Do not expose to moisture 6 C-Tick approval mark Do not burn Batteries may enter water cycle if disposed improperly, which can be hazardous for ecosystem. Do not dispose of waste batteries as unsorted municipal waste. Li-ion battery. This product has been marked with a symbol relating to ‘separate collection’ for all battery packs and battery pack.
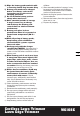
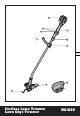
9 8 7 1 2 6 3 7 10 4 5 Cordless Lawn Trimmer Lawn Edge Trimmer WG168E
1. Three Speed Settings 2. Auxiliary Handle 3. Auxiliary Handle Locking Clamp 4. Safety Guard 5. Edge Guide 6. Shaft Locking Knob 7. On/Off Switch 8. Lock Off Switch 9. Battery Pack 10. Line Cutter 11. Trimmer Head Cover (See Fig. I2) 12. Cap Release Latch (See Fig. I2) 13. Spool (See Fig. I2) 14. Trimmer Head (See Fig. I2) 15. Eyelet (See Fig. I2) 16. Line Feed Button (See Fig. I1) 8 * Not all the accessories illustrated or described are included in standard delivery.
TECHNICAL DATA Voltage No load speed Cutting diameter 40V Max** 8300/min 33cm Line diameter 2.0mm Charging time 1hr Machine weight 3.5kg ** Voltage measured without workload. Initial battery voltage reaches maximum of 40 volts. Nominal voltage is 36 volts. Accessories Charger (WA3735) battery pack (WA3536) spool (WA0200) 1 1 1 We recommend that you purchase your accessories from the same store that sold you the tool. Use good quality accessories marked with a well-known brand name.
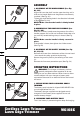
ASSEMBLY A1 1. ASSEMBLY OF THE MAIN HANDLE (See Fig. A1, A2) Align and insert the shaft into the upper housing until a click can be heard. Make sure the grooves are correctly matched. (See Fig. A1). Tighten the shaft locking knob in the direction indicated to lock (See Fig. A2). Note: Make sure that the handle is firmly locked C1in place D2 2.ASSEMBLY OF THE AUXILIARY HANDLE (See Fig. B1, B2) Slide the auxiliary handle onto the grooves of auxiliary handle support until a click can be heard.
When the battery is empty, the machine will switch off by means of a protective circuit: The trimmer head no longer rotates. In a warm environment or after heavy use, the battery pack may become too hot to permit charging. Allow time for the battery to cool down before recharging. 3. TO REMOVE OR INSTALL BATTERY PACK (See Fig. D1, D2) Depress the battery release button to release battery A1 pack from your trimmer (See Fig. D1). After recharging, insert the battery pack into trimmer’s battery port (See Fig.
6.THREE SPEED SETTINGS (See Fig. F ) Your machine is fitted with a 3 Speed selector button Speed 1 –Used for basic light trimming of short grass Speed 2 –Used for medium / longer grass trimming –ie. trimming against walls/fences etc. Speed 3 –Used for tough over grown area’s of long grass. 16 7. ADJUSTMENT OF AUXILIARY HANDLE (See Fig. G) H1 Release the auxiliary handle locking I1 clamp, move the the auxiliary handle to the most comfortable and balanced position. Close the clamp to tighten the handle.
Edging (See Fig. H1, H2, H3) ALWAYS REMOVE THE BATTERY PACK BEFORE ADJUSTING THE TRIMMER HEAD POSITION For edging, position the trimmer head as Fig.H2. To rotate the trimmer head to edging—first hold the trimmer shaft as shown in fig H3---then with your other hand hold the trimmer head - Push down and rotate 180 degrees and then release- the trimmer will then lock into the edging position automatically—Fig H4 D2 only rotate in one Note: The trimmer head will direction.
• • • 16 I1 11 12 13 15 I2 14 J 14 When refitting the spool cap, keep all areas of the cap and spool holder clean. Replace the cap, pressing firmly down towards the spool holder to ensure cap is fully located into position. Check that the cap is correctly fitted by trying to remove it without depressing the two latches. Replace the trimmer line and Spool (See Fig. J). K2 ALWAYS REMOVE THE BATTERY PACK BEFORE ADJUSTING THE TRIMMER HEAD POSITION • Remove Spool Cap Cover.
STORING YOUR GRASS TRIMMER Always remove the battery pack from your trimmer after use. Store in a dry place where the trimmer and battery can be protected from damage. MAINTENANCE 16 Always remove the I1 battery pack from your trimmer after use. Always check the product prior to being used for any damage. Never operate your product if it is damaged Your power tool requires no additional lubrication 11 or maintenance. There are no user serviceable parts in 12 your power tool.
Troubleshooting The following table gives checks and actions that you can perform if your machine does not operate correctly. If these do not identify and correct the problem, contact your service agent. Warning: Switch the machine off and remove the battery prior to any troubleshooting. 16 Problems Possible Causes Corrective Action Trimmer fails to operate. Battery discharged. Battery too hot/cold. Motor is broken. Internal wiring of machine damaged.
Copyright © 2013, Positec. All Rights Reserved.